TEAM by WorkWave Employee Mobile App – Search for Work Set Up
This search for work feature allows field employees to use the TEAM by WorkWave employee mobile app to search and apply for open shifts. Employees can search specific dates, time and location preference to display a list of open shifts they can apply for. Web users will then review and approve or cancel the request to place the employee into the shift.
The search for work feature is also offered within the TEAM by WorkWave Employee Portal.
This topic includes the steps to set up the system to use the search for work feature. Review the Search for Work in the Employee Mobile App topic for additional information on field employee use.
Employee Portal Function Role set up
To enable the search for work feature the Employee Portal Function Role needs to have at least one (or more) associated Security Items provisioned and the employee's record Portal Settings need to include this Function Role.
- Navigate to: Admin | Engagement | Employee Portal | Function Role
- Select the appropriate role
- Expand the Diary options
- Select at least one (or more) of the following Security Items - based upon what search for work features you want to provision:
- Employee Diary – Search For Work option
- Employee Diary – Search for Event Work option
- Search for Duty Give Work option
- Click Save
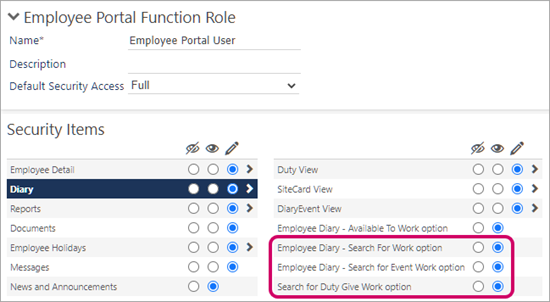
Note: At least one of these options need to be provisioned for the Find Work button to display on the mobile app home page and on the menu
Portal Setting set up for employee
Once the Employee Portal Function Role is provisioned with the search for work feature, it needs to be applied to the Employee's Function Role.
- Navigate to: Set Up | Employees
- Select the appropriate employee
- Select the HR tab
- Apply the appropriate Function Role in the Portal Settings section
- Click Save
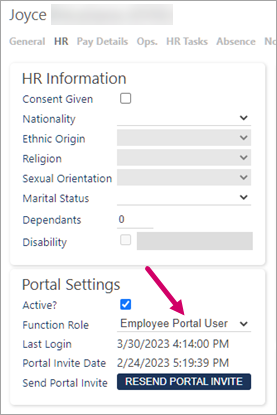
Review the Employee Portal Settings topic for additional information on Search for Work and Search for Events Settings.
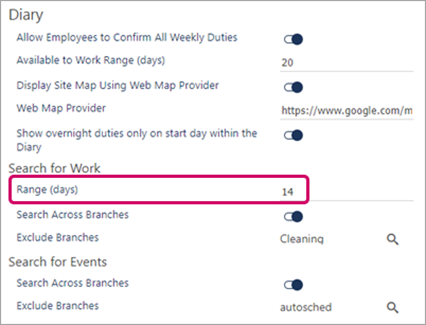
Search for Work Settings set up
Use the following steps to set up the Search for Work settings.
-
Navigate to: Admin | Engagement | Employee Portal | Settings | Search for Work
-
In the Search for Work section enter the Range (days) value to set the number of days the employee can search for in the future
-
Select the Search Across Branches option if you want to allow employees to search across all branches when searching for work
-
Optional: Select one or more branches to exclude from searching
-
Click Save
Self Service Scheduling Rule set up
Optional: You may set up a Self Service Scheduling Rule to control which open posts you want to display on specific sites/branches. If you do not set up a rule, all open posts will display.
Use the following steps to set up a new Self Service Scheduling Rule.
The Show open posts option needs to be enabled in the Self Service Scheduling Rule to enable display of open posts.
-
Navigate to: Admin | Engagement | Employee Portal | Self Service Scheduling Rules
-
Select the appropriate rule or click Add to set up a new rule
-
Select the Show open posts option
-
Optional: select Stage open posts and Show event open posts
-
Use the Sites and Branches options to designate which will be included in the rule
-
Ensure the Active option is selected
-
Click Save

Note: If no sites or branches are set for the rule, the rule will not take affect in the system.
Help Desk Task Type set up
Setting up a help desk task type for search for work will create a new task every time an employee requests to work a duty/shift. You need to add one of each of the following task types:
-
Start
-
In Progress
-
Cancelled
-
Completed
-
Not Aproved
Use the following steps to set up a new task type.
-
Navigate to: Admin | Engagement | Help Desk Task Types
-
Select the appropriate task type or click Add to set up a new type (if adding a new type, select the DUTYREQUEST type and enter a Name)
-
Optional: enter a Description or Help Text
-
Click on the Status magnifier to enter the appropriate statuses
-
Click Select
-
Toggle on the Define Escalation Group option
-
Click the Tier 1 Escalation Group drop down and select the appropriate group
-
Optional: Toggle on the Tier 2 Escalation Group Enabled option and select the appropriate Tier 2 Escalation Group from the drop down
-
Optional: Chose Diary Event Markers using the Task Creation, Task Completed and Task Rejected drop downs (adding markers will add them to the employees diary when the even occurs)
-
Click Save and Close
For example, you could choose New, In Progress, Cancelled and Approved