How do I create and assign Locations to a site?
From within the Site Maintenance (Set Up | Sites | Locations) part of the system, Locations are created that can subsequently be used when developing tours in Set Up | Sites | Services.
Locations for a tour can be logically stored in a hierarchy, for example by floor then by room for example. Within each location, proof of presence QR and NFC (RFID) tags can be defined along with GPS location coordinates. This enables effective tracking of the tour as it progresses. Notes pertaining to the location are also stored.
If you have not set up a location before for a site, you are presented with the option to copy location content (and subsequently tour content) from another site or to create the location information manually. If you wish to copy the information from another site you are then prompted to choose which site from a site list and additionally whether they wish to copy the tour information. If you do not wish to do this (i.e. you have no sites defined that you wish to copy or they are new locations), you can enter the details manually. The details below explain how to manually create sites. To find out how to copy sites (and their associated tours onto a new site, see How do I copy locations and tours for a new site?
Preparing to manually create and assign your locations
-
Open the Locations tab within Site Maintenance (Set Up | Sites | Locations).
-
If the site has no locations set up, you will be presented with the following screen:

-
Select Manually create locations.
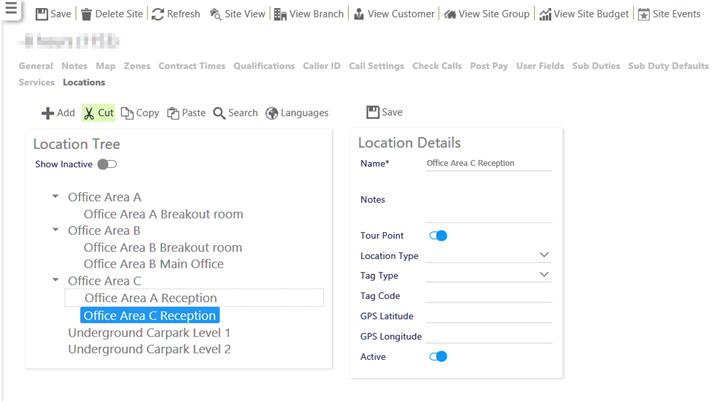
If the site already has locations configured or following the selection of Manually create locations, you will be presented with a screen similar to the one below. From here you can create your locations:
Manually creating and assigning your locations
From the previous screen, create and assign your locations by following these steps:
-
Select Add
-
Enter the Location Details
-
Enter the Name
-
Add any relevant Notes
-
Select the Tour Point if the Location is available to be set against a Tour Definition
- Select a Location Type
- Select the Tag Type (NFC (RFID) or QR) - See What's a QR Code and how do I create them for my Service Locations? for more information
- If using a Tag Type, enter the Tag Code
- If using GPS enter the GPS Latitude and GPS Longitude
- Select Active to ensure the location is available for selecting when creating tours
-
-
Select Save
To create a sub-location, select the parent location within the Location Tree (for example, in the screen shot above, Office Area C) before selecting Add. Locations can be expanded/contracted by pressing the arrows next to their names.