How can I schedule in Site View?
The following 1 min 36 sec clip shows you how to schedule in Site View:
The site schedule can be accessed by selecting Plan from the main menu, followed by selecting Site from the sub menu. Next, select the site you wish to view from those on the left-hand side of the screen. The Site View Grid (similar to the one below will be displayed):
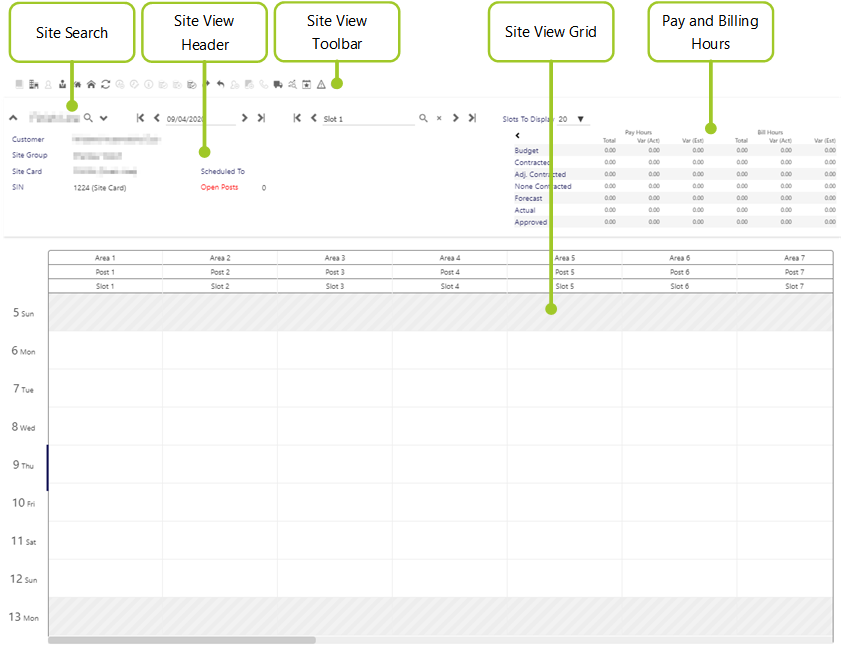
Site View grid
This grid shows a whole week of duties for a site. Down the left hand side of this grid are the days and dates for the week being shown. Today's date is highlighted with a blue line. Along the top of the screen are the duty slot numbers 1, 2 etc. (or headers, depending upon how they have been configured). Each duty slot (shown as a “cell” that’s underlined) holds details for one duty. It shows start time, finish time, hour’s type, pay level and employee allocated to that duty. A duty, or multiple duties can be selected by clicking on them with the left-mouse button. Once selected, they can be actioned using the context sensitive choices on the toolbar (see Site View Toolbar for more information). A context sensitive right-hand mouse button option list is available too. This comprises those actions that can be undertaken on the selected duty/duties. Additionally, drag-and-drop is supported. For example, a duty can be selected with the left-hand mouse button and dragged into another slot. Any necessary validation will take place regardless of how duties are modified/added etc.
Site Search
The Site Search bar can be split into two parts, one for searching for Sites, the other for searching for specific Slots on given days.
Searching for a site is simple using the Site Search functionality. Select either:
- Select
 to show a list of previously visited sites in a drop down menu. Select the site of choice from the list
 - Select
 to open the Select Site window, and choose a site from the pop-up view
 - Select Search
The second part of the search toolbar is used to find slots on given days:
- Select the Date that you wish to search on/from, and an appropriate the Slot
- Select to select a slot from the pop-up view
- Select Search.
You can also choose how many slots that you display on the screen at any one time (using the Slots To Display drop-down list). By default, this is set at 20.
Site View Header
The Site View Header comprises a summary of Customer name, Site Group, Site (including the SIN), the last date to which RotaLoad has been completed, and the number of open posts for the week currently displayed.
Site View Toolbar
The following are the various buttons on the quick access toolbar - these will be explained in more detail to you as you work through this section of the guide:
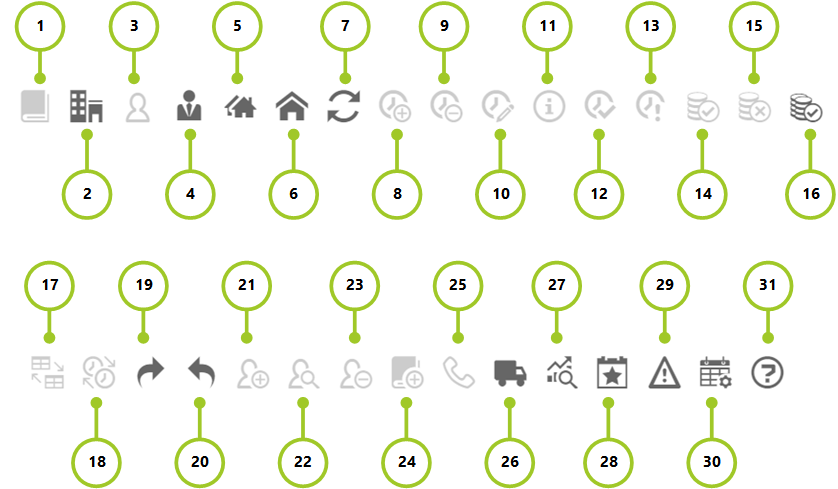
|
1 |
Employee diary |
11 |
Duty info |
21 |
Assign an employee |
|
2 |
Branch details |
12 |
Confirm duty |
22 |
Suitable employee |
|
3 |
Employee details |
13 |
Temporary duty |
23 |
Remove employee |
|
4 |
Customer details |
14 |
Approve duty |
24 |
Add diary event |
|
5 |
Site group |
15 |
Un-approve duty |
25 |
Contact details |
|
6 |
Site |
16 |
Bulk approve duties |
26 |
Supplier reference |
|
7 |
Refresh view |
17 |
Make contracted |
27 |
Site teams |
|
8 |
Add duty wizard |
18 |
Swap employees |
28 |
Events |
|
9 |
Delete duty |
19 |
Rotaload |
29 |
Create incident |
|
10 |
Edit a duty |
20 |
Unrotaload |
30 |
Configure slots |
|
|
|
|
|
31 |
Legend |
Pay and Billing Hours
This collapsible part of the screen provides summary information including budgeted hours, contracted hours, adjusted contracted hours, forecast hours, actual hours and approved hours. This is for both pay and bill hours. The same type of information can be accessed in the Site Teams view. Using this information, you can track spending and undertake budget reviews. Access to this functionality is controlled by a security item, so it can be turned on and off for specific roles. By default, budget information is not expanded (shown on screen) - it can take a while to load and also takes up a large proportion of the screen.
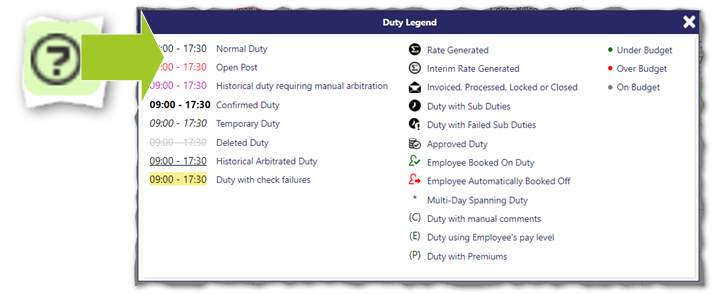
Legend
The following legend, accessed by selecting ![]() from the quick access toolbar explains the schedule components:
from the quick access toolbar explains the schedule components: