How are Hour Types set up?
The following 1 min 35 sec clip shows you how to set up new hour types. It looks at the various individual fields that are completed including different pay methods:
Select Admin | Finance. From the Post Pay column, select Hour Types. The Hour Types page is shown below. Follow the instructions to set up your Hour Types:
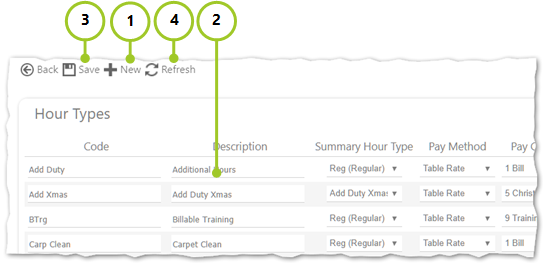
- Select New
- Enter the details of the hour type. Repeat this step until you have all your hour types set up. The following fields benefit from further explanation:
- Code - A unique code to identify the hour type for example REG
- Description - A more detailed explanation of the hour type code for example Regular Hours
- Summary Hour Type - Selected from a drop-down list box for example Regular (Regular Hours)
- Pay Method - Select one of five values in this drop-down list box: Table rate, Employee base rate, Greater of Base/Table Rate, Lesser of Base/Table rate, Time Off in Lieu (TOIL)
- Pay Column - If a Pay Method that needs to access the Post Pay table is chosen by the user, then this drop-down list should show which column in the table to use
- Pay Multiplier Column - This indicates which column in the Site Post Pay table is used as a multiplier to the rate determined by the Pay Column that must be selected using the drop-down list
- Pay Multiplier - This is a flat rate that is used as a multiplier to the rate defined in the Pay Column. for example 2 for double-time, 1.5 for time-and-a-half and 1 for standard pay
- Bill Method - This determines whether to use the Site's fixed charge per hour rate or the rate on the Site Post Pay table offering variable charge rates. There are four variables to select from: Table Rate, Site Card Charge Rate, Greater of Base/Table Rate or Lesser of Base/Table Rate
- Bill Column - If a Bill Method that needs to access the post pay table is selected, then this drop-down list box should be used to choose which column in the table to use
- Bill Multiplier Column - This indicates which column in the Site Post Pay table is to be used as a multiplier to the rate. This is determined by the Bill Column that must be selected using the drop-down list box
- Bill Multiplier - This is a flat rate that is used as a multiplier which is applied to the rate defined in the Bill Column. for example 2 for double-time, 1.5 for time-and-a-half and 1 for standard pay
- Remain in this Hour Type? - This setting ensures the same pay and bill rules continue when one duty moves into another Hours’ Type (for example from regular hours to overtime) when the check box is selected
- Pay Code - This value determines exactly which rate is to be used
- Bill Code - This value determines which bill code is to be used for an hour type
- Billing Description - A description that gives more detail to explain the Bill Code
- Excl. From POT Calc. - Select this box if the user does not want this type of hours worked to be used towards the period overtime (POT) limit i.e. the hours’ worked before overtime kicks in. For example, the hour type “Meal Break” would probably not be counted towards the overtime limit. Assume an employee’s Period Overtime Limit is 40 hours. The employee works 37.5 “Regular” hours and 5 “Meal Break” hours. This totals 42.5 hours. The overtime limit of 40 has not been exceeded, as only the 37.5 Regular hours count towards the overtime limit. Therefore, another 2.5 “Regular” hours would have to be worked before the overtime rate kicks in
- Excl. From Avg. Calc. - This setting enables the user to include or exclude average daily rates when calculating authorised absences - select in order to exclude from the calculation
- Contracted - If this is selected, then when a user manually adds a duty and uses this hour type, the “contracted” times of the duty are populated. This is a change from normal behavior, whereby these fields are only populated when the duty origin is auto schedule generated
- Default Daily Overtime 1 - 4 Hour Type and Default Holiday Hour Type - These default mappings determine how Hour Types will be treated when Overtime or Holiday applies to duties worked under this Hour Type.
- Select Save
- To remove changes without saving them, select Refresh