How do I configure FaceGo in Timegate Web?
To access the part of Timegate Web where a FaceGo device can be registered, the user must first have the correct access privileges defined, using a security item in their function role. Follow these instructions to ensure the user has the correct access rights:
-
Open Admin | Security | Function Role
-
Select the Function Role to add access to (e.g. Administrator)
-
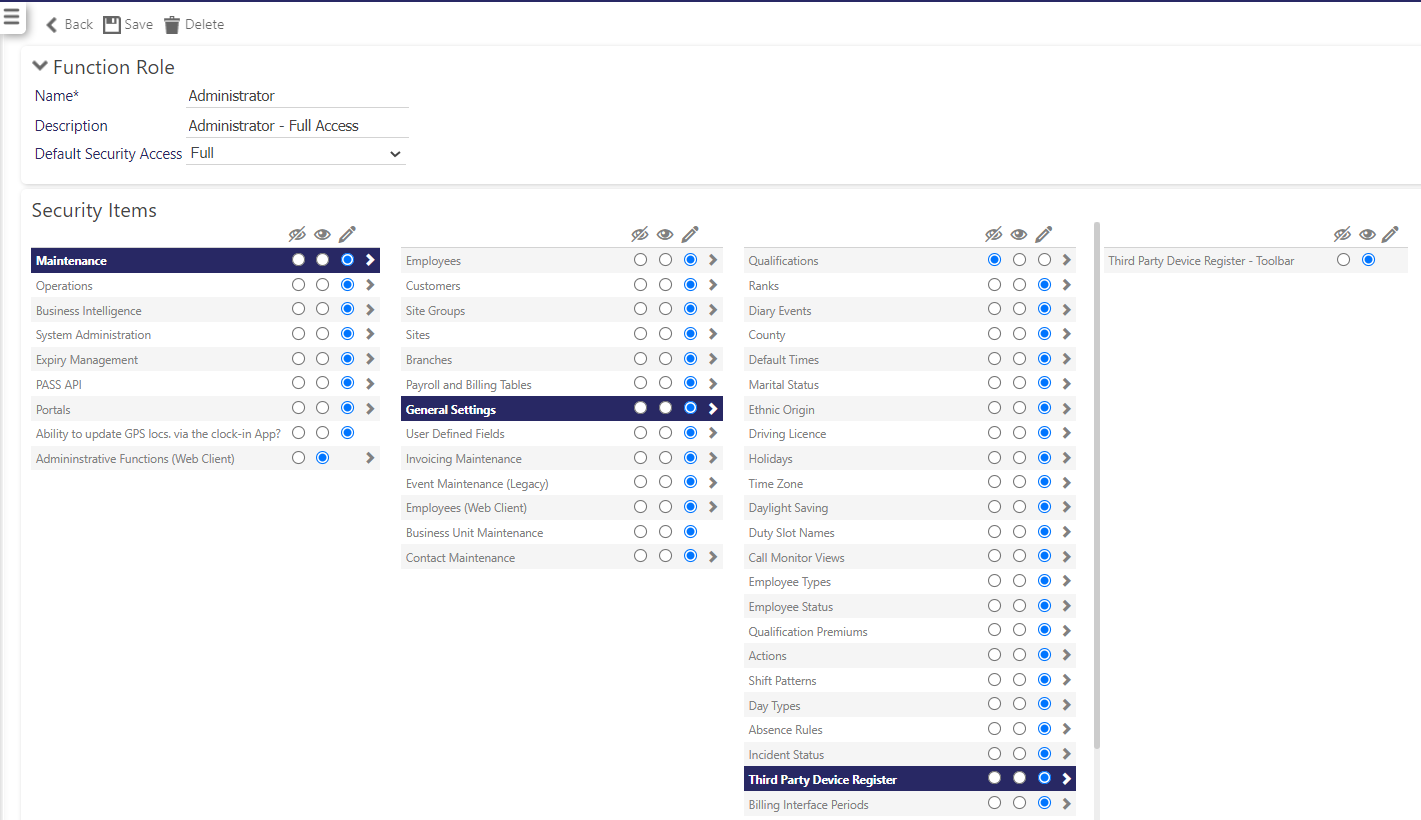
Locate the Function Role under Maintenance | General Settings | Third Party Device Register and set to allow access. Be aware that there is no read only security option for this page. This is shown below:

-
Select Save. If you have made changes, you will need to log out and then back in to Timegate Web
To add a new FaceGo device. Follow these steps:
-
Select Manage | Devices to open the following screen:

-
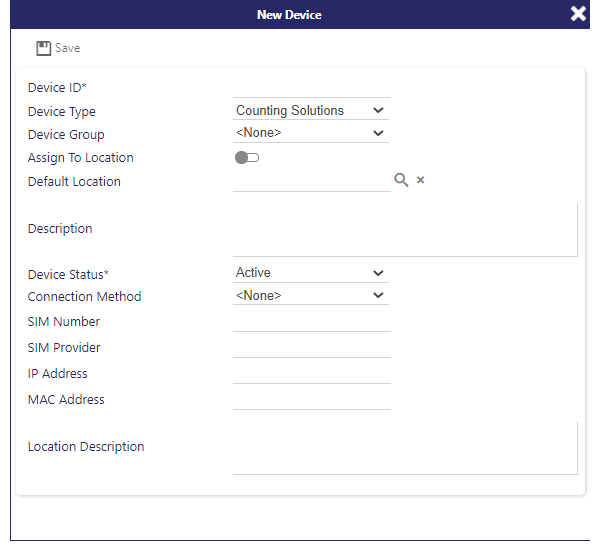
Select Add. A screen similar to the one below will open:

-
Enter a Device ID. This is the 16 digit serial number of the device found at the bottom of the FaceGo device. If you cannot find the label holding this information, you can search for it when the FaceGo device is switched on. To find the serial number, select Menu, Option 4 System Infoor 6 System Info(depending on the FaceGo model) and then Option 2 Product Info on the device. It is displayed on screen as SN, followed by the 16 digit number). An example is as follows:

-
Set the Device Type as FaceGo
-
There is no need to select a Device Group unless you wish to logically group your devices for informational purposes, but it has no functional value
-
Decide whether you are assigning the device to a specific location or not. Generally, most customers assign the device to a specific location (either a Site or Site Group). To do this, select Assign To Location. The following table explains the implications of either selecting or deselecting this setting when configuring your FaceGo device:
Assign to Location Fields shown on screen What this does Selected -
Use Site Group
-
Site / Site Group - depending upon whether Site Group is selected or not
When selected, when a user logs in, a duty is searched for within either the Site or Site Group that has been selected. The Site / Site Group - is entered in the appropriate field if displayed. To assign a Site Group, Use Site Group must first be selected, which changes the Site name data entry point to one for the Site Group. Deselected -
Default Location
When this setting is deselected, the field Default Location is available for selection. Under these circumstances, when a device is used to log onto a duty, if the duty cannot be found (i.e. is ad hoc) it will be assigned to the location specified in the Default Location setting. If the Default Location selected is configured with Auto Duty Create, all duties sent to the Default Location will be automatically created.
Tip: For further guidance about Assign to Location and the associated Default Location value, see Audience for devices used in locations with both scheduled and adhoc duties.
-
-
If you selected Assign to Location either:
-
Select your Site of choice
-
Or Select Use Site Group and then select the relevant Site Group
-
-
If you deselected Assign to Location, select your Default Location. This is the location that all duties without SINs (i.e. adhoc duties) will be directed to if a specific Site or Site Group has not been configured.
-
You can optionally enter a short Description of the device s required
-
Select Device Status and set to Active (otherwise, the device won't be available to use)
-
At this point, you can entering the Connection Method, SIM Number, SIM Provider, IP Address, MAC Address and Location Description. This is optional. The values serve no functional purpose, they're recorded for information purposes only
-
Select Save
If you have lots of employees going through the doors to sign on at the same time and don’t want your employees to have to enter a SIN when booking onto duties, Timegate Web can now be set up to support the situation without generating lots of arbitrations. Some of these duties may be scheduled, whilst some may be adhoc (employees turn up, swipe and expect duties to be created for them.) Timegate Web can be set up so that if there is a scheduled duty for an employee, it will match to the site. If there is no scheduled duty, Timegate Web can, when configured correctly create a duty for the employee.
If a device has a default location rather than an assigned location, if a duty cannot be found for a PIN, it will be assigned to the default location. If the default location has been set up to auto duty create, a duty will be created. If the default location has not been set up to auto duty create, and a duty is not present for the employee, an arbitration will be created for the PIN at the default location. The Device can be set up to a Location (Site or Site Group) using the Assign to Location option or can be left to a Default Location
All Employees that are going to be using the biometric devices need to have their Third Party PIN set up. If a Site has been set up as Multi, the Site will need to have it’s Third Party SIN set up
Open the Set Up | Employee page:
-
Select the Employee that you wish to set up by selecting the information icon next to their name. The Employee General tab will open
-
Select the User Fields tab
-
Next to the Third Party PIN User Field, enter the Employee Number (in the Value field) for your employee. In the example below this is 0016

-
Select Save
Open the Set Up | Sites page:
-
Select the Site that you wish to set up by selecting the information icon next to it’s name. The Site General tab will open
-
Select the User Fields tab
-
Next to the Third Party SIN User Field, select Other Text, then enter the SIN for your Site for example in 00117

-
Select Save
When setting up your FaceGo devices, you have the option to use them in one of two ways - single site mode (their default setting) or multi site mode. Most organisations will opt to use their devices in single site mode.
-
Single Site Mode - In Single Site Mode, the FaceGo device will log employees onto a single site. When employees book on / off, there will be no need for them to enter a SIN. If you are using the FaceGo device in this way, it must be assigned to a single site in Timegate Web
-
Multi Site Mode - In Multi Site Mode the FaceGo device can be used to log users onto multiple sites. Take an airport for example. You may have one FaceGo device in a general security area to book on staff working across two terminal building. Each terminal is treated as a separate site, but there is only one device to book on / off with
A baggage handler may be working at Terminal 1 (Site 1) and a cleaner may be working at Terminal 2 (Site 2). Both employees book on/ off on the same device, but for different sites.
When using this configuration, when an employee books on / off, they will also need to enter the SIN for the site that they wish to book on / off.