How do I add a new Diary Event page?
-
Firstly, open Admin | General | Diary Events |
-
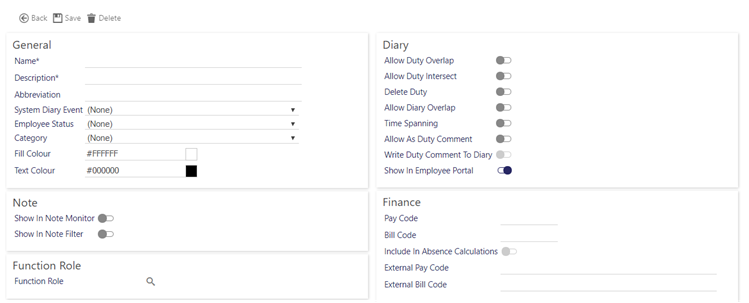
Select + Add is selected from the Diary Events Settings page, the following sub-screen is displayed:

-
Complete the various settings using the information below to help:
|
Name
|
Mandatory descriptive name of the diary event type |
|
Description |
Mandatory description of the diary event type
|
|
Abbreviation |
A single letter abbreviation can be added to the event so it can be easily recognisable when added to the Employee diary. There are reserved letters of “D” for Duty and “R” for Rest Day that cannot be used, however, lower-case “d” and “r” could be used instead.
|
|
System Diary Event |
System Diary Events links with incident recording within both the diary and absence management. The System Diary Event should be left as (None) otherwise the System Diary Event listed as Incident is used in conjunction with the incident log to record diary events as incidents (for example, Duress calls and similar). Within the optional Absence Management Module, the System Diary Events are used to flag Holiday and Sickness type events. The System Diary Events listed below are shown in the drop-down list. They are used to tell the Absence Management Module that a potential payment could be made: are used to flag Holiday and Sickness type events. They are selected using a drop-down list. Within the Absence Management Module that a potential payment could be made:
Note: The System Diary Events listed as Employee Contract End and Jobs are no longer in use within Timegate Web v18.2 onwards, therefore, they should be ignored
|
|
Employee Status |
Use this option to select the status of an Employee. Options for employment status are as follows:
|
|
Category
|
This option has been provided to enable you to group Diary Events by category for reporting purposes (Diary Event Categories are created/managed/deleted from within the Admin | General | General Maintenance | Diary Event Categories setting page)
|
|
Fill Color |
Select background fill color of this type of diary event (when displayed on the diary screen) - by default this is white (#FFFFFF)
|
|
Text Color |
Select text color for this type of diary event (when displayed on the diary screen)- by default this is black (#000000)
|
|
Show in
|
Select this option to ensure that the event shows up in the Note Monitor |
|
Show in
|
Select this option to ensure that the event is displayed in the Note Filter
|
|
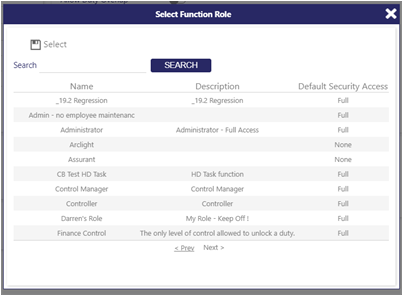
Function Role |
This setting enables you to control who can see, create and edit this type of diary event. If a diary event is relevant for a user’s function role (function role(s) selected here) they will be able to see the event and be granted access to it. Select the magnifying glass to choose the functional role(s) you wish to assign to the diary event. Once selected, confirm by selecting Select:
Note: The function role will only be checked at the point the user attempts to add/edit a diary event. If an existing diary event is of the type unavailable to the user, the Edit will not be available. If the user is able to access the Diary Event page (e.g. add or selecting a permitted type), the selector drop down will prevent the user selecting a type for which they have no access. |
|
System Diary Event
|
Select from the drop down list |
|
Allow Duty Overlap
|
Select Allow Duty Overlap to ensure that by default that the given diary event can be overlapped by other duties
|
|
Delete duty |
By selecting this option, Timegate Web is being configured to allow a diary event to be created that will remove the duty (and the Employee) from duties that fall in that diary event range. This will only occur if the Employee is in the scheduled or operational phase of the duties
|
|
Allow Diary Overlap |
Select Allow Diary Overlap to ensure that by default that the given diary event can be overlapped by other diary events
|
|
Time Spanning |
Time Spanning indicates that the event will have a start and finish time, as opposed to being an event that happens at a single point in time
|
|
Allow Duty Intersect |
When selected, allows a diary event to intersect with a duty start and/or finish time. Note: This is different from Allow Duty Overlap, which will disallow any overlap between duties and diary events if not switched on
|
|
Allow as Duty Comment |
If selected, when adding or amending a duty, a pop-up will be displayed with a comments box so that comments can be made about the change. This will be recorded
|
|
Write Duty Comment To Diary
|
If selected, when a duty comment is written to diary, it is displayed as well as stored |
|
Show in Employee Portal
|
When selected (by default) diary entry will be visible in the Employees portal so that they can see it. You may wish to disable this to hide confidential/personal content or other details that you do not want to be displayed in the diary
|
|
Pay Code |
Enter your Pay Code the drop-down list (this is the code which is sent to the payroll).
This is used to tell the Payroll system how to classify the payment when sent to a third party solution using the interface Note: Not all interfaces send Absence Information, contact your TEAM Software by WorkWave representative for further clarification. The Pay Code is normally linked to a Pay Element in Payroll and therefore must exist in the Payroll System before being used in Timegate Web. Note: Values of over 10 characters long should be entered into the External Pay Code field below
|
|
Bill Code |
Select Bill Code the drop-down list - Only used within the Absence Management Module be aware: Values of over 10 characters long should be entered into the External Bill Code field below as this field is restricted to 10 characters only, whilst the one below have the space for 50 characters.
|
|
Include in Absence Calculations
|
Select to include when calculating absence - Only used within the Absence Management Module. When selected this:
|
|
External pay Code |
Unique payroll number for exporting to those systems that require of 10 or more characters
|
|
External Bill Code |
Unique billing number for exporting to those systems that require of 10 or more characters
|
Diary event request markers are automatically created when a specific task hits a new stage. The three stages that are currently implemented are Started, Accepted and Rejected. An example of use would to assign a Rejected request marker against a holiday request, this would then mark the employee’s diary when a holiday had been rejected. To configure these, you need to have diary events with the following settings selected:
-
System Diary Event = None
-
Allow Duty Overlap = On
-
Allow Duty Intersect = On
-
Delete Duty = Off
-
Allow Diary Overlap = On
-
Time Spanning = On
Once configured, the user will be able to assign the marker against a help desk task, under the Diary Event Markers field.
