How do I set up a tour for a site using my locations?
To create a tour and make it available for a given Site, open the Services tab for your selected site within Site Maintenance (Set Up | Sites | Services). Select +Add Tour. A screen similar to the following will be displayed (with tour details initially opened):
- Enter the Tour Details
- Name - name of the tour
- Description - brief description of the tour
- Expected Duration (mins) - how long the tour should take to complete
- Flexible Tour - whether the tour must run sequentially (in the order it has been defined) or whether the locations can be visited in a random order of the employees choice when conducting the tour
- Randomised Tour - Select to make a tour can be randomised. Randomised tours are tours that Timegate automatically randomises the order of the locations for. The employee should complete in the order presented to the Locations for. The employee should complete in the order presented to them.
- Pay Level - select using
 . Only employees of this pay level will be able to see the tour. Can be left blank so that everyone can see the tour
 If you wish to enable Scheduling it can be selected
As required, Enable Missed Tour Alerting can be selected
As required, Enable Completed Tour Alerting can be selected
- Touch And Go - select this to enable more basic and rapid NFC tag scanning. When enabled for a tour, a successful adhoc NFC tag scan will result in the related tagged location being flagged as completed, without the user being navigated around a Structured tour
- Form - select the form (if any) that you wish to attach to the tour
- Select as required whether the form is Scorable (i.e. it has a score attributed to it)
If Scorable, as required, Enable Passed Tour Alerting can be selected
If Scorable, as required, Enable Failed Tour Alerting can be selected
- Active - enable to make the tour visible for the employee when they clock on to their duty
-
As required, enter any Scheduling information
-
Recurrence Pattern - what type of pattern will there be to the scheduling? Will it be Monthly, Weekly, Daily or Hourly?
-
Start Date - date that you wish for the schedule to commence upon
-
Other scheduling options will vary based upon your selected Recurrence Pattern. Depending on your choices you will have the option to schedule pre- and post time in minutes, hours, days or weeks
-
-
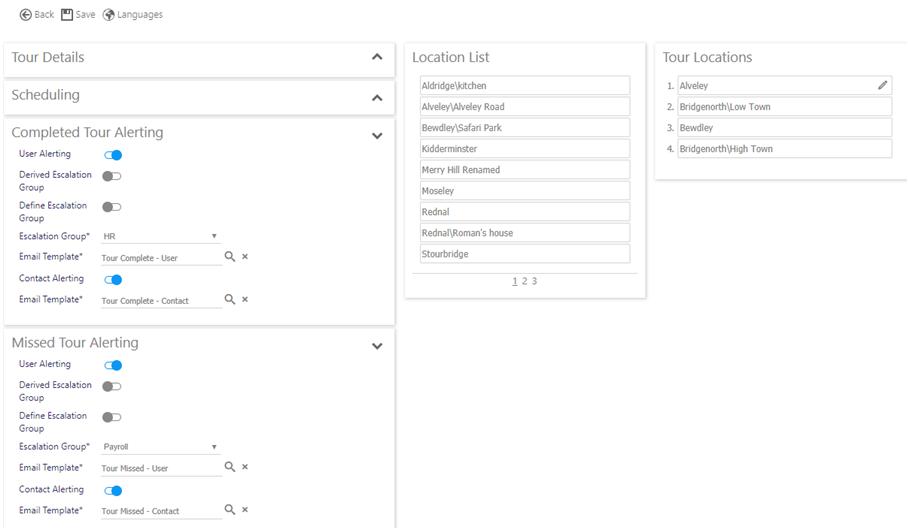
As required, enter any Completed Alerting information such as the target audience for the alerts along with message:
-
User Alerting - Select if you wish for users to receive completed tour alerts
-
Derived Escalation Group - Select to use the Derived Escalation Group i.e. the default escalation group
-
Define Escalation Group - Select to define an Escalation Group (using the Email Template option below)
-
Escalation Group - Select the Escalation Group to alert when tours are complete
-
Email Template - Select the Email Template that you wish to use to alert escalation groups with, when tours are completed
-
Contact Alerting - Select if you wish for contacts to receive alerts when tours are complete
-
Email Template - Select the Email Template that you wish to use to contacts with, when tours are completed
-
-
As required, enter any Missed Tour Alerting information such as the target audience for the alerts along with message:
-
User Alerting - Select if you wish for users to receive missed tour alerts
-
Derived Escalation Group - Select to use the Derived Escalation Group i.e. the default escalation group
-
Define Escalation Group - Select to define an Escalation Group (using the Email Template option below)
-
Escalation Group - Select the Escalation Group to alert when tours are missed
-
Email Template - Select the Email Template that you wish to use to alert escalation groups with, when tours are missed
-
Contact Alerting - Select if you wish for contacts to receive alerts when tours are missed
-
Email Template - Select the Email Template that you wish to use to contacts with, when tours are missed
-
-
As required, enter any Passed Form Alerting information such as the target audience (be that an escalation group or contacts) and associated message template:
- User Alerting - Select if you wish for users to receive a message if the tours form is passed
-
Derived Escalation Group - Select to use the Derived Escalation Group i.e. the default escalation group
-
Define Escalation Group - Select to define an Escalation Group (using the Email Template option below)
-
Escalation Group - Select the Escalation Group to alert when the tours form is passed
-
Email Template - Select the Email Template that you wish to use to alert escalation groups with, when the tours form is passed
-
Contact Alerting - Select if you wish for contacts to receive alerts when the tours form is passed
-
Email Template - Select the Email Template that you wish to use to contacts with, when the tours form is passed
-
As required enter any Failed Form Alerting information such as the target audience (be that an escalation group or contacts) and associated message template:
- User Alerting - Select if you wish for users to receive failed formr alerts
-
Derived Escalation Group - Select to use the Derived Escalation Group i.e. the default escalation group
-
Define Escalation Group - Select to define an Escalation Group (using the Email Template option below)
-
Escalation Group - Select the Escalation Group to alert when the tours form is failed
-
Email Template - Select the Email Template that you wish to use to alert escalation groups with, when the tours form is failed
-
Contact Alerting - Select if you wish for contacts to receive alerts when tours the tours form is failed
-
Email Template - Select the Email Template that you wish to use to contacts with, when tours the tours form is failed
-
Drag and drop the desired, available locations from the Location List onto the Tour Locations list
-
Order the Tour Locations as required (again this is drag-and-drop) if you wish the locations to be visited in a sequential manner
-
Select Save
Note: If you are setting up locations on a site for the first time, you will be given the opportunity to copy both locations and tours from another site that could speed up the process of the creation of locations and tours. See How do I copy locations and tours for a new site? for further information.