How can I create a dashboard?
Note: This content is applicable to the legacy web version of Timegate.
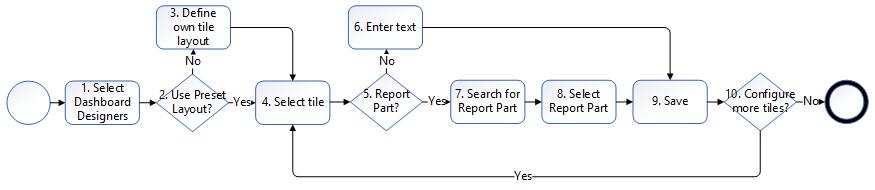
The following flowchart details the process of creating a dashboard. Each step is described in the table below:
|
Process Step |
Description |
|
|---|---|---|
|
1. |
Select Dashboard Designers
|
The process starts by selecting Designers followed by Dashboard Designers
|
|
2. |
Use Preset Layout?
|
You will be prompted to select a preset layout from a selection on screen (Dashboard Preset Layout). If you would like to use one of the layouts, select it and proceed to Step 4
|
|
3. |
Define own tile layout |
If you would prefer to create your own layout, select X to close the Dashboard Preset Layout dialog box
|
|
4. |
Select tile |
From the Dashboard screen, now select the tile that you wish to add a report part or text into. Select using +
|
|
5. |
Report Part? |
Once the tile is selected, you are presented with the choice to add either a Report Part or Text. Select as appropriate. If you select Text, proceed to Step 6, otherwise, go to Step 7
|
|
6. |
Enter text |
Enter the text that you wish to display in the tile. Format the text using the formatting tools provided on the screen
|
|
7. |
Search for Report Part |
If you choose to add a Report Part, you will be asked to search for the report that you wish to use, through the Report Part Selection screen. Enter your search criteria and select Search
|
|
8. |
Select Report Part |
A list will be displayed on screen that provides the search results. Select the report that you wish to use in the tile. Select the Report Part Title and then Select OK
|
|
9. |
Save |
Select Save to save your changes. You can resize the tile (as needed) at this point so that it fits onto the screen in a more user friendly manner
|
|
10. |
Configure more tiles? |
If you wish to add further tiles, return to Step 4 and select a new tile to display a report part or text. Do this by selecting +
|