How do I alter the Employee Portal general settings?
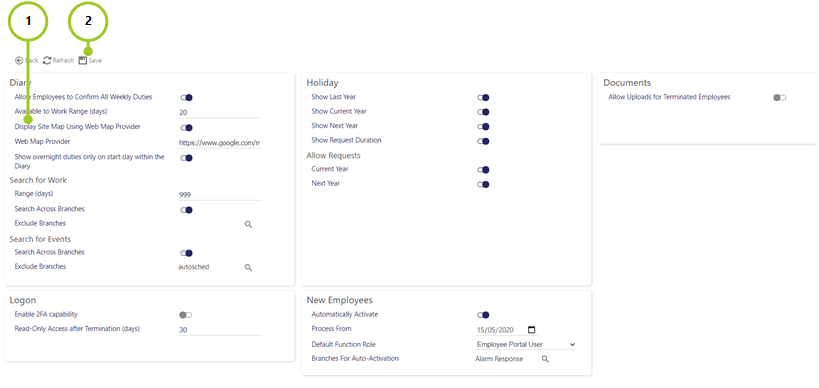
Select Admin | Engagement | Employee Portal to open the page below and follow the steps:

-
Modify the settings as necessary, selecting/clearing the check boxes and by completing the text boxes for the Employee portal (see below for detailed explanations)
-
Select Save
The following explain the settings:
| Field | Description |
|---|---|
|
Allow Employees to Confirm All Duties Within a Week
|
Select to gives the employee an option to confirm all of their duties weekly, instead of individually |
|
Available to work range (days)
|
Enter a number here and that will be the maximum number of days in advance of the Start date that an employee can say that they are available to work e.g. if set to 20, the employee will only be able to set their availability for up to 20 days in advance of the start date. If the number of days between the start and end date exceeds this, an error message is displayed. When 20 days is set the message will be " check the date range. You may select a range of 20 days only"
|
|
Display Site Map Using Web Map Provider
|
Will display a location map when the Employee selects duty in their diary and have pressed the map hyperlink |
|
Web Map Provider
|
Enter the URL of you web map provider here. By default, this is set to Google Maps |
|
Show overnight duties only on start day within the Diary
|
Select to ensure that those duties that run over night are only shown on the start day |
| Field | Description |
|---|---|
|
Range (Days)
|
Enter a number here to indicate the maximum number of days in advance of the Start date that an employee can search for work i.e. if this is set to 50 days, if an employee tries to search for work using a range that exceeds 50 days they will receive an error message. In the case of 50 days this would be " check the date range. You may select a range of 50 days only"
|
| Search Across Branches |
Select to search across all branches when searching for work
|
| Exclude Branches |
Select branch or branches to exclude from an searches for work across multiple branches
|
| Field | Description |
|---|---|
| Search Across Branches |
Select to search across all branches when searching for events related work
|
| Exclude Branches |
Select branch or branches to exclude from searches for event work across multiple branches
|
| Field | Description |
|---|---|
| Automatically Activate |
When an employee is set up, if this option is selected, automatically a user ID and password will be created and sent to them for use in the Empoyee Portal, based on the Process from date. i.e. if a a user ID and password have not been created for a user after the Process from date, then create them a new user ID and password for the Portal automatically
|
| Process from |
Select a data from which to process an automatic activate updates i.e. the date from which any users without Employee Portal IDs/passwords will have them automatically generated for them
|
| Default Function Role |
The role that will by default be allocated to an employee when their portal access is automatically activated
|
| Branches For Auto-Activation |
The branch that will by default be allocated to an employee when their portal access is automatically activated
|
| Field | Description |
|---|---|
|
Show Last Year
|
Will give the employee a view of their holiday entitlement and their holiday requested for the previous year. Some clients may hide this as the focus is normally on the current year |
|
Show Current Year |
Will give the employee a view of their holiday entitlement and holiday requested for the current year
|
|
Show Next Year
|
Will give the employee a view of holiday entitlement and holiday requested for the forthcoming year
|
|
Show Request Duration
|
Only, used with the Absence Management Module, when the Employee books a holiday through the portal, they will be asked to enter the number of days or hours in duration that they wish to take. For example, a week is booked but only 5 days entitlement will be paid for the duration
|
|
Allow Requests -Current Year
|
Enables the employee to request holidays on the portal for the current year |
|
Allow Holiday - Next Year |
Enables the employee to request holidays on the portal for next year |
| Field | Description |
|---|---|
|
Maximum Document Upload File Size (MB)
|
Select from the drop-down list the maximum size that a single document can be for uploading. A lower number will improve the performance of the Web Client when loading screens that show these files for example the employee picture
|
|
Allow Uploads for Terminated Employees
|
Select to be able to make uploads to employees that have been terminated |
| Field | Description |
|---|---|
| Enable 2FA capability |
Select to enable 2FA (Two Factor Authentication). When enabled, an employee sends a request to the system for an access code. The access code is sent to the employee by email. When the user logs into the Employee Portal, they then use this access code alongside their user name to secure access. This significantly improves security
|
| Read-only access after termination (Days) |
Enter the number of days that a terminated employee can gain that to the Employee Portal (be that on a read only basis) after their termination date (so that they can, for example, download content such as their payslip)
|