How should I use Period Lock/Unlock/Close (PPA)?
This section walks you through the process of finalising your payroll using Timegate Web, taking advantage of the Prior Period Adjustment (PPA) processing functions (Period Lock, Period Unlock, Period Close) functionality.
Prior Period Adjustment (PPA) functionality allows you to lock off a period that your finance/payroll team would approve. Locked periods can be unlocked by those with the appropriate level of administrative rights to modify as needed and then relocked. This means that arbitrations can be made throughout the period, rather than just at one final point in time, as desired. Once an overall period is finalised, it can be closed. When the period is both locked and closed, for audit purposes, it can no longer be changed. Each period that is locked is given a unique transaction number. This provides a great way to locate pay periods rather than searching by date.
How this functionality is used differs from company to company. Companies choose to lock and close their pay periods in different ways. For example, a company choosing to run a monthly payroll may lock each week regularly for the whole month, scooping up any unarbitrated duties and dealing with them as the month progresses. They will do this by running a report to see the latest transactions every week and then relock it. At the end of the month, when they are happy to commit the information to payroll, the period is then closed. Other companies may choose to lock once and then close straight away at the end of a period. The volume of arbitrations and the duration of the period, along with your existing working practices will help determine your approach to using this function.
Within this guide, we take you through both a one-week example and a calendar month example of the process.
In the one-week example, the period is locked on week 1, relocked that same week if there are any corrections, and then once everything is in order, the period is closed. It includes details of which reports to generate and view to determine that your payroll information is correct and complete before ending the pay period.
In the calendar month example where the period is locked on week 1 and re-opened and locked again in subsequent weeks. On week four, once everything is in order, the period is closed. Again, it includes details of which reports to generate and view to determine that your payroll information is correct and complete before ending the pay period.
Using these examples, you can adapt the approach for your business to enable the smooth collection of duty information for payroll processing.
Flow Chart

Step-by-step supporting notes
You must make sure all arbitrations and failed duties are cleared down for the period. This can be checked through the Arbitrations and Failed Duty tiles. The Duty Filter is a great place to search for arbitrations and failed duties. Any duties that have not been arbitrated will not be included in the pay and bill phase. They will not appear on Payroll reports for the phase.
Once all duties have been arbitrated, you should run the Rate Generation Check Report (04-01-05) to identify if any duties have either not been rate generated or have a zero value. If the report returns any such duties, these need to be corrected before rate generation is re-run.
The basic principle of Prior Period Adjustment (PPA) processing is that once all duties and diary events are aligned (through arbitration) for a given period (in this case, 1 week), you can lock the period. Locking the period creates a transaction number that is assigned to all affected duties and diary events. This can be useful when reporting or submitting your data to a third-party system. Following locking, duties and diary events can still be edited if you have the correct security permissions to relock the period (covered from Step 4). You can adjust dates, times, hour type, pay level etc. Any changes that you make to duties will be submitted back onto the rate generation queue. Any rate generation information that was locked (against the transaction number) will remain, and a negative and positive set of figures will be created to reflect the change in the next period. The following screenshot shows the Manage | Queues screen from where the lock is set up:
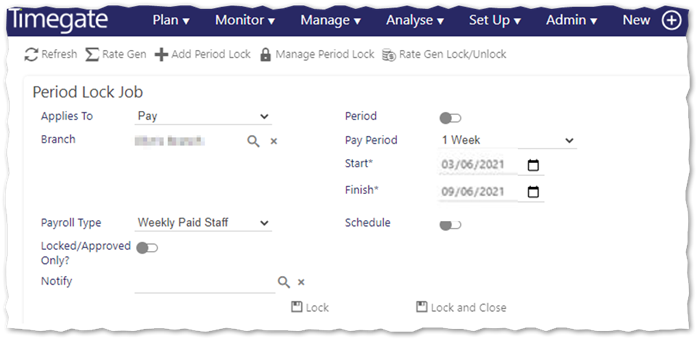
To Lock from the Manage | Queues screen:
-
Select Add Period Lock to open the Period Lock Job screen
-
Select Applies to type – either Pay or Finance (if applicable)
-
Select Branch – this can either be one, many or all branches (this is mandatory)
-
Select the duration of the employee Pay Period – in this example, 1 Week. The system will automatically update the Start of Period and Finish of Period dates based on your selection (adjust if necessary)
-
Select the Payroll Type (if applicable)
If your company’s business process involves checking and approving all duties one by one to stop the addition of any unapproved duties, you may wish to select the Locked/Approved Only? When selected, only duties that have been flagged as approved are included in the lock. Unapproved duties will not be included in the transactional lock
If you wish to notify an escalation group that the period has been locked, select an appropriate group within Notify. The selected group will receive an email notification upon completion
You do not have to lock the period immediately. You can schedule a time and date for the lock in the future. To set this up, select Schedule, then enter in the Scheduled For date and time
If you do not wish to schedule a time and wish to Lock the period immediately, select Lock. You will be prompted to confirm that you wish to lock the period. DO NOT SELECT LOCK AND CLOSE. Further details about this option can be found in the Lock and Close.
A bold record shows in the tasks queue. Make a note of the Transaction Number (this will make finding the record easier). This will be visible for all users to notify them that a lock is about to take place. If the job is not scheduled, then it is unlikely that it will remain there for more than a few seconds. It will disappear when the user refreshes the page.
The Transaction Number is important when PPA is enabled because standard rate generation reports are enhanced in Timegate Web, make running reports easier. A new option is available enabling you to run transactional reporting. Transactional Reporting enables you to run a report against a transaction period. You can browse for the period of your choice by either the Transaction Number or the date. All of the information about the period is contained within the transaction making reporting much faster as you do not have to configure the report. All configurations have been done for you. Moreover, your year is broken into transactions and all of the data within the transaction has been validated. You can simply select the Transaction and then select Run Report.
To run your report from Analyze | Reports:
-
Select Payroll Reports (5)
-
Select General (8)
-
Select Prior Period Adjustments (73). The report will now load
-
Select how you would like to group your information
-
Select Next
-
Select Transaction
-
Select the Transaction from the drop-down list (use the Transaction Number that you noted previously to locate the Period details)
-
Select Next
-
If you wish to filter the report, select your criteria using the field names and the boolean operators
-
Select Run Report
Now it is important to check that the output from the report is as you expected. You should check that the various totals for the period look appropriate. Check that the report contains the adjustment information you expected and correct any errors as necessary
Select your pay report from those available in Analyze | Reports. Remember to report by Transaction when you are given the option. Configure the report as required and then select Run Report. Check that the output from the report is as you expected. If any of your payroll run data looks erroneous it will need checking in Timegate Web. You should check that the various totals for the period look appropriate.
Re-run the Prior Period Adjustments report from Analyze | Reports:
-
Select Payroll Reports (5)
-
Select General (8)
-
Select Prior Period Adjustments (73). The report will now load
-
Select how you would like to group your information
-
Select Next
-
Select Transaction
-
Select the Transaction from the drop-down list (use the Transaction Number that you noted previously to locate the Period details)
-
Select Next
-
If you wish to filter the report, select your criteria using the field names and the boolean operators
-
Select Run Report
-
Re-check that the output is as you expected and correct any errors as necessary. Once corrected, move onto the final step of this process.
When you are happy that all of the duty information within your period is correct, then (and only then) are you ready to close the period. Upon closing the period, Timegate Web flags all duties and diary events in the period as being closed. At this point, you are not able to edit the duties or diary events in the closed period. Any prior period adjustments will be included in your current transaction via a look back.
To close the period, from the Manage | Queues screen:
-
Select Manage Period Lock to open the Update Period Lock Job screen
-
Select the existing period from Duty Rates Period. Select the magnifying glass. A new Select Period dialog box will be displayed. Choose your period from those displayed or by using the search function. This task is made simpler if you made a note of the Transaction Number previously as this is easy to search with/see on the screen,
-
Select Close to add in any outstanding transactions for the period. You will be prompted to confirm that you wish to close the period. Remember, only confirm if you are sure that everything is correct and there are no outstanding issues. You cannot undo this action
Week 1 Flow Chart
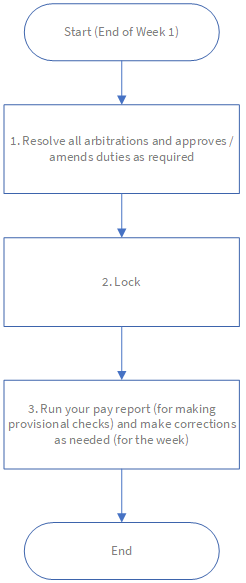
Week 1 Step-by-step supporting notes
You must make sure all arbitrations and failed duties are cleared down for the period. This can be checked through the Arbitrations and Failed Duty tiles. The Duty Filter is a great place to search for arbitrations and failed duties. Any duties that have not been arbitrated will not be included in the pay and bill phase. They will not appear on Payroll reports for the phase.
Once all duties have been arbitrated, you should run the Rate Generation Check Report (04-01-05) to identify if any duties have either not been rate generated or have a zero value. If the report returns any such duties, these need to be corrected before rate generation is re-run.
The basic principle of Prior Period Adjustment (PPA) processing is that once all duties and diary events are aligned (through arbitration) for a given period (e.g. in this case a calendar month), you can lock the period. Locking the period creates a transaction number that is assigned to all affected duties and diary events. This can be useful when reporting or submitting your data to a third-party system. Following locking, duties and diary events can still be edited if you have the correct security permissions to relock the period (covered in Step 4). You can adjust dates, times, hour type, pay level etc. Any changes that you make to duties will be submitted back onto the rate generation queue. Any rate generation information that was locked (against the transaction number) will remain, and a negative and positive set of figures will be created to reflect the change in the next period.
The following screen shot shows the Manage | Queues screen from where the lock is set up:
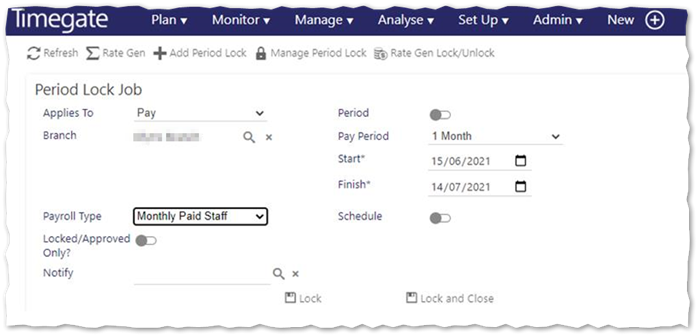
To Lock from the Manage | Queues screen:
-
Select Add Period Lock to open the Period Lock Job screen
-
Select Applies to type – either Pay or Finance (if applicable)
-
Select Branch – this can either be one, many or all branches (this is mandatory)
-
Select the duration of the employee Pay Period from either 1 Week, 2 Weeks, 3 Weeks, 4 Weeks or 1 Month. In this example, select 1 Month. The system will automatically update the Start of Period and Finish of Period dates based on your selection (adjust if necessary)
-
Select the Payroll Type (if applicable)
-
If your company’s business process involves checking and approving all duties one by one to stop the addition of any unapproved duties, you may wish to select the Locked/Approved Only? When selected, only duties that have been flagged as approved are included in the lock. Unapproved duties will not be included in the transactional lock
-
If you wish to notify an escalation group that the period has been locked, select an appropriate group within Notify. The selected group will receive an email notification upon completion
-
You do not have to lock the period immediately. You can schedule a time and date for the lock in the future. To set this up, select Schedule, then enter in the Scheduled For date and time
-
If you do not wish to schedule a time and wish to Lock the period immediately, select Lock. You will be prompted to confirm that you wish to lock the period. DO NOT SELECT LOCK AND CLOSE. Further details about this option can be found in Lock and Close
A bold record shows in the tasks queue. Make a note of the Transaction Number (this will make finding the record easier in the future). This will be visible for all users to notify them that a lock is about to take place. If the job is not scheduled, then it is unlikely that it will remain there for more than a few seconds. It will disappear when the user refreshes the page.
The Transaction Number is important when PPA is enabled because standard rate generation reports are enhanced in Timegate Web, make running reports easier. A new option is available enabling you to run transactional reporting. Transactional Reporting enables you to run a report against a transaction period. You can browse for the period of your choice by either the Transaction Number or the date. All of the information about the period is contained within the transaction making reporting much faster as you do not have to configure the report. All configurations have been done for you. Moreover, your year is broken into transactions and all of the data within the transaction has been validated. You can simply select the Transaction and then select Run Report.
Select your pay report from those available in Analyze | Reports. Remember to report by Transaction when you are given the option. Configure the report as required and then select Run Report.
Finally, it is important to check that the output from the report is as you expected. If any of your payroll run data looks erroneous it will need checking in Timegate Web. You should check that the various totals for the period look appropriate. Fix any problems as required.
Week 2 Flow Chart
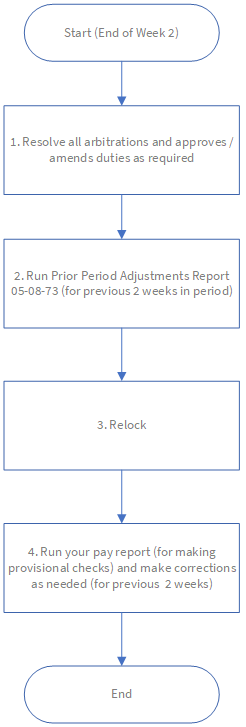
Week 2 Step-by-step supporting notes
You must make sure all arbitrations and failed duties are cleared down for the period. This can be checked through the Arbitrations and Failed Duty tiles. The Duty Filter is a great place to search for arbitrations and failed duties. Any duties that have not been arbitrated will not be included in the pay and bill phase. They will not appear on Payroll reports for the phase.
Once all duties have been arbitrated, you should run the Rate Generation Check Report (04-01-05) to identify if any duties have either not been rate generated or have a zero value. If the report returns any such duties, these need to be corrected before rate generation is re-run.
To run your report from Analyze | Reports:
-
Select Payroll Reports (5)
-
Select General (8)
-
Select Prior Period Adjustments (73). The report will now load
-
Select how you would like to group your information
-
Select Next
-
Select Transaction
-
Select the Transaction from the drop-down list (use the Transaction Number that you noted previously to locate the Period details)
-
Select Next
-
If you wish to filter the report, select your criteria using the field names and the boolean operators
-
Select Run Report
Check that the report contains the adjustment information you expected
Now, relock. The following screen shot shows the Manage | Queues screen from where the relock is set up:
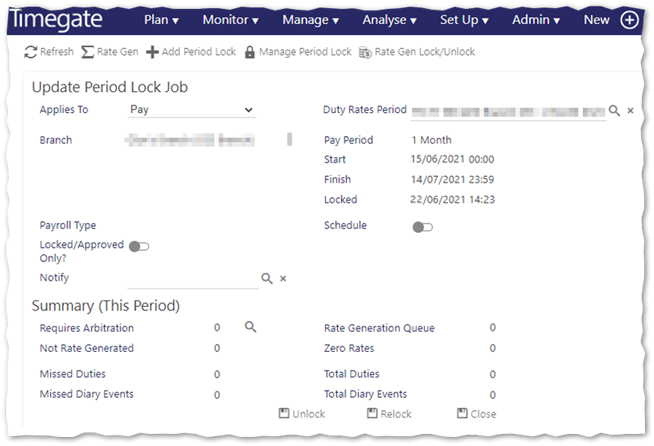
To relock from the Manage | Queues screen:
-
Select Manage Period Lock to open the Update Period Lock Job screen
-
Select the existing period from Duty Rates Period. Select the magnifying glass. A new Select Period dialog box will be displayed. Choose your period from those displayed or by using the search function. This task is made simpler if you made a note of the Transaction Number previously as this is easy to search with/see on the screen
-
Select Relock
Select your pay report from those available in Analyze | Reports. Remember to report by Transaction when you are given the option. Configure the report as required and then select Run Report.
Finally, it is important to check that the output from the report is as you expected. If any of your payroll run data looks erroneous it will need checking in Timegate Web. You should check that the various totals for the period look appropriate. Fix any problems as required.
Week 3 Flow chart
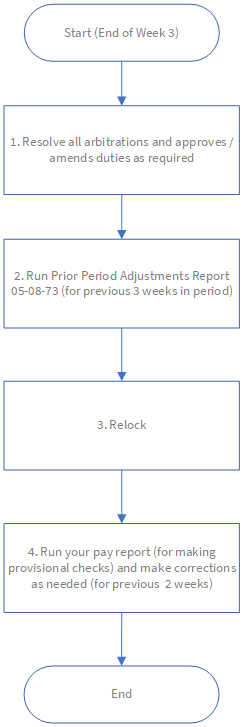
Week 3 Step-by-step supporting notes
You must make sure all arbitrations and failed duties are cleared down for the period. This can be checked through the Arbitrations and Failed Duty tiles. The Duty Filter is a great place to search for arbitrations and failed duties. Any duties that have not been arbitrated will not be included in the pay and bill phase. They will not appear on Payroll reports for the phase.
Once all duties have been arbitrated, you should run the Rate Generation Check Report (04-01-05) to identify if any duties have either not been rate generated or have a zero value. If the report returns any such duties, these need to be corrected before rate generation is re-run.
To run your report from Analyze | Reports:
-
Select Payroll Reports (5)
-
Select General (8)
-
Select Prior Period Adjustments (73). The report will now load
-
Select how you would like to group your information
-
Select Next
-
Select Transaction
-
Select the Transaction from the drop-down list (use the Transaction Number that you noted previously to locate the Period details)
-
Select Next
-
If you wish to filter the report, select your criteria using the field names and the boolean operators
-
Select Run Report
Check that the report contains the adjustment information you expected
Now, relock. The following screen shot shows the Manage | Queues screen from where the relock is set up:
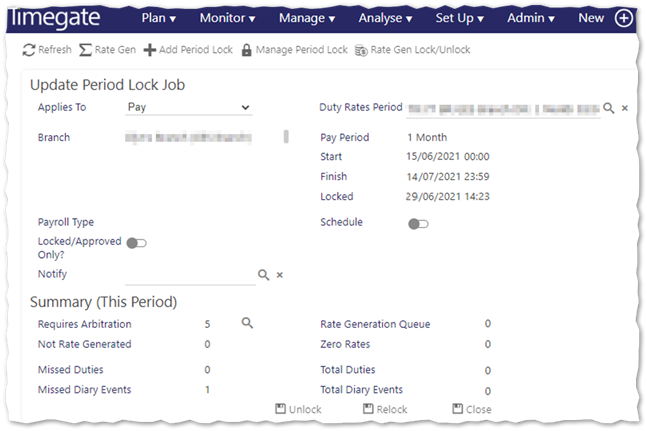
Now, relock. To relock from the Manage | Queues screen:
-
Select Manage Period Lock to open the Update Period Lock Job screen
-
Select the existing period from Duty Rates Period. Select the magnifying glass. A new Select Period dialog box will be displayed. Choose your period from those displayed or by using the search function. This task is made simpler if you made a note of the Transaction Number previously as this is easy to search with/see on the screen
-
Select Relock
Select your pay report from those available in Analyze | Reports. Remember to report by Transaction when you are given the option. Configure the report as required and then select Run Report.
Finally, it is important to check that the output from the report is as you expected. If any of your payroll run data looks erroneous it will need checking in Timegate Web. You should check that the various totals for the period look appropriate. Fix any problems as required.
Week 4 (Period end) Flow chart

Week 4 (Period end) Step-by-step supporting notes
You must make sure all arbitrations and failed duties are cleared down for the period. This can be checked through the Arbitrations and Failed Duty tiles. The Duty Filter is a great place to search for arbitrations and failed duties. Any duties that have not been arbitrated will not be included in the pay and bill phase. They will not appear on Payroll reports for the phase.
Once all duties have been arbitrated, you should run the Rate Generation Check Report (04-01-05) to identify if any duties have either not been rate generated or have a zero value. If the report returns any such duties, these need to be corrected before rate generation is re-run.
To run your report from Analyze | Reports:
• Select Payroll Reports (5)
• Select General (8)
• Select Prior Period Adjustments (73). The report will now load
• Select how you would like to group your information
• Select Next
• Select Transaction
• Select the Transaction from the drop-down list (use the Transaction Number that you noted in Step 3 to locate the Period details)
• Select Next
• If you wish to filter the report, select your criteria using the field names and the boolean operators
• Select Run Report
Check that the report contains the adjustment information you expected
Now, relock. The following screen shot shows the Manage | Queues screen from where the relock is set up:
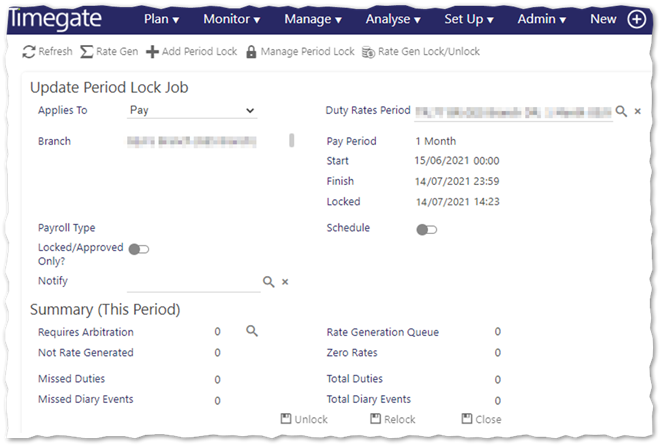
To relock from the Manage | Queues screen:
-
Select Manage Period Lock to open the Update Period Lock Job screen
-
Select the existing period from Duty Rates Period. Select the magnifying glass. A new Select Period dialog box will be displayed. Choose your period from those displayed or by using the search function. This task is made simpler if you made a note of the Transaction Number previously as this is easy to search with/see on the screen
-
Select Relock
Select your pay report from those available in Analyze | Reports. Remember to report by Transaction when you are given the option. Configure the report as required and then select Run Report. Check that the output from the report is as you expected. If any of your payroll run data looks erroneous it will need checking in Timegate Web. You should check that the various totals for the period look appropriate.
Run the Prior Period Adjustments report again from Analyze | Reports:
-
Select Payroll Reports (5)
-
Select General (8)
-
Select Prior Period Adjustments (73). The report will now load
-
Select how you would like to group your information
-
Select Next
-
Select Transaction
-
Select the Transaction from the drop-down list (use the Transaction Number that you noted in Step 3 to locate the Period details)
-
Select Next
-
If you wish to filter the report, select your criteria using the field names and the boolean operators
-
Select Run Report
Re-check that the output is as you expected and correct any errors as necessary. Once corrected, move onto the final step of this process.
When you are happy that all of the duty information within your period is correct, then (and only then) are you ready to close the period. Upon closing the period, Timegate Web flags all duties and diary events in the period as being closed. At this point, you are not able to edit the duties or diary events in the closed period. Any prior period adjustments will be included in your current transaction via a look back.
To close the period, from the Manage | Queues screen:
-
Select Manage Period Lock to open the Update Period Lock Job screen
-
Select the existing period from Duty Rates Period. Select the magnifying glass. A new Select Period dialog box will be displayed. Choose your period from those displayed or by using the search function. This task is made simpler if you made a note of the Transaction Number previously as this is easy to search with/see on the screen,
-
Select Close to add in any outstanding transactions for the period. You will be prompted to confirm that you wish to close the period. Remember, only confirm if you are sure that everything is correct and there are no outstanding issues. You cannot undo this action
Lock and Close
Do not use the Lock and Close button. It is always better to Lock your period, check for errors, correct, Relock and then Close. You cannot undo this action.
Unlock
The Unlock button has been carried over from previous versions of Timegate Web. It is redundant in the processes above as you use the relock button without needing to unlock items. Where this button is useful, however, is when you wish to get rid of a transaction. For example, you have a period locked that is erroneous and you wish to discard it. By unlocking the period, you are removing the transaction as nothing is locked. The next time that you lock an item it will inherit the transaction number from the discarded, unlocked period.