Set up: Users (on Premise)
How to get there: Set Up | Users
This page of the system enables system users with the appropriate access rights the ability to search for users and amend their details. Additionally, the page can be used to delete users and configure the Site Role Employee Access for individual users. be aware that on self-hosted systems this screen has more functionality than on FM Cloud based systems. When Timegate Web is hosted upon the FM Cloud, users are managed from outside of the Web Client (see next section that details how you manage users in the FM Cloud).
Screen Layout and Fields
Self-Hosted

FM Cloud

|
(All Branches) |
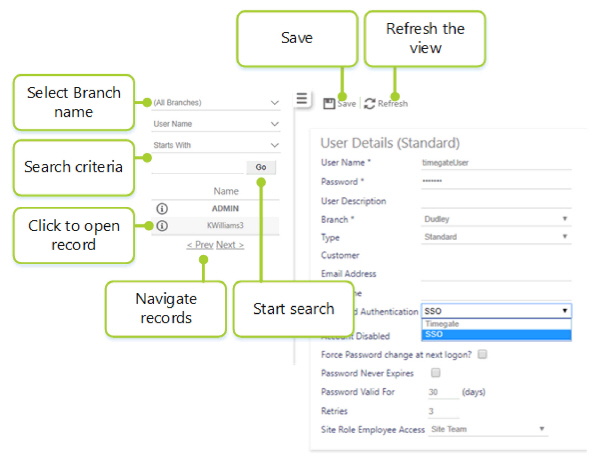
Select the name of the Branch that is to be searched from the drop-down list |
|
User Name |
Name of user |
|
Password |
Password associated with the User ID |
|
Starts With/Ends With/Contains/Exact Phrase |
Select how to search i.e. for Users who have a name that starts with the value in the free form search text |
|
Free Form Search |
Enter in the text to search for the User |
|
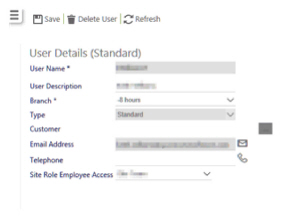
User Name |
Name of the user |
|
Description |
Description of the specific user |
|
Branch |
The branch that the user is allocated to |
|
Type |
Type of user |
|
Customer |
Details of the customer that the user is aligned to |
|
Email Address |
Contact email address for the user. Select the email icon next to the address to launch your email client to send an email to that address |
|
Telephone |
Enter a telephone number for the individual employee in this space. If Click-To-Call has been enabled, the telephone icon will appear next to the Telephone number. Select to launch the dialler and caller the number |
|
Password Authentication |
User accounts can be individually configured to use either Timegate Web Authentication or SSO Authentication (also referred to as AD or Active Directory Integration). This feature is only available when AD Integration is enabled and Apply Single Sign-On? is disabled If the system AD Integration is not configured correctly, this new setting will be disabled and will have no effect on the login process If a customer does not have Active Directory Integration enabled then the Login process will remain unchanged If Active Directory Integration is enabled the default value for Password Authentication will be set to SSO, otherwise it will default to Timegate Web If a customer does have Active Directory Integration enabled and Apply Single Sign-On? disabled, then the login process will check the new Password If it is set to SSO, then the user will login with their Active Directory Username and Password as normal If it is set to Timegate Web, then the User will login with their Timegate Web Username |
|
Account Disabled |
If selected the account will be disabled |
|
Force Password Change at Next Logon? |
If selected, user will have to change their password at next logon |
|
Password Never Expires |
Password is always valid and does not need to be replaced after the amount of days shown in the Password Valid For field |
|
Password Valid For |
Time between password resets - i.e. 30 days - the password needs resetting after 30 days |
|
Retries |
Number of retries before the password locks |
|
Site Role |
A change was made in the system several releases ago that changed the behavior of a standard web user when a data role was assigned. The change meant that the user would only see employees if they were in the site teams table for the sites which they had access to. This has caused issues for certain customers who have requested that the previous behavior be restored. This field has been put in this table to restore the missing functionality. This drop-down list contains two values:
When this value is left as “Site Team”, the behavior, when displaying employee lists will be as intended since the change. Therefore, when a standard web user has a site role (or multiple site roles) assigned, then that user will only see employees, where they are in the site team table for any of the sites. When this drop-down field is set to “Branch”, then the behavior will revert back to the way the system used to work. Therefore, when a standard web user has a site role (or multiple site roles) assigned, then that user will be able to see all employees belonging to the branches that are assigned to them, regardless of whether the employee appears in a site team of not |
Actions
|
Go |
Click to commence search using criteria defined above |
|
Information Icon |
Click to view the record of the User that the Information Icon is located next to |
|
< Prev |
Navigate to previous screen of User records (where applicable) |
|
Next > |
Navigate to next screen of User records (where applicable) |
|
Save |
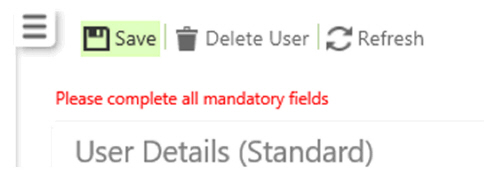
Click save to update the User’s details. If mandatory fields have not been completed, the following error message will be displayed onscreen: 
|
|
Refresh |
Click to cancel any changes and revert to original state before any edits had been made to the User’s details |
|
Delete User |
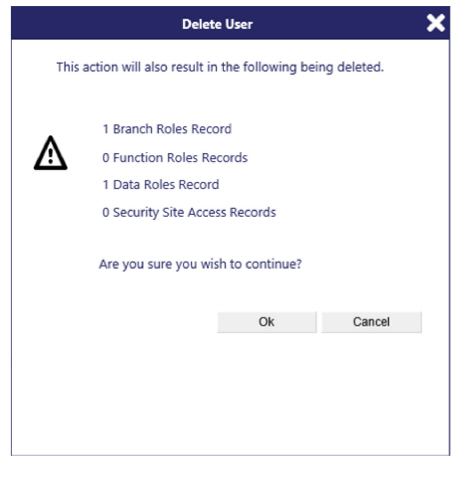
The Delete User option is shown on screen once changes have been made to a record. It is shown in the Save error message screenshot above. To delete a user, click on the Delete User button. The following screen will be shown highlighting the implications of the delete action: 
If the user wishes to proceed and delete the user record, they should click on the OK button, otherwise they should click on Cancel |