Setup: Sites - General
How to get there: Set Up | Sites | General Tab
This is used to set up the base information about the location where the services will be carried out for a Customers. Where the system is set up to not use Site Groups, the Branch and the Customer will be available for selection.
refer to your system administrator for your specific configuration. What a company has licensed and configured determines what tabs are displayed on Site screens e.g. Locations and Services tabs are only available to those companies that license Service Delivery.
The key areas for this are shown and detailed below:
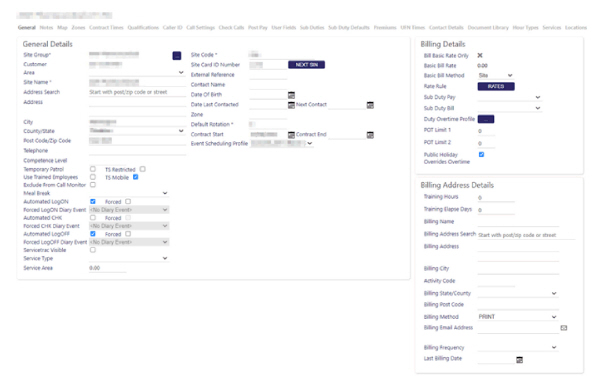
Screen Layout and Fields
|
Site Group* (Mandatory) |
Select the Site Group that the site belongs to, by clicking the [...] Select button to the right of the Site Group field. A pop-up window will appear that enables the user to search for a Site Group or select the Site Group required. 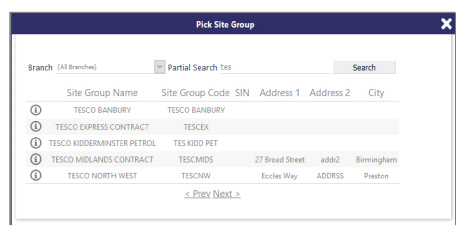
Hovering over the row will highlight the Site Group. Click the Information Icon to the left of the Site Group Name to select it. The pop-up window will close and the selected Site Group will appear in the General Tab. For more information on the setting up of a Site Group, see Set Up | Site Groups. Where the system is setup to not use Site Groups, the Branch and the Customer will be available for selection. refer to your system administrator for your specific configuration |
|
Customer |
Displays the Customer that is assigned to a Site Group. Where the system is setup to not use Site Groups, the Branch and the Customer will be available for selection. The system administrator will be able to detail the specifics of the configuration of a given company’s system implementation |
|
Area |
Used for the classification of the site to a certain area. A drop-down list is available to select the area required. see Admin | General | General Maintenance | Areas for more information |
|
Site Name* (Mandatory) |
Name by which the internal operations people will know the site as. This will appear throughout the system and needs to be meaningful |
|
Address Search |
Option for searching for addresses |
|
Address |
Address details |
|
City |
City |
|
County/State |
Country. A drop-down list is available of Counties. see Admin | General | General Maintenance | Counties for more information |
|
Postcode/Zip Code |
Post or Zip Code |
|
Telephone |
Telephone number for the site where an employee can be contacted. Additional information can be set in Setup | Sites | Site Contact Details Tab |
|
Competence Level |
This must be used carefully as it may contravene localised HR policies. It is used to rate the employee that are required to work on the site from 1 (being the lowest) to 9 (being the highest) in terms of presentation and competence. An employee may also have their competence set. A system Duty Check is available that will compare the employee and site and advise when an employee does not have the correct rating |
|
Temporary Patrol |
Will indicate that the site is a temporary site and not one that has a fixed contract. For information only |
|
Use Trained Employees |
Indicates whether an employee needs specific training to work upon the site. If an employee is selected to work on the site and they do not have the necessary training, an error message will be displayed. The process for adding an employee to a duty where they do not have training is to add the site to the employees Trained (and Banned) Tab, then allocate them to the duty. see Setup | Employees | Sites Trained and Banned Tab for more information |
|
Exclude From Call Monitor |
When set, the site will be excluded from displaying on the Call Monitor, as the duty calls (ON, CHK, and OFF) will not be created and therefore not expected. This is useful if you do not intend for this site to use T&A devices for proof of presence. If you would prefer for Timegate to automatically take calls at the expected time, then you can utilise the Automated LogON/CHK/OFF feature on the General tab of the site card so that the duties can still be rate generated. see Monitor | Calls for more information |
|
Meal Break |
Where an employee may work a variety of duties per day, the amount of Meal Break time deducted may also vary. Selecting a Meal Break Profile will ensure that the correct amount of time is deducted for the employee when working on this site. see the Desktop Client Maintenance | General Settings | Meal Breaks for |
|
Automated LogON |
When set, the Duties ON call will be taken automatically once the Post Time has been reached. For Example, if the site has an ON Post Window of 10 minutes, then an 0600 ON Call will be automatically taken 10 minutes after the Duty was meant to start. see Setup | Sites | Call Settings Tab for more information |
|
Forced |
Where the Automated LogON is set, an automatic Diary Event can be created against the employee noting a failure to Log On. If set, a Diary Event defined below will be created |
|
Forced LogON Diary Event |
Where the Forced flag is set, a drop-down list of Diary Events are available for selection. These are Diary Events that will have their System Diary Event Type not set. see Maintenance | General Settings | General | Diary Events for more information |
|
Automated LogCHK |
When set, the Duties CHK calls will be taken automatically once the Post Time has been reached. For example, if the site has an CHK Post Window of 15 minutes, then a 0800 CHK Call will be automatically taken 15 minutes after the Call was due. see Set Up | Sites | Call Settings Tab for more information |
|
Forced |
Where the Automated CHK is set, an automatic Diary Event can be created against the employee noting a failure to make a check call. If set, a Diary Event defined below will |
|
Forced LogCHK Diary Event |
Where the Forced flag is set, a drop-down list of Diary Events are available for selection. These are Diary Events will have their System Diary Event Type not set. see Maintenance | General Settings | General | Diary Events for more information |
|
Automated LogOFF |
When set, the Duties OFF call will be taken automatically once the Post Time has been reached. For Example, if the site has an OFF Post Window of 30 minutes, then a 1400 Duty OFF Call will be automatically taken 30 minutes after the Duty was meant to finish. see Set Up | Sites | Call Settings Tab for more information |
|
Forced |
Where the Automated LogOFF is set, an automatic Diary Event can be created against the employee noting a failure to Log Off. if set, a Diary Event defined below will be created |
|
Forced LogOFF Diary Event |
Where the Forced flag is set, a drop-down list of Diary Events are available for selection. These are Diary Events will have their System Diary Event Type not set. see Maintenance | General Settings | General | Diary Events for more information |
|
ServiceTrac Visible |
When set, it will indicate to the Timegate to ServiceTrac integration that the site is available within ServiceTrac |
|
Service Type |
This is used to compare similarly sized or types of sites with others to identify why some are costing more to service for others. A drop-down list is available of Service Types. see Maintenance | General Settings | General | Service Types for more information |
|
Service Area |
This is the Service Area associated with the Service Type. It is important to define up front what the Unit of Measure is for each Service Type in order to successfully compare sites. Report 16-04-02 Site Productivity by Service Type will show this comparison |
|
Site Code |
A Site Code is used to make a link between the system and an external Payroll or Billing application. It is shown on most report extracts and filters |
|
Site Card ID Number |
This is a very important field for the T&A system and is commonly known as the Site SIN. It is a unique numeric code that the employee uses when they are booking on and off a duty for a site. The SIN number is a fixed length which is set within the system settings. When saving a site, a check is carried out to ensure that the SIN is unique and will warn if it is in use: 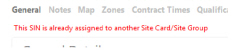
A system setting is available that will either retain or remove a SIN number from any site that is deleted from the system. see Admin | System | Scheduling for more information |
|
Next SIN Button |
Clicking the Next SIN button will allocate the next available unused SIN to the Site Card. To generate a new SIN where one is already allocated, clear the Site SIN field and click the Next SIN button |
|
External Reference |
Normally used to hold the customers reference for the site. For example, it could be a |
|
Contact Name |
Name of the client contact on site. Additional information can be configured in Set Up | Sites | Site Contact Details Tab |
|
Date of Birth |
Client contact Date of Birth for information |
|
Date Last Contacted |
Date the site was last contacted. This may be used to track site visits |
|
Next Contact |
Date the site is to be contacted next. This may be used to track site visits |
|
Zone |
Used to categorise the site to indicate the area or manager that they are assigned to. As this is a free format field, an alternative solution would be to use the Sites General Tab Area Field or the Sites Contact Details Tab Escalation Groups to store this information. This is used in many report filters |
|
Default Rotation (Mandatory) |
The standard weeks in rotation that the site operates. Set this to 1 for all new sites. The system will update this when the Sites | Contracted Times Tab is updated |
|
Contract Start (ddd) (Mandatory) |
The week commencing date that the site will become operational. A date selector is available. The date selected must be on the start day of week defined on the Sites Branch or in the System Settings. see Setup | Branches | Rate Gen Settings Tab or Admin | System | Rate Generation for more information |
|
Contract End |
The date that the last duty will be performed on the site (unless the duty starts on this day and spans midnight, into the following day - see note below). When this date is selected, all duties will be removed from the site, starting at the day after the entered Contract End date onwards. Shifts on the contract end date will not be deleted, it will be those that commence on days thereafter that will. Note: The Contract End should be set to the day after the finish date time of the last duty on the site. For example, if the last duty worked was on the 6th July at 19:00 to 7th July 07:00 then the Contract End should be set to the 8th July. The system will always assume 00:00 on for the Contract End so setting it to the 7th July will remove their last duty as it overlaps the Contract End of 7th July at 00:00 |
|
Event Scheduling Profile |
A drop-down selection is available to select the Event Scheduling Profile assigned to the site. This is used where the site is scheduled as part of a larger Event mobilisation. see Maintenance | General Settings | General | Event Scheduling Profiles for more information |
General Details
|
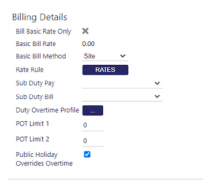
Bill Basic Rate Only |
Set this if the billing rate for all duties carried out on the site are to be billed at the same rate, irrespective of the Pay Level assigned to them |
|
Basic Bill Rate |
When the Bill Basic Rate Only is set, enter the bill rate here. |
|
Basic Bill Method |
Select a Basic Bill Method, either at Site or System level. If Site is selected, Rate Rule is shown along with a RATES button - this is explained in more detail below If System is selected, Rate Card Rule is shown along with a [...] button - this is explained in more detail below |
|
Rate Rule |
Select the required Rate Rule, by selecting RATES. A window called Rate Rules will open, listing all bill rates by Effective Date. This is shown below: 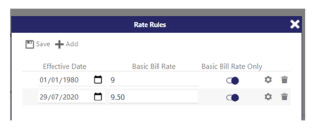
Additional Effective Dates can be added here (by selecting Add), and existing ones can be removed (by selecting the trash can/rubbish bin). To add extra rules, select Add and complete the new row. To access the multi-rates for each effective date, select the cog icon on the relevant row. The following will be shown: 
From here, rates can be added and removed. additionally, an optional Employee, Day of the week, Pay Level, Method and Rate can be applied: Employee - select an Employee using the pop up list accessed when the magnifying glass is pressed. If this is left blank, the rate will apply to all employees Pay Level - selected from the pop up window (the values listed are configured in Set Up | Site | Post Pay) Day - Select the day of the week that the rate is to be applied to. The selection is All by default. Alternatively, Monday through Sunday can be individually selected as too can Weekend, Weekday or Public Holiday |
| Method |
The Method can be:
After changes have been made/additions made, select Save. There is no limit to the number of rate rows that can be maintained. Once all changes have been made, click save and you will be taken to the effective date window. You may notice a small monetary symbol on the row between the cog and trash can/rubbish bin. This indicates that there are multi-rates beneath that effective date. To delete an entry select the trash can/rubbish bin |
|
Rate Card Rule |
Select the required Rate Card Rule, by selecting [...]. A window called Select Rate card will open, listing all active Rate Cards that are associated to the specific Branch where the site resides. An example of this is shown below: 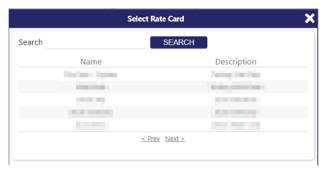
Select the card of choice. the system will then return to the Site | General page and update the Rate Card Rule field with your selection. To remove the selection, simply select X. For more information about setting up Rate Card Rules, see Admin | Finance | Rate Card Rule page |
|
Sub Duty Pay |
Defines how the employee will be paid should a Sub Duty be defined within a Duty. See the Sub Duties Section below for more information |
|
Sub Duty Bill |
Defines how the site will be billed should a Sub Duty be defined within a Duty. See the Sub Duties Section below for more information |
|
Duty Overtime Profile |
Select a Duty Overtime Profile for the site. Rate Generation uses the selected profile to calculate the bill figure for the Employee duties. This will take precedence over/override any duty overtime profile set against the employee (regardless of the new “Pay/Bill” drop-down field). |
|
POT Limit 1 |
Period Over Time Limit 1 - The number of hours that are worked in the Period on the site before the Employee is paid at the Period Overtime 1 Hours Type. POT Limit 1 along with POT Limit 2 are both optional number fields that allow values of up to 999.99 to be entered. Validation is in place so that the POT Limit limit cannot have a greater value than the Period Overtime 2 limit. Note: Period overtime thresholds set against a site card will be used instead of those set at an employee level for the purpose of billing. When period overtime values are set against the site, then only the hours for that site will be tracked for the purpose of period overtime. This could mean that when an employee works across multiple sites in a single pay period, some sites may attract period overtime and others may not |
|
POT Limit 2 |
Number of hours that are worked in the Period before the Employee is paid at the Period Overtime 2 Hours Type. Note: •Period overtime thresholds set against a site card will be used instead of those set at an employee level for the purpose of billing. When period overtime values are set against the site, then only the hours for that site will be tracked for the purpose of period overtime. This could mean that when an employee works across multiple sites in a single pay period, some sites may attract period overtime and others may not |
|
Public Holiday Overrides Overtime |
The Public Holiday Overrides Overtime option enables your business to choose whether Timegate does or does not bill to the customer the public holiday rate or the overtime rate. By default, in Timegate if a duty spans a normal day, into a public holiday, the overtime rate takes preference when billing, instead of the holiday rate. This option enables this to be changed so that the public holiday rate takes preference over the overtime rate. By default this box is not unchecked When checked, Rate Generation will bill holiday instead of overtime when a duty moves from overtime to holiday. When unchecked, Rate Generation will bill overtime instead of holiday when the duty moves from to the public holiday. By default this setting is switched off, so holiday rates do not override overtime. |
Billing Details
|
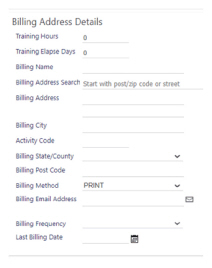
Training hours |
The number of hours that an employee must work before they are deemed to be trained on the site. The Duties that the employee will need to work must have an Hours Type that is set to be a Training Hours Type Site |
|
Training Elapse Days |
The number of days that the employee over which the total Training Hours above should be worked. Once the employee has worked these hours, the site is automatically added to their Sites Trained Tab |
|
Billing Name |
Name to appear on Invoices and Credits |
|
Billing Address Search |
Option for searching for address for billing address |
|
Billing Address |
Address to appear on Invoices and Credits |
|
Billing City |
City to appear on Invoices and Credits |
|
Activity Code |
A free-format code used by some customers. This will be displayed when information is exported from the system into their billing software |
|
Billing State/County |
County to appear on Invoices and Credits. A drop-down list is available of Counties. see Admin | General| General Maintenance | Counties for more information |
|
Billing Postcode |
Postcode to appear on Invoices and Credits |
|
Billing Method |
Method that the Invoices and Credits are sent to the Customer. A drop-down list is available of the Billing Methods:
see the Desktop Client Maintenance | Invoice Maintenance| Invoice Settings for more information |
|
Billing Email Address |
Email address that the documents will be sent to. Select the email icon next to the address to launch your email client to send an email to that address |
|
Billing Frequency |
Alternate Billing Frequency to use instead of the Site Group Level. A drop-down list is available of the Billing Frequencies. see the Desktop Client Maintenance | Invoice Maintenance| Billing Frequencies for more information |
|
Last Billing Date |
Up to and including the date that the last Bill covered. A date selector is available. Setting this date will exclude any duties prior to and including this date |
Billing Address Details
The screen is controlled by the Timegate Security Function Role assigned to the user.
Screen Actions
|
Save |
Click to save site changes |
|
Delete Site |
Click to delete the site from the system. A confirmation pop-up will be shown confirming the deletion which will remove all duties for the site from the system |
|
Refresh |
Click to revert to the unsaved state |
|
Site View |
Click to open the site View screen for the site |
|
View Branch |
Click to open the Branch screen for the site |
|
View Customer |
Click to open the Customer screen for the site |
|
View Site Group |
Click to open the Site Group screen for the site |
|
View Site Budget |
Click to open the Site Budget screen for the site |
|
Site Events |
Click to open the Events Search for the site |
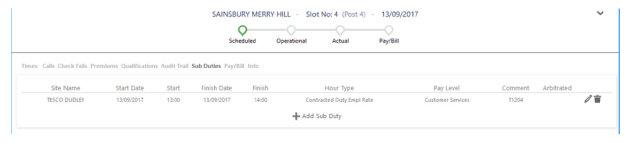
Sub Duties
Sub Duties are where a Main Duty may be split into several work items that may be paid at another rate or be performed for a different site.
For example, a normal (main) Duty may be for cleaning a Shopping Centre Store covering 8 hours a day. On a particular day, the employee worked 1 hour for another tenant of the center as a Customer Service person.
Adding a Sub Duty within the Main Duty for 1 Hour for the tenant, will tell the system to carry out more processing.
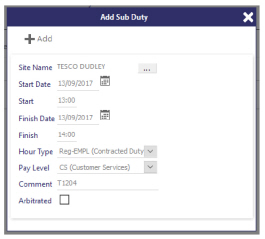
Based upon the Pay and Bill Sub Duty settings assigned to the site, Rate Generation will do the following:Main Duty Only - Will pay the employee or bill the site for the 8 hours to Sainsburys as a cleaner
-
Sub Duty Only - Will pay the employee or bill the site for Tesco as a customer services person
-
Main and Sub Duty - Will the employee or bill the site for Sainsurys as a cleaner and 1 hour for Tesco as a customer services person