Setup: Sites - Document Library
How to get there: Set Up | Sites | Document Library
From this page, the user can, search for, upload and categorise files for sharing within the selected site. The user can either upload files one-by-one. Alternatively, they can upload multiple documents. Documents are categorised based on those categories defined in Document Categories (Admin | General | Site Settings | Shared Document Category)
Initial Shared Document screen
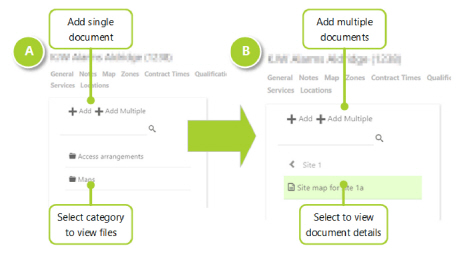
When this page is loaded, there will be limited visible content within it. If sub-categories have been set up, the parent category will show. If files have already been uploaded into categories, those categories will be shown. An example is as shown below. In screenshot A, two categories exist. In screenshot B, the Maps Category has been selected, showing the document called Site Map for Site 1a that has been uploaded. To view the specific document details (not it’s contents), the user should select the file:
Screen Layout, Fields and Actions
|
Add |
Add a single document |
|
Add Multiple |
Select and add multiple documents to the site |
|
Folder |
Select a folder to see the category’s contents |
|
File-name |
Select a file-name to see the document’s details |
Selecting a file
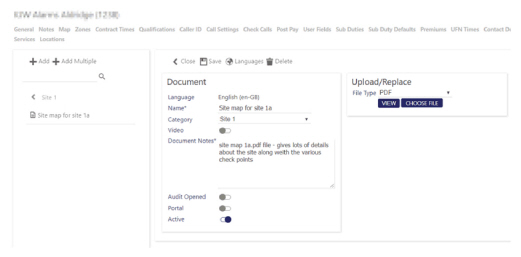
When an individual file is selected, it’s document details are shown - a screen shot of this is shown below:
Screen Layout, Fields and Actions
Share Documents |
|
|
Add |
Add a single document |
|
Add Multiple |
Select and add multiple documents |
|
Folder |
Select a folder to see the category’s contents |
|
File-name |
Select a file-name to see the document’s details |
|
< Folder |
Step back one level within the folder structure |
Document |
|
|
Close |
Close the open document details |
|
Save |
Save any changes to the document details |
|
Languages |
Select to switch between multiple languages - there may be different versions available for different languages |
|
Delete |
Delete the document details (and document) |
|
Language |
Label the document with the appropriate language |
|
Show Audit (Displayed when Audit Opened is selected - see below) |
When selected, the following dialog box is loaded: 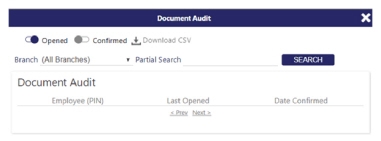
Details of those employees that have opened the document can be seen. Employees can be searched for who have confirmed opening the document too (as applicable). Additionally, the user has the opportunity to select across branches to see who has read their documents. Finally of note, there is the option to download a CSV copy fo the data for use/analysis in third party systems such as Excel (Download CSV). |
|
Name |
Name of the document - this can be entered by the user or is automatically created |
|
Category |
Select a category for the document (these have previously been defined in Admin | General | Site Settings | Shared Document Category) |
|
Notes |
Any notes associated with the document |
|
Audit Opened |
Select to track when someone has opened the document - enables the Show Audit menu option (see above) when saved |
|
Audit Confirmation (shown when Audit Open is selected) |
Select to prompt the end user in the Employee App to give a confirm that they have opened/read the document |
|
Confirmation Text (Shown when Audit Confirmation is selected) |
The text that will be displayed before the end user in the Employee App confirms that they have opened the document when Audit Confirmation is enabled |
|
Portal |
Select to show the document on the employee portal |
|
Active |
Select if the document is going to be available to use |
Upload/Replace |
|
|
File Type |
Select the File Type from those available in the drop down menu |
|
View |
Select to view the existing file that has been uploaded |
|
Choose File |
Select to upload a replacement file |
Adding a file
When Add is selected, the following screen is loaded:
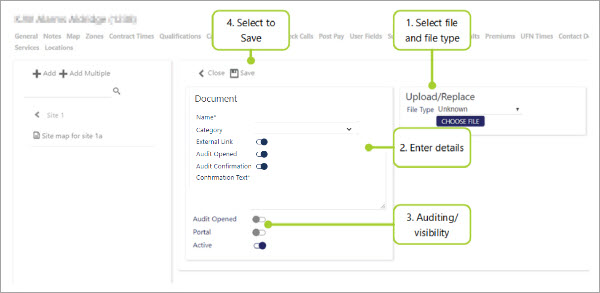
Select Choose File to upload a file using the computer operating system’s file manager. Additionally, from the drop-down list, select a File Type
Enter the Name (if a single file was selected, this will default to the name of the file), select a Category and add any Document Notes as appropriate
Determine if auditing should be enabled to show when the file has been opened (Audit Opened), select whether the file will be available for viewing on the Employee Portal (Portal) and select whether the document is to be Active (i.e. visible to users) at this point in time
Select Save to save changes and update
Auditing documents
Configuration
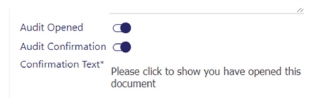
Documents can be audited by selecting Audit Opened
If the user wishes to gain a confirmation from their employees that they have opened/read the document, they should select Audit Confirmation. Having selected Audit Confirmation, a Confirmation Text field is shown. This field should be completed with the text that is to be displayed at the point of employee confirmation (within the Employee App, before the document is loaded onto the users screen)
Upon selecting and saving Audit Opened (along with Audit Confirmation and Confirmation Text as applicable), Show Audit is displayed as a menu item within the document area
Viewing Audit information
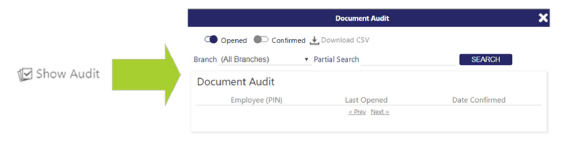
Select the menu item Show Audit
From the Show Audit screen the user can display those that have opened, and confirmed reading the document (as applicable). They can search across branches for these results. The results can also be exported into a CSV by selecting Download CSV
Add Multiple files
When Add Multiple is selected, the following screen is loaded:
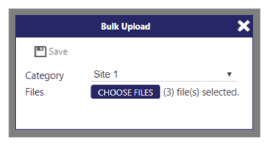
Select the Category
Select Choose File to upload a file using the computer operating system’s file manager
Select Save
Once completed, for each file, the user must now select each file from the shared documents category view to open it’s details. The various settings then need to be entered as detailed in Adding a file above:
Review the Name (if a single file was selected, this will default to the name of the file), the File Type and add any Notes as appropriate
Determine if auditing should be enabled to show when the file has been opened (Audit Opened), select whether the file will be available for viewing on the Employee Portal (Portal) and select whether the document is to be Active (i.e. visible to users) at this point in time
Select Save to save changes