Setup: Sites - Contract Times (Manual Entry)
The following video demonstrates how to manually set up Contract Times and how to assign employees to them.
The following video demonstrates how to set up your contract times manually and assign employees to them.
How to get there: Set Up | Sites | Contract Times Tab
Adding a New Contract
This is used to create a new Effective Date in which the new Contracted Times Schedule can be defined. The Effective Date should always be on the start day of week as defined on the System or Branch Rate Generation Settings.
see Set Up | Branches | Rate Generation Settings Tab or Admin | System | Rate Generation for more information.
If the Contract is to start or finish mid-week, the Start Date and Finish Date can be entered accordingly. This will ensure that Auto Scheduled Duties are only created between these dates.
If a Finish Date is not set, then the Schedule is auto loaded until a new Effective Date is reached, or the Site Contract End Date is reached.
If you are making major changes to the Contract Times, remember to set the Auto Scheduling Profile to None so that the system will not make your changes live.
If you decide not to do this, the system will ask if you wish to un-RotaLoad the effected periods, but exclude duties that have started to be worked.
Once complete, the system will re-RotaLoad the Site Automatically.
Screen Layout and Fields
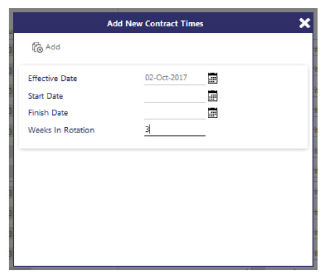
A pop-up window will allow the following information to be set.
|
Effective Date |
Week Commencing Date for the Schedule. The date needs to be greater than the last effective date entered for the Site |
|
Start Date |
Date to start scheduling duties on |
|
Finish Date |
Date to finish scheduling duties on |
|
Weeks In Rotation |
Number of Weeks In Rotation after which all Employees on the Site will revert to week 1 |
|
Add Button |
Clicking Add will validate that the Effective Date entered is correct and will advise accordingly if the Effective Date entered is less than or Less Than Or Equal To The Sites Previous Contract Effective Date which is invalid |
Updating a Blank Contract Effective Date
Once an Effective Date has been added, the Effective Date will be shown on the Contract Times Tab. If the Effective Date is not shown select it from the Effective Date drop-down list.

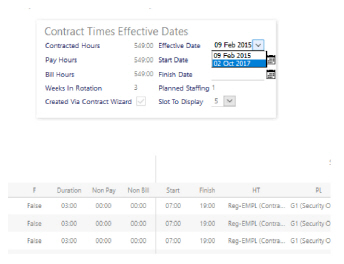
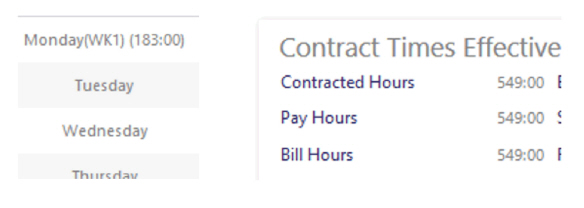
Contract Times Effective Dates
This Section will not only allow the selection of an Schedule Effective Date, but will also show additional information about the contract.
|
Effective Date |
A drop-down list for the Effective Date of the Site |
|
Start Date |
Date to start scheduling duties on |
|
Finish Date |
Date to finish scheduling duties on |
|
Planned Staffing |
Number of employees that are working on the Site. This is used in Report 01-04-08 Site Contract Planning |
|
Slot to Display |
Adjusts the number of Slot columns shown on the screen. A set of Navigation Icons are available to page left and right to the next batch of Slots 
|
|
Weeks In Rotation |
Number of Weeks In Rotation after which all employees on the Site will revert to week 1 |
|
Contracted Hours |
Total number of hours for all weeks |
|
Pay Hours |
Total Pay Hours for all weeks less Non Pay Hours |
|
Bill Hours |
Total Bill Hours for all weeks less Non Bill Hours |
|
Weeks In Rotation |
Number of Weeks in Rotation |
|
Created Via Contracted Wizard |
Checked when the Effective Date has been created using the Contracted Wizard. All changes must be made through the Contract Wizard. If you wish to manually maintain an Effective Date, copy a Contract Wizard Effective Date to a new Effective Date that starts on Week 1 Day 1 of the selected Effective Date. ie if 3 weeks in rotation, the New Effective Date needs to be in ranges of 3 weeks to maintain the week number count |
Populating a Blank Schedule
When a new Effective Date is creates, a blank Schedule will then be shown ready for the duties to be setup.

The Week Number and the Day of the Week will be shown to the left, and the Posts (slots) per day which shown across the top. The number of Slot to show on the screen can be selected from the Slot to Display drop-down below
the Effective Date.
A Slot is normally reflects an Employee who would work a Pattern of Duties listed in a column, or a set of Employees grouped together by the type of work and ordered (left to right) by the Start Time of the Day.
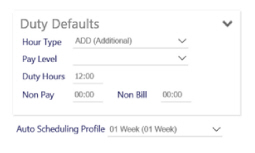
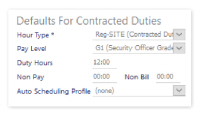
Duty Defaults
In this example, we are going to define the duties that will be carried out by the cleaner. To aid in the setup of these, the Duty Defaults section will be used. When a duty start time is entered on this screen, these defaults are used to configure the remaining information on the duty.
|
Hour Type |
Hour Type to be assigned to the Duty. This is normally set to be a contracted rather than additional Hour Type. see Admin | Finance | General Maintenance | Hour Types for more information |
|
Pay Level |
Pay Level that is used to obtain the rate of Pay or Bill for the Duty. If left blank, Duties will use the Pay Level assigned to the employee. The Duty will be marked with an (E) on Site View and Site Teams where this is the case. see Admin | Finance | General Maintenance | Pay Levels for more information |
|
Duty Hours |
Duration of the Duty in hours and minutes (HH:mm) |
|
Non Pay |
Number of Hours and Minutes that will be deducted from the Duty Hours above when paying the Employee (HH:mm) |
|
Non Bill |
Number of Hours and Minutes that will be deducted from the Duty Hours above when Billing the Site (HH:mm) |
|
Auto Scheduling Profile |
Set to None during the setup or change of Contract Times to prevent invalid duties being created for the Site. When setup and signed off by the business, the Auto Schedule Profile can be selected for the Site and the system will Auto Schedule the Duties into the see Set Up | General | General Maintenance | Auto Scheduling Profiles for |
Adding a Contracted Duty to Contract Times Schedule
With the Defaults for Contracted Duties set up, we can add the first duty for Cleaning which is Monday at 0600. Click in the Start Time Cell for Week 1 Monday, Slot 1 and enter 0600 (the system will default the colon):
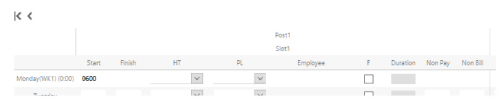
Pressing enter will do the following using the Defaults:
-
Add the colon in for the start time
-
Set the Finish Time to be 3 hours on from the start time
-
Set the Hour Type, Pay Level, Duration, Non Pay and Non Bill information from the defaults

-
Follow the same process for Tuesday to Friday on Week 1 and Monday to Friday on the remaining weeks will complete the Cleaning requirements for the Site.
Alternatively, copy and paste the start time to the remaining Start Times by doing the following:
-
Treble clicking on the Start Time will highlight the time
-
Right Click and Copy (or Ctrl-C) to copy the Start Time
-
Click in the next day to be setup and Right Click Pasting the Start Time
-
The remaining information for the day will be shown when clicking into the next day or by pressing enter
Clicking Save will calculate the Hours that have been setup so far for the contract and display the totals for all weeks at the top of the screen and the total each week on the start day of week in brackets to the left:
If your Effective Date is in the future, reselect the Effective Date from the drop-down list.
If the requirement was that the 3 hour cleaning can take place any time between 06:00 and 12:00, then the duty will be setup as a Flexible Shift:

This time, the Start and Finish Times are the period by which the work needs to be completed in, and by checking the F column (meaning Flexible), the Duration is editable and set to the Duration of the Duty.
This process is repeated for the remaining contractual requirements for the Site:
The Defaults are now set for Security Officers and 12 Hour Duties.
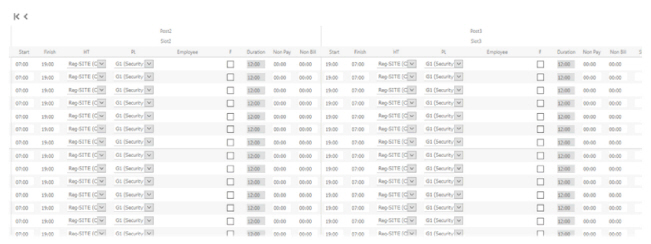
As the requirement is for 24-hour cover, slot 2 is used for the day shift and slot 3 is used for the night shift but all work 7 days per week.
Assigning Core Employees to the Contracted Times Schedule
Once the Schedule has been created, the core team of Employees that will work on the Site should be assigned. Failure to do this will result in the system creating Open Post Duties in the Live Schedule with no Employees assigned.
This may be the Operational requirement as the Site may be difficult to assign a fixed team, however this is normally
an exception.
Where a team of Employees have been assigned, and those Employees are not available to work in the Live Schedule due to Absence or Re-Assignment, the system will create an Open Post for the Employee. This is ideal as you will have a log of where they should have worked, and why they haven’t worked using the Duty Audit.
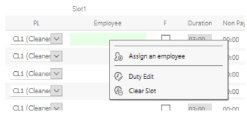
An Employee can be assigned in the Contract Times by clicking once in the Employee place-holder to highlight the slot, then right clicking to show a menu of options, depending on whether it already contains an Employee Name:
Right-clicking an Empty Employee will show the following:
Right-clicking a Filled Employee will show the following:

|
Assign an Employee |
Pops up an Employee selector to assign to the slot. A Partial Search is available to locate the Employee. 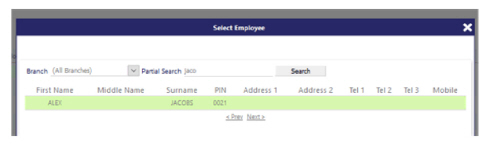
Hovering over the Employee will highlight and clicking anywhere will choose the Employee |
|
Duty Edit |
Pops up a Duty Edit window to change the selected slot in a list layout 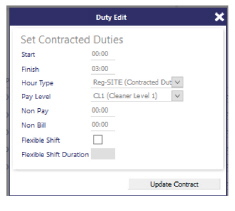
Clicking Update Contract will update the slot and show the change in the Contract Times |
|
Clear Slot |
Clears all the entries for the selected slot 
|
|
Copy Employee |
This will copy the selected Employee to then Paste into another slot: 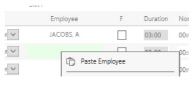
|
|
Replace Employee |
When clicked on, this option pops up an Employee selector to assign to the slot. A Partial Search is available to locate the Employee. 
Hover over the Employee to highlight. Next, clicking anywhere on the highlighted line will choose the Employee |
|
Remove Employee |
Removes the Employee from the Slot |
Updating an Existing Contracted Times Schedule Effective Date
If you are making major changes to the Contract Times Schedule, remember to set the Auto Scheduling Profile to None so that the system will not make your changes live.
If you decide not to do this, the system will ask if you wish to un-RotaLoad the effected periods, but exclude duties that have started to be worked.
Once complete, the system will re-RotaLoad the Site Automatically.
There may be occasions where an existing Effective Date will need to be updated due to a setup error.
A number of considerations should be made before making this change as the correct actions may not be to update existing Effective Date:
Reason |
Suggestion |
|
An existing Effective Date has been setup incorrectly |
Update the existing Effective Date as this may affect the payment of Absence for an Employee
|
|
An existing Effective Date is completely incorrect |
Delete the Effective Date and start again
|
|
A change to the Employees on the Site |
Copy the existing Effective Date to a new date then update the Employees from the date of the Change. Don’t forget to check the Employee Absence Rules to see if they also need to updated from the New Effective Date |
|
A change to a Schedule from a given date |
Copy the existing Effective Date to a new date then update the schedule accordingly. Don’t forget to check the Employee Absence Rules to see if they also need to updated from the New Effective Date
|
|
An Hour Type or Pay Level has changed |
If the change is a historic one then the respective Effective Dates should be updated. However, those duties that have become Operational (the Employee has booked onto the Duty) or are Complete will need to be updated manually. A manual Rate Generation of these Duties for the Site may also be required if Dynamic Rate Generation is switched off. see Admin | System | Rate Generation and Manage | Rate Gen Jobs for more information |
Once the decision has been made on which Effective Date to use, changes to each slot will follow the same process as documented in the above sections.
Saving a Contracted Times Schedule with Auto Scheduling Profile Enabled
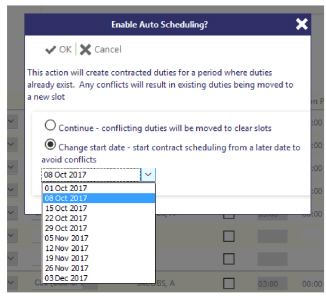
When a Schedule has been changed and the Site has already been automatically RotaLoaded with the live Schedule, the system will ask you what you wish to do:
|
Continue - conflicting duties will be moved to |
Will move any manually added started duties to a free slot that is not used when re-RotaLoading the Site |
|
Change start date - start contract scheduling from a later date to |
Change the Scheduling Effective Date to one that is after the last week RotaLoaded. A drop-down selection is available to choose a new date. |