Setup: Sites Contract Times (Contract Wizard)
How to get there: Setup | Sites | Contract Times Tab
Introduction
The Contract Wizard is opened in a new window by clicking the Contract Wizard button on the Contract Times Tab. The use of the wizard is to automatically maintain the Contract Times Tab based upon a pre-defined set of Shift Patterns of varying weeks in rotation.
|
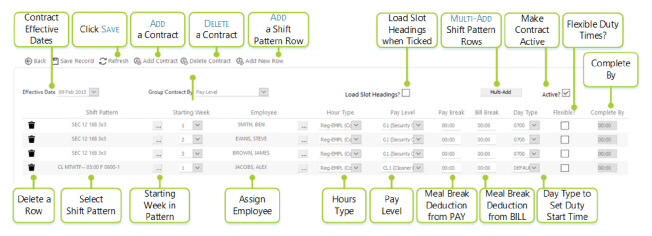
Save Record |
Click to save your changes so far |
|
Refresh |
Click to revert to the unsaved state |
|
Add Contract |
Click to Add a new Effective Date. The existing Effective Date will be copied to the new date for modifications to be made. Note: It may be necessary to adjust the Starting Week number of copied Shift Patterns as the week number is always based on the Effective Date |
|
Delete Contract |
Click to delete the current Effective Date |
|
Add New Row |
Click to add a new shift pattern row |
If major changes are being made to the Contract Times, remember to set the Auto Scheduling Profile to None so that the system will not make your changes live.
If it is decided not to do this, the system will ask the user if you wish to un-RotaLoad the effected periods, but exclude duties that have started to be worked.
Once complete, the system will re-RotaLoad the site automatically.
Effective Dates
Opening the wizard for the first time will show a blank window where a new Effective Date can be selected using the
date selector:
Screen Layout and Fields
|
Effective Date |
Week Commencing Date for the Schedule. The date needs to be greater than the last effective date entered for the Site. The Effective Date should always be on the start day of week as defined on the System or Branch Rate Generation Settings. see Set Up | Branches | Rate Generation Settings Tab or Admin | System | Rate Generation for more information. If the Contract is to start or finish mid-week, the Start Date and Finish Date can be entered accordingly within the Site Card Contract Times Tab itself. This will ensure that Auto Scheduled Duties are only created between these dates. If a Finish Date is not set, then the Schedule is auto loaded until a new Effective Date is reached, or the Site Contract End Date is reached |
|
Group Contract By |
A drop-down list to specify what the Contract Times Post Headings should contain. This enables ease of navigation for the user. The available options are:
|
|
Load Slot Headings? |
Tick to indicate that the Post Headings are to be loaded |
|
Multi Add Button |
Opens a window where multiple rows of the same Shift Pattern can be added. See the Multi Add section below |
|
Active? |
Leaving this clear will allow you to setup the Contract without making it active within the Site Card Contract Times Tab. If an existing Effective Date is clear, it will be removed from the Site Card Contract Times Tab. When ticked, the Site Card Contract Times Tab will be updated. If selected, on Save, the system will work out the total weeks in rotation for all of the Shift Patterns defined and create the new Effective Date in the Site Card Contract Times Tab along with the associated patterns in the order specified |
Shift Pattern Rows
At the bottom of the window, rows can be added which will reflect a set of duties over 1 or more weeks in rotation that a specific Employee would work.
A Shift Pattern could represent a Cleaner working 3 hours per day, Monday to Friday:

Or a Security Guard working on a 3 week schedule with two other colleagues providing 24 hour support:
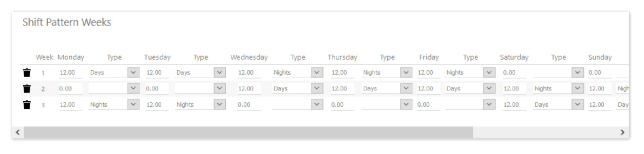
see Admin | General | Shift Patterns for more information.
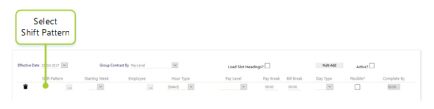
To assign the Cleaning Shift Pattern to the Site, you click the Add a New Row button. A new Row will be shown as follows:
|
Bin Icon |
Remove the row |
|
Shift Pattern |
Shift Pattern to be performed on the Site. Clicking the [...] Shift Pattern button a pop-up selection window will be shown. On selection, the Shift Pattern Name will be shown and the remainder of the row information will be pre-filled from the Shift Pattern. See Shift Pattern Selection below for more information |
|
Starting Week |
The week number from the Shift Pattern that will be worked on Week 1 of the Effective Date |
|
Employee |
The Employee that would normally work the Shift Pattern. Clicking the [...] Employee Button, a pop-up selection window will be shown. On selection, the Employee Name will be shown |
|
Hour Type |
The Hour Type that will be assigned to the duty |
|
Pay Level |
The Pay Level that will be assigned to the duty |
|
Pay Break |
The Pay Meal Break Deduction that will be assigned to the duty |
|
Bill Break |
The Bill Meal Break Deduction that will be assigned to the duty |
|
Day Type |
Will be used to set the Start Time that will be assigned to the duty. Available Day Types are assigned to each Shift Pattern |
|
Flexible? |
Indicates that the Shift is Flexible, for example, a 3 hour duty will be worked between the hours of 06:00 and 13:00 |
|
Completed By |
The time that the duty should be completed by, in the above example, this would be 13:00 |
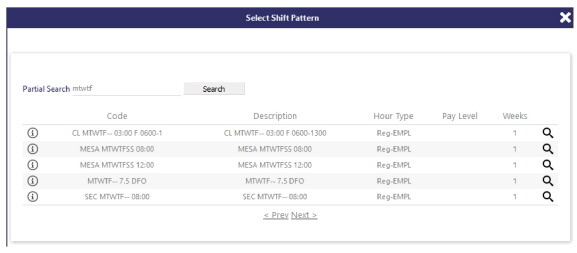
Shift Pattern Selection
|
Partial |
Enter text to search for a Shift Pattern that contains the text. It is important to ensure that the naming conventions are meaningful to get the most out of this function |
|
Code |
Shift Pattern Code |
|
Description |
Shift Pattern Description |
|
Hour Type |
Default Hour Type for the Shift Pattern |
|
Pay Level |
Default Pay Level for the Shift Pattern |
|
Weeks |
Number of Weeks in Rotation for the Shift Pattern |
|
Magnifier Icon |
Clicking the icon will open a window that will show a summary of the Shift Pattern 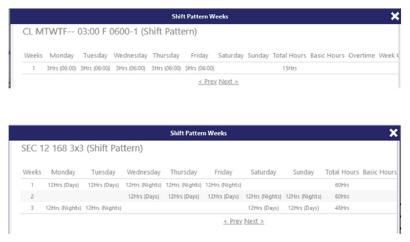
|
Hovering over the row will highlight the Shift Patten then Click the Information Icon to the left of the Code to select.
The pop-up window will close and the selected Shift Pattern will appear in the row.
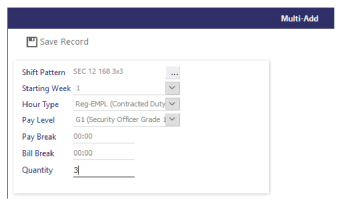
Multi Add
This will allow you to add multiple rows of the same Shift Pattern type to the contract. Clicking the Multi Add button will show the following pop-up window:
|
Shift Pattern |
Shift Pattern to be performed on the Site. Clicking the [...] Shift Pattern button, a pop-up selection window will be shown. On selection, the Shift Pattern Name will be shown and the remainder of the row information will be pre-filled from the Shift Pattern. See Shift Pattern Selection below for more information |
|
Starting Week |
The week number from the Shift Pattern that will be worked on Week 1 of the Effective Date |
|
Hour Type |
The Hour Type that will be assigned to the Duty |
|
Pay Level |
The Pay Level that will be assigned to the Duty |
|
Pay Break |
The Pay Meal Break Deduction that will be assigned to the Duty |
|
Bill Break |
The Bill Meal Break Deduction that will be assigned to the Duty |
|
Quantity |
The number of rows to add of the selected Shift Pattern |
|
Save Record |
Will close the Window and add the number of Rows at the end of the current rows 
The rows can then be updated with the correct Employee and the Starting Week Numbers. |