Setup: Event Templates
Within this section of the guide, The Event Templates part of the system is documented. Event Templates are used as the starting point for setting up and running Events.
Note: Within the system, in order to manage Events that operate and span across multiple days, it is necessary to use multiple Event entities. These should be named clearly to allow individual management of each set of duties for example FM Conference UK 2018 - Trade Centre Day 1; FM Conference UK 2018 - Trade Centre Day 2 etc.
Setting Up Event Templates
Accessing Event Templates
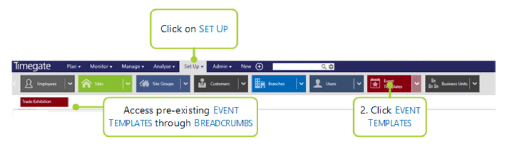
How to get there: Set Up | Event Templates
To access the Event Templates Page, click on the Set Up menu and then Event Templates from the drop-down list. If you have already set up Event Templates, you can click on the down arrow next to the red Event Templates button to access your previously created Event Templates from the “Breadcrumbs”. This is shown in the following screenshot:
Note: Access to the Event Template is controlled by a new security function. The ability to manage an Event Template against a specific site is controlled by the existing data security curtain. This cannot be configured using the Web Client. Speak to your TEAM Software representative for further help and information.
Event Template Screen View
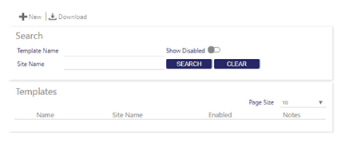
How to get there: Set Up | Event Templates | Event Template List
An Event Template comprises one or more Teams and their associated Roles. From the Event Templates/Event Template List page, the user can set up, modify, save and view Event Templates. They can also search for existing Event Templates.
Screen Layout and Fields
|
Name |
The name of the Event Template |
|
Site Name |
The site name where the Event is being run. Each template is associated with a specific site and is based on a single day Event. Where an Event lasts several days then the template can be re-used to create several Event entities, one per day |
|
Enabled |
If ticked, this means that the Event Template is Enabled and that the Event Template can be seen in the Plan | Events screen (thus it can be used to plan an Event) and also within the Set Up | Event Templates screen |
|
Notes |
Any notes that have been written about the Event Template, explaining what it is |
Screen Actions
|
New |
Click this to start creating a new Event Template |
|
Download |
Click this to download a copy of the Event Template in a CSV format |
|
Template Name |
Enter the name of the template that you are searching for here before clicking on the |
|
Site Name |
Enter the name of the site that the Event Templates which are being searched for are assigned to |
|
Show Disabled |
If ticked, this will show any Event Templates that are not Enabled |
|
Search |
Click this button after entering a value in either Template Name or Site Name |
|
Clear |
Click this button to clear the values in the Template Name and Site Name |
|
Page Size |
Select from the drop-down list the maximum number of Event Templates to display in a list on the screen |
|
Delete |
Click on the delete icon to remove the Event Template |
|
Number (e.g. 1) |
Click on the number to browse through the multiple pages of Event Templates (when there are more than one) |
|
Event Template Row |
Click on an individual Event Template row to access a more detailed template screen that lets the user manage the individual Event, adding teams and roles |
Creating a New Event Template
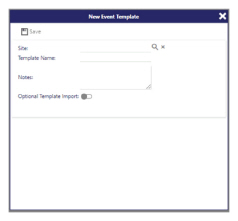
How to get there: Set Up | Event Templates | New Event Template
Screen Layout and Fields
To create an Event Template, select New. This will load the following screen:
-
Select the Site that the Event Template is going to be assigned to (use )
-
Enter a name for the Event Template
-
Add any notes to the Event Template
-
To set up the rest of the site using a CSV file, tick the Optional Template Import Button and follow the instructions in the section called “Using CSV Files to create the Event, Team and Roles”
-
Select Save
|
Site |
Select the name of the site for the Event |
|
Template Name |
Unique name for the template |
|
Notes |
Any notes about the template that is being set up |
Screen Actions
|
[...] |
Click this button to select a Site for the Event Template |
|
Optional Template Import |
Click this button in order to use a template to import information from to set up the Event |
|
Save |
Click to create the blank new Event template, ready for defining Teams and Roles |
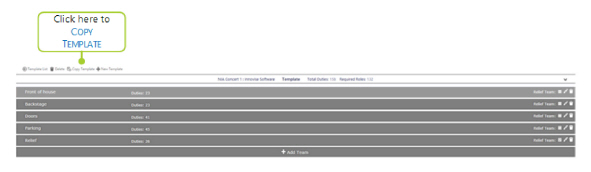
Defining teams and roles within an Event Template
How to get there: Set Up | Event Templates
From the Event Template List screen view, click on the name of the template to be edited within the Templates section list.
Screen Layout and Fields
To start with, the following screen will be opened for the selected Event:

This view can be displayed or hidden by clicking on the ˅ Button. The expanded view is shown in more detail below:
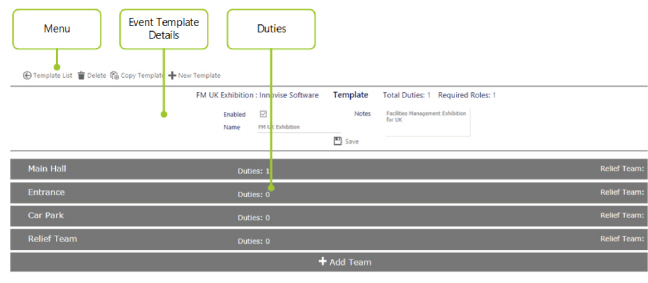

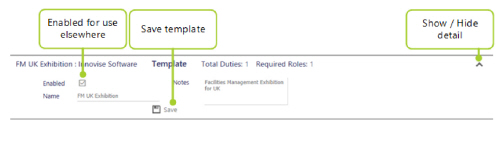

More detail is shown on screen as a team is clicked upon. Teams are shown in green. Multiple team information can be shown on the same screen view:
|
Name |
Name of the Event Template |
|
Notes |
A description of the Event template |
|
Total Duties |
Number of Duties in total for the Event (calculated by adding together all of the duties across the Event teams) |
|
Required Roles |
Number of Roles that require filling for the Event (in total, calculated by adding together the number of Roles across the different teams for the Event). It should, however, be noted that any Role that is within a relief team will not be included in this total, as they are not critical to the Event going forwards |
|
Role Name |
Description of the Role |
|
Number of Duties |
Quantity of Duties for this Role |
|
Hour Type Code |
The type of hours for example regular, overtime etc. |
|
Pay Level Code |
The type of pay allocated to the Role for example supervisor, cleaner, security officer etc. |
|
Start Time |
The time that the Duty for that Role Type will start |
|
Finish Time |
The time that the Duty for that Role Type will end |
|
Qualifications |
The Qualifications that have been added to the Role |
|
Staff Pool |
The number of potential staff available to undertake the Role |
|
Unbilled Meal Break Duration |
The duration (in HH:mm) of any unbilled meal breaks during the duty created |
|
Unpaid Meal Break Duration |
The duration (in HH:mm) of any unpaid meal breaks during the duty created |
|
Notes |
Any other details about the Duty which are relevant when setting up the Event |
The following table lists the fields on this screen when it is fully expanded:
Screen Actions
|
Template List |
Return back to the list of all templates |
|
Delete (in menu bar) |
Delete this template |
|
Copy Template |
Make a new template as a copy of this template (see the “Copying an Event Template ready to Create a New Event Template” section of this guide) |
|
New Template |
Create a new template (see the “Creating a New Event Template” section of this guide) |
|
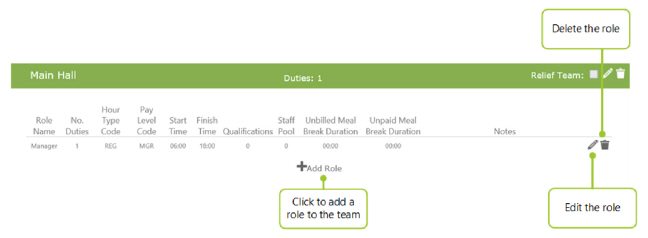
+ Add Team |
Add a new team |
|
+ Add Role |
Add a role team |
|
Click on Team |
Edit the team information |
|
Relief Team |
Select this team as a relief team |
|
Delete (on team) |
Delete the team from the Event |
|
Edit (on team) |
Edit the team information |
|
˅ or ˄ |
Toggle between these two buttons to show or hide the template detail |
|
Enabled |
Tick this box to enable the template for use elsewhere within the system. If this box is not ticked, the template will not be available |
|
Save |
Click to save the template |
|
Delete (on role) |
Delete the role from the team |
|
Edit (on role) |
Edit the role |
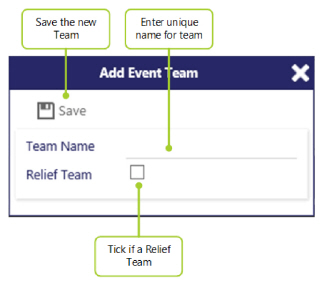
Add Event Team
How to get there: Set Up | Event Templates | + Add Team
To add an Event Team, click on the + Add Team as shown in the screen shots above.
Screen Layout, Fields and Actions
|
Team Name |
Enter a unique identifier to recognize the name of the team that is being set up |
|
Relief Team |
Tick this box to choose the team as a relief team. A relief team is a team that may not be required at the Event but instead comprises employees on standby in case a need for them arises. Any roles within a relief team will not be included in the total for Required Roles |
|
Save |
Click to save any changes |
Add Role
How to get there: Set Up | Event Templates | + Add Role
Roles are allocated to the different teams. At this point in time, it is not possible to assign specific employees directly to the roles as they have not been processed and turned into duties. It is, however, possible to define a set of employees against a role. These are those that the scheduler thinks could potentially work the duties that the role defines. At the point the duties are created (in the processing stage) the system will attempt to schedule these employees to these duties, based on the configured duty checks.
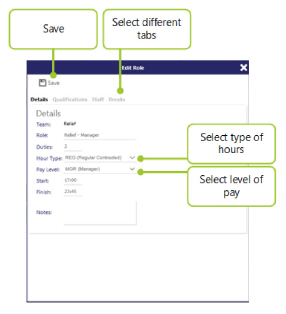
To add a Role, click on the + Add Role from within the a Team view of the Event Template. Complete all of the details in the window that is displayed. There are four tabs to consider when adding a role: Details, Qualifications, Staff and Breaks. There are also two additional pop-up screens (one for qualification selection, the other for staff pool selection). These windows are detailed below:
Add Role - Details
Screen Actions, Layout and Fields
|
Save |
Save the role. If Save is clicked before all mandatory fields are completed correctly, an error message is displayed on the screen |
|
Tabs |
Click between the four different tabs to enter all of the role information |
|
Team |
Name of the team that the role is being allocated to |
|
Role |
Enter a name for the role |
|
Duties |
Enter a number of duties that are going to be created for the given role i.e. if 5 people are needed to undertake the given role, enter in the number 5 |
|
Hour Type |
The type of hours for example regular, overtime etc. |
|
Pay Level |
The type of pay allocated to the role for example supervisor, cleaner, security officer etc.) |
|
Start |
The time that the duty for that role type will start |
|
Finish |
The time that the duty for that role type will end |
|
Notes |
Any other relevant notes about the role |
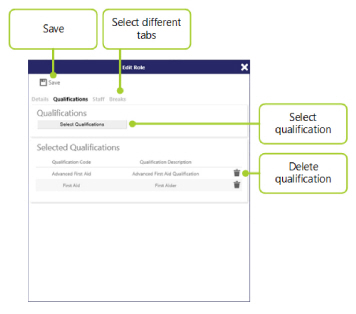
Add Role - Qualifications
Screen Actions, Layout and Fields
|
Save |
Save the role. If Save is clicked before all mandatory fields are completed correctly, an error message is displayed on the screen |
|
Tabs |
Click between the four different tabs to enter all of the role information |
|
Select Qualifications |
Click this button to select the qualifications to add to the role that employees taking on the duties generated by the role will need |
|
Qualification Code |
Unique identifier of an already selected qualification |
|
Qualification |
Description of the selected qualification that is required to fill a role |
|
Delete |
Click on the icon to delete the qualification |
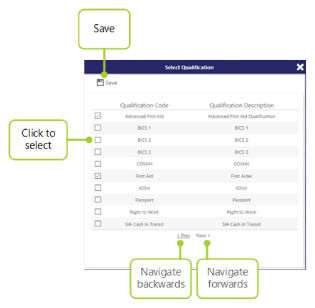
Add Role - Select Qualifications
Screen Actions, Layout and Fields
|
Save |
Save the role. If Save is clicked before all mandatory fields are completed correctly, an error message is displayed on the screen |
|
Tabs |
Click between the four different tabs to enter all of the role information |
|
Qualification Code |
Unique identifier for the qualification |
|
Qualification |
Description of the selected qualification that is required to fill a role |
|
check box |
Tick the check box in order to select the qualification |
|
< Prev |
Navigate backwards through the qualification types |
|
Next > |
Navigate forwards through the qualification types |
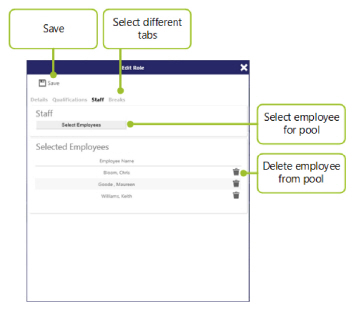
Add Role - Staff
Screen Actions, Layout and Fields
|
Save |
Save the role. If Save is clicked before all mandatory fields are completed correctly, an error message is displayed on the screen |
|
Tabs |
Click between the four different tabs to enter all of the role information |
|
Select Employees |
Click this button to select the employees to add to the role |
|
Delete |
Click on this to remove already selected employees from the pool of employees available to fill duties for the role |
|
Employee Name |
Name of employee(s) already selected as part of the pool |
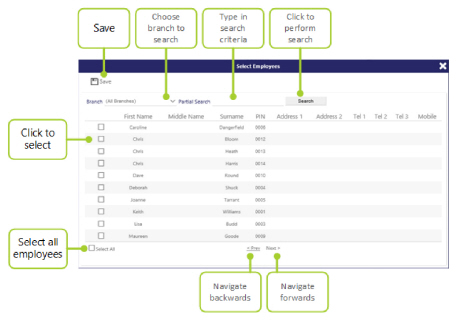
Add Role - Select Employees
Screen Actions, Layout and Fields
|
Save |
Save the role. If Save is clicked before all mandatory fields are completed correctly, an error message is displayed on the screen |
|
Tabs |
Click between the four different tabs to enter all of the role information |
|
Branch |
Using the drop-down list, select the Branch to search upon |
|
Partial Search |
Enter free form text to search upon |
|
Search |
Click this button to search for employees meeting the criteria given in the Branch drop-down list and the Partial Search text box |
|
First Name |
Employees first name |
|
Middle Name |
Employees middle name |
|
Surname |
Surname of the employee |
|
PIN |
Employees PIN (Personal Identification Number) |
|
Address 1 |
First line of the employees address |
|
Address 2 |
Second line of the employees address |
|
Tel 1 |
Telephone number for employee |
|
Tel 2 |
Secondary telephone number for employee |
|
Tel 3 |
Third telephone number for employee |
|
Mobile |
Mobile telephone number for employee |
|
Select All |
Click this box to select all employees on the screen |
|
check box |
Tick the check box in order to select the employee |
|
< Prev |
Navigate backwards through the qualification types |
|
Next > |
Navigate forwards through the qualification types |
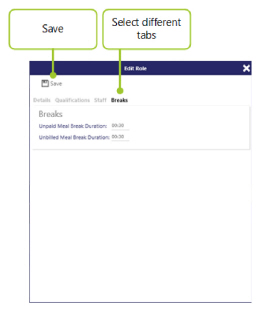
Add Role - Breaks
Screen Actions, Layout and Fields
|
Save |
Save the role. If Save is clicked before all mandatory fields are completed correctly, an error message is displayed on the screen. |
|
Tabs |
Click between the four different tabs to enter all of the role information |
|
Unbilled Meal Break Duration |
Enter the duration (in HH:mm) of any unbilled meal breaks during the duty created |
|
Unpaid Meal Break Duration |
Enter the duration (in HH:mm) of any unpaid meal breaks during the duty created |
Copying an Event Template ready to Create a New Event Template
How to get there: Set Up | Event Templates | Template List
Once an Event Template has been successfully set up, it can be copied in order to create a new one.
Click on the Copy Template Button to load the following Copy Template dialog box that should be completed as shown with suitable values for the new Event.
Screen Layout and Fields
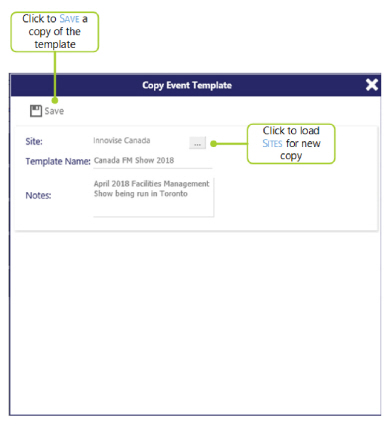
|
Template Name |
Unique name for the Event Template |
|
Notes |
Useful supporting notes about the specific Event Template as necessary |
Screen Actions
|
[...] |
Click this button to select a Site for the copy of the Event Template |
|
Save |
Click to create a copy of the existing template as a new one with the name specified |