Setup: Employees - Right to Work
How to get there: Setup | Employees | Right to Work Tab
This page is used to create new Right to Work items and (as appropriate) request Right to Work items from RightCheck
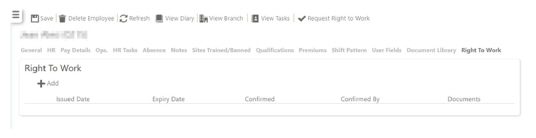
This screen will not be available to all users. The screen is controlled by the Timegate Security Function Role assigned to the user. If the Right to Work security item and the Recruit license are disabled, then this page will not be shown. The following shows the screen initially:
To create a simple Right for Work item, select +Add. A new screen will load where you must enter an Issued Date, then optionally an Expiry Date. They then select Save. (See Screen before Saving an Item below) After saving (Screen after Saving an Item), there are several extra menu options that open up significant functionality to save and manage documents as well as to confirm a person’s right to work. See below for further information.
Alternatively, you could select Request Right to Work. This button should be used to request/re-request Right to Work information from RightCheck e.g. in the case of missing/wrong IDs. This functionality is available to PASS/PDC users with the correct security clearance. It is also available to those customers importing content into Timegate using Eploy (automatically via a plugin, using a CSV file transfer.) If using Eploy, ensure that your employees External HR Id. that is available in the Employee | HR tab is correct to ensure the appropriate documents are imported.
Note: The purpose of the right to work record is to store right to work documents and details. They do not currently have any impact on scheduling, qualifications, or any scheduling checks.
Screen Layout, Actions and Fields
Screen before saving an Item
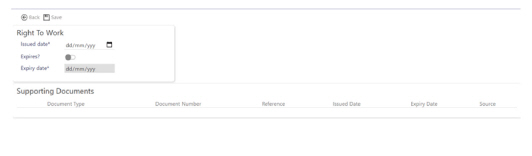
|
Issued Date |
Date of issue for the Right to Work document |
|
Expires? |
Select whether or not the Right to Work document expires. When selected, the Expiry Date field becomes available to enter a value into |
|
Expiry Date |
Date that the Right to Work document expires |
|
Document Type |
Selected from drop down list when storing a supporting document |
|
Document Number |
Entered when storing a supporting document - unique identifier for the document |
|
Reference |
Entered when storing a supporting document - unique reference number for the document |
|
Source |
The source that provided/submitted the Right to Work documentation evidence - system generated |
|
Save |
Select to save details and open up further menu items (as detailed below) |
|
Back |
Return to previous screen |
Screen after saving an Item
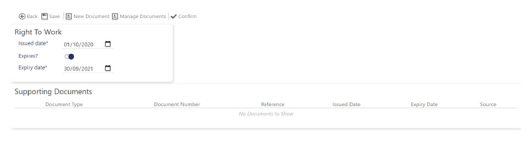
In addition to the previous attributes, the following functions are available from this screen:
|
New Document |
Select to create a new personal document and automatically associate it to the Right to Work |
|
Manage Documents |
Select to search through existing personal documents of the employee and associate one or many to the Right to Work |
|
Confirm |
Select to lock the Right to Work so that it is now read only and cannot be changed at all. Note: Only one unconfirmed right to work can be registered against an employee at any time. After the user confirms a permanent right to work, they cannot create another permanent item for that employee |
Screen following addition of documents
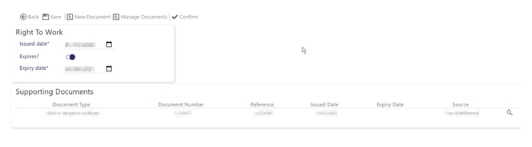
The above screen shows how the screen look when a Right to Work item has been confirmed and extra documents have been added.
|
Save |
Select to Save Employee changes |
|
Delete Employee |
Delete the Employee from the system. Note: If the Employee is a leaver, then do not Delete the Employee. Instead, set their Date Left on the HR Tab |
|
Refresh |
Select to revert to the unsaved state |
|
View Diary |
Select to view Employee Monthly Diary screen |
|
View Branch |
Select to view Branch information screen |
|
View Tasks |
Select to view Employee Help Desk Tasks screen |
|
+ Add |
Add a new Right to Work item |
|
Pencil |
Select the pencil icon to edit the Right to Work item |
|
Magnifying glass |
View the supporting documents as shown below |
|
Manage Documents |
Select to search through existing personal documents of the employee and associate one or many to the Right to Work |
|
Confirm |
Select to lock the Right to Work so that it is now read only and cannot be changed at all. Note: Only one unconfirmed right to work can be registered against an employee at any time. After the user confirms a permanent right to work, they cannot create another permanent item for that employee |
Screen following confirmation of documents
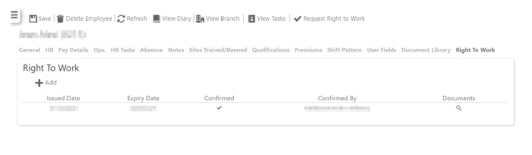
The above screen shows how the screen look when a Right to Work item has been confirmed and extra documents have been added.
|
Save |
Select to Save Employee changes |
|
Delete Employee |
Delete the Employee from the system. Note: If the Employee is a leaver, then do not Delete the Employee. Instead, set their Date Left on the HR Tab |
|
Refresh |
Select to revert to the unsaved state |
|
View Diary |
Select to view Employee Monthly Diary screen |
|
View Branch |
Select to view Branch information screen |
|
View Tasks |
Select to view Employee Help Desk Tasks screen |
|
Pencil icon |
Select the pencil icon to edit the Right to Work item |
|
Magnifying glass |
View the supporting documents as shown below |
|
Request Right to Work |
This button should be used to request/re-request Right to Work information from RightCheck e.g. in the case of missing/wrong IDs. This functionality is available to PASS/PDC users with the correct security clearance. It is also available to those customers importing content into Timegate using Eploy (automatically via a plugin, using a CSV file transfer.) If using Eploy, ensure that your employees External HR Id. that is available in the Employee | HR tab is correct to ensure the appropriate documents are imported. |