Setup: Employees - Pay Details
How to get there: Set Up | Employees | Pay Details Tab
The Pay Details Tab is where the Pay Settings are stored for the Employee. Once the configuration of the system has been running for a while and the Pay and Bill information that is calculating correctly, most clients will decide to use system outputs to pay their staff. The key areas for this are shown and detailed below.
Screen Layout and Fields
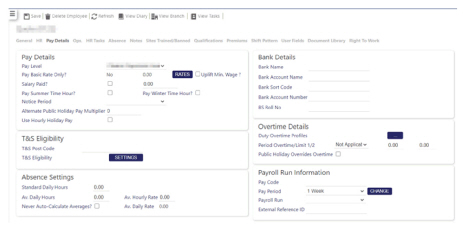
The screen is split into several sections that are all controlled by the system Security Function Role assigned to the user.
These sections are detailed within this document.
Screen Actions
|
Save |
Save Employee changes |
|
Delete Employee |
Delete the Employee from the system. Note: If the Employee is a leaver, then do not Delete the Employee. Instead, set their Date Left on the HR Tab |
|
Refresh |
Revert to the unsaved state |
|
View Diary |
View Employee Monthly Diary screen |
|
View Branch |
View Branch information screen |
|
View Tasks |
View Employee Help Desk Tasks screen |
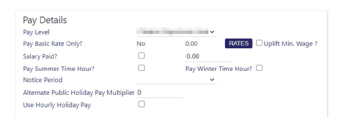
Pay Details
This section holds general information about how an Employee is paid. All drop-down lists in this section are maintained within the system, but a set of defaults are available for ease of use.
Screen Layout and Fields
|
Pay Level |
This is the default pay level for the Employee. It is used in the Duty Checks to ensure that the correct level of Employee is assigned to the Duty. Note: Where a duty has no default Pay Level, the Employee Pay Level will be used instead. This is useful where your system has been configured with a Grading Structure and the structure is adhered to |
|
Pay Basic Rate Only? |
Sets the Employee to be paid the same rate wherever they work. See the Basic Pay Section below |
|
Uplift Min. Wage ? |
Select where the Employees Pay Rates should be reflected in any Minimum Wage Scheme Uplifts assigned to the Employee Branch. see Admin | Finance | Minimum Wage Schemes and Setup | Branches | General Tab |
|
Salary Paid? |
Indicates whether the Employee is paid a salary. This is for information only, as Salaried Employees are normally paid directly through a company’s payroll application |
|
Pay Summer Time Hour? |
Indicates whether to pay the Summer Time Hour when an employee is on a duty overnight and the clocks change into Summer Time. For example, in England Summer Time, clocks move forward 1 hour meaning that the Employee will actually work 1 hour less than scheduled. Therefore, if not paying this extra hour, leave this setting un-ticked Note: The settings for applying the Pay Summer and Pay Winter Hours can be set as a default to the branch the employees belong to. This setting is personal to the employee and will override the Branch settings. |
|
Pay Winter Time Hour? |
Indicates whether to pay the Winter Time Hour when an employee is on a duty overnight and the clocks change into Winter Time. For example, in England Winter Time, clocks move backwards 1 hour meaning that the Employee will actually work 1 hour more than scheduled. Therefore, if not paying this hour, leave this setting ticked Note: The settings for applying the Pay Summer and Pay Winter Hours can be set as a default to the branch the employees belong to. This setting is personal to the employee and will override the Branch settings |
|
Notice Period |
To choose a Notice Period, select an option from the drop-down list shown: 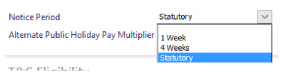
The Notice Period Description will be shown in the list. Click the desired option to select it. The Notice Period selected will be shown on the screen. see Admin | General | General Maintenance | Notice Periods for more information |
|
Alternate Public Holiday Pay Multiplier |
Where an Employee is paid a different multiplier when they work on a Designated Public Holiday, the setting here will override any Site Contract settings. This is mainly used for Employees that are TUPE |
|
Use Hourly Holiday Pay |
When selected, ensures that Use Hourly Holiday Pay functionality is used in new duty rate generation processing. Some employees (because of the nature of their work) are unable to take their annual leave. Whilst being entitled to the leave, it is not possible due to their working circumstances to take it. To compensate for this, they will have their hourly rate uplifted by a given percentage to offset their lack of holiday. For this feature to work, it must be enabled at a Branch level as well as selected here. See Branch | General, the fields under Hourly Holiday Pay for more information (Hourly Holiday Pay, Hourly Rate Percentage and QualifyingWeeks) |
Basic Pay
The system supports the ability to pay the employee using Site Card Post Pay. This is linked to the Pay Level assigned to the Duty or is paid through a set Basic Pay Rate assigned to Employee.
Basic Pay can be:
-
A single rate that is paid wherever the Employee works
-
A rate that is paid when an Employee works on a specific Site and/or Pay Level
-
A mix of Post Pay and Basic Rate dependent on the Hours Type that is assigned to the Duty
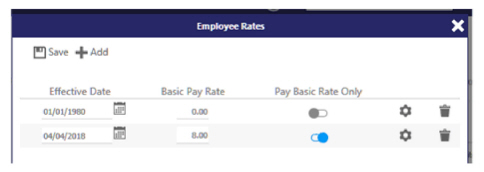
Each Rate is defined with an effective date and the current settings are always shown in the Pay Details section:

These are set within the pop-up window that is accessed by pressing the Rates button.
If the system is setup to automatically Rate Generate on Rate Changes, then all Duties and Diary Events for the Employee, within a pre-set historic window (default 90 days) from the period will automatically be Rate Generated.

see Admin | System | Rate Generation for more information.
Screen Actions
|
Save |
To save rate changes |
|
Add |
To add a new Rate Effective Date |
Screen Layout and Fields
|
Effective date |
The date that the rate is effective from. A date selector is available |
|
Basic Pay Rate |
The rate to pay where no other valid Multi Rate is available |
|
Pay Basic Rate Only |
Select where the Employee will only be paid the Rates assigned to them irrespective of the Hours Type assigned to the Duty |
|
Multi Rate Settings |
A pop-up window is shown when the is selected as shown: 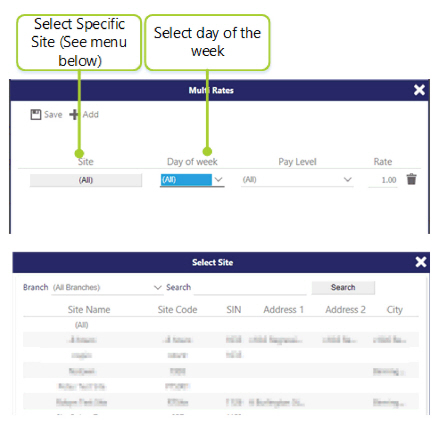
The window will allow new rates to be set up for Sites and different days of the week. These are then assigned to the Employee with an optional Pay Level and an associated Rate. Sites can be changed by selecting (All) as shown above. The Select Site box will then launch. Day of week can be changed by selected from the drop-down list. Pay Levels are selected from the associated drop down Multi Rates can be removed using the Bin Icon against the Rate In terms of usage, Day of Week and Site will be set to the default value of All - hence there is no Multi Rate Defined. The user can change the Day of Week from All to a given day of the week (e.g. Monday through Sunday), Week Day (all week days - Monday through Friday), Weekend (Saturday and Sunday) or Public Holiday. This enables multiple rates to be set up with minimum repetition. The validation of this page prevents duplicate entries but takes into consideration the Day of Week option. The most specific option available is used in calculations: For Site, a specific site will be chosen over (All) sites. For Day of Week, Monday through Sunday will take precedence over Weekday, Weekend or (All) Week day or Weekend will take precedence over (All) Public Holiday record will be used in preference over all other values (Monday through Sunday, Weekday, Weekend and (All)) i.e. if the duty is worked on a non-public holiday, then the logic will fall back to other rows and attempt to match against those. This Public Holiday option for Day of Week will also be used when clock-in attempts to match an open post duty to an employee. Clock-in will also attempt to read onto this information when auto-creating a duty, i.e., if the duty is to be worked on a public holiday, then the pay level found against the Public Holiday row will be used, in preference to other pay levels for a different day of the week. |
|
Bin Icon |
Delete the Effective Date and all Multi Rate Settings associated with it |
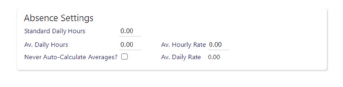
Absence Settings
This section is used for the calculation of Paid Absence for the Employee.
Note: Average information is only used as a straw pole guide based upon Absence Settings assigned to a Branch. see Setup | Branches Absence Tab
Screen Layout and Fields
|
Standard Daily Hours |
The number of hours that the Employee is paid when assigned an Absence Rule where the Using setting is set to Standard. See Set Up | Employees | Absence Tab |
|
Av. Daily Hours |
The number of hours that the Employee is paid when assigned an Absence Rule where the Using setting uses Average. This value will be used until the system has enough history to calculate the averages automatically. If the field is display only, then the system is calculating the hours. See Set Up | Employees | Absence Tab |
|
Av. Hourly Rate |
The Hourly Rate that the Employee is paid when assigned an Absence Rule where the User setting uses Average. This value will be used until the system has enough history to calculate the averages automatically. If the field is display only, then the system is calculating the hours. See Set Up | Employees | Absence Tab |
|
Av. Daily Rate |
Calculated field showing the Average Daily Hours x Average Hourly Rate |
|
Never Auto-Calculate Averages? |
This is set when the user does not want the system to calculate the Average Hours and Rate. By selecting this option, the system will use the entered settings rather than a |
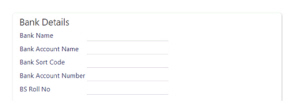
Bank Details
Bank information can be held for the Employee here. The information is encrypted within the database.
Screen Layout and Fields
|
Bank Name |
Name of the Bank |
|
Bank Account Name |
Name that appears on the Bank Account |
|
Bank Sort Code |
Sort Code for the Bank Account in a nn-nn-nn format |
|
Bank Account Number |
Bank Account number |
|
BS Roll No |
Building Society Roll No |
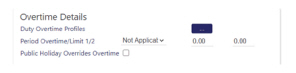
Overtime Details
This is where one or more overtime profiles are assigned to an employee. Additionally, period overtime can be assigned from this part of the screen.
Overtime profiles are configured in the Admin | Finance | Duty Overtime Profiles page.
The information held on this page and within the assigned profiles is used in conjunction with the Site Group Tab or Site Card Hour Types Tab which will define the Hours Type to use when the employee is due an overtime payment.
On the Employee, you can set duty overtime (using a profile) and/or period overtime. Duty overtime relates to the number of hours an employee works in a duty - if an employee is contracted to work 8 hours on their duty, then any time after that could be calculated as overtime. Period overtime, on the other hand relates to a different pay period of the employee for example if an employee is contracted to work 40 hours a week, any time after that could be calculated as overtime.
The following video shows you have to create a period overtime limit for an employee.
see Admin | Finance | Duty Overtime Profiles for setting up Duty Overtime Profiles
see Set Up | Site Cards | Hour Types Tab for more information about setting up table rates and multipliers or setting these rates at a site level
Screen Layout and Fields
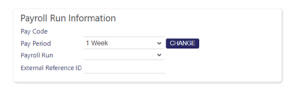
Payroll Run Information
This section is used to assign the Employee their Payroll settings so that their pay information is extracted within the correct Pay Period and contains their correct Payroll Number.
Note: Dependent on the Payroll Application and the system Export Report that is being used (if any), the reference by which the Employee is known by could be stored in the Pay Code, External Reference ID or could be the PIN number defined on the General Tab.
Screen Layout and Fields
|
Pay Code |
Payroll Number |
|
Pay Period |
Pay Period that the Employee is paid in. Options are 1 Week, 2 Week, 3 Week, 4 Week |
|
Change |
This is used to change the Pay Period assigned to an Employee that has already worked. Pressing the Change button will pop-up a window to enable the change to be made. see Pay Period Change below |
|
Payroll Run |
This is used in conjunction with the Pay Period to further filter the information sent on a Payroll Extract Report. note that not all Extract will have the Payroll Run Type as However, it is available using the Desktop Client Lock and Close Pay Period functionality. see Admin | Finance | General Maintenance | Payroll Run Types for more information |
|
External Reference ID |
Used to store a different Payroll Number or a reference by which the Employee is known by in a different system or employer |