Setup: Employees - HR
The following video reviews how to fill out the information on the HR tab on the employee record.
How to get there: Set Up | Employees | HR Tab
The HR Tab is where a majority of the confidential information is held for the Employee. A number of clients have very basic HR needs and use the Employee Card as their main storage location.
Screen Layout and Fields
The screen is split into several sections that are all controlled by the system Security Function Role assigned to the user. These sections are detailed within this document.
Screen Actions
|
Save |
Save Employee changes |
|
Delete Employee |
Delete the Employee from the system. Note: If the Employee is a leaver, then do not delete the Employee. Instead, set their Date Left on the HR Tab to their date of leaving |
|
Refresh |
Revert to the unsaved state |
|
View Diary |
View Employee Monthly Diary screen |
|
View Branch |
View Branch information screen |
|
View Tasks |
View Employee Help Desk Tasks screen |
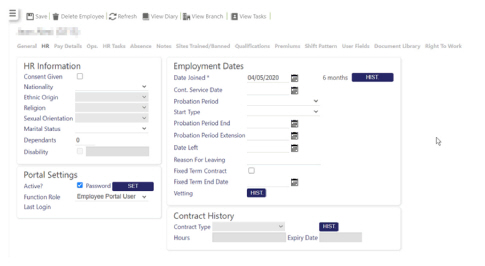
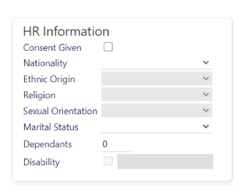
HR Information
This section holds confidential information about the employee that may be used for reporting to government equal opportunity bodies. All of the drop-down lists in this section are maintained within the system, but a set of defaults are available for ease of use.
Screen Layout and Fields
|
Consent Given |
When the Consent Given check box is not selected i.e. consent hasn’t been given fields that are deemed sensitive for the purposes of GDPR are disabled. Not selected is the default state for this setting. Note: If you are in any doubt about using this setting, speak to your TEAM Software representative as changes are irreversible. These are enabled as soon as the state changes to checked, enabling information to be entered. Those fields are: Ethnic Origin, Religion, Sexual Orientation and Disability. When the user presses Save, a User Defined Fields dialog box will appear stating that the user has confirmed that consent has been given, and to enter a comment detailing how the consent was obtained: 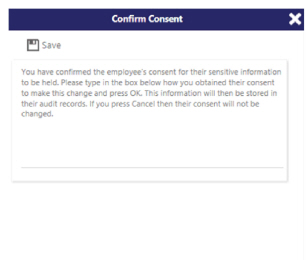
A comment must be added before the dialog box will close when OK is selected. Select X to undo changes and return to the previous screen. The comment will be written to the GDPR audit log. Any sensitive fields that have been changed will be logged. Note: The detail of the change will not be noted in this log, only the fact that there has been a change. A new field will appear, this indicates the date and time that consent was given: 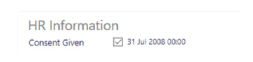
While the Consent Given check box is selected, then these fields can be changed at any time, but the dialog box will still require a comment detailing how consent was obtained and audited as above.The date field will only show the date at which consent was originally given and will be hidden if consent is withdrawn. It will only reappear if consent is given again, with a new date and time. As soon as Consent Given is not selected the sensitive fields will immediately be disabled as shown in the example below: 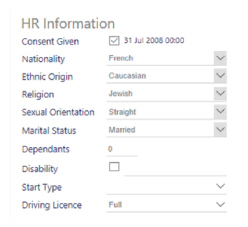
Once Save has been selected, as before, a User Defined Fields dialog box will be displayed, indicating that consent has been withdrawn and that these fields will be blanked as shown: 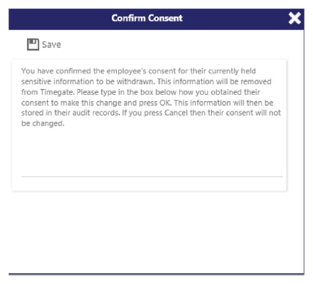
The change to consent will be logged. Again, Save will not proceed without a comment. Changes will be reverted if X is selected. If consent has been withdrawn, these fields will be blanked when the save has completed. Any logged items in the standard event log will also be removed, as these may contain the old values prior to the withdrawal of consent. |
|
Nationality |
The Nationality of the Employee, normally obtained from a passport or legal document. To choose a Nationality, select one from the drop-down list shown. 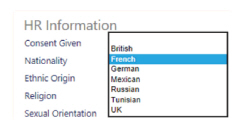
The Nationality Description will be shown in the list. Hovering over the row will highlight then click anywhere on the line to select. The Nationality selected will be shown on the screen. This field can be set to either mandatory or optional, depending upon your company’s individual needs. see Admin | General | Employee Settings | Employee Mandatory Fields to select whether this field is made mandatory or not. By default it is set to optional. When selected as mandatory, an * will be displayed next to it’s label on screen to show this. If a value isn’t entered, an error message will be displayed in red indicating that the field must be completed. see Admin | General | Employee Settings| Nationality for more information about configuring the values available for selection in this drop-down list. |
|
Ethic Origin |
Controlled by Consent Given -The Ethnic Origin of the Employee, normally obtained from a legal document. To choose a Ethnic Origin, select one from the drop-down list shown. 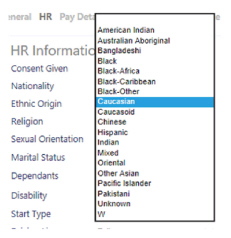
The Ethnic Origin Description will be shown in the list. Click anywhere on the desired line to select. The Ethnic Origin selected will be shown on the screen. This field can be set to either mandatory or optional, depending upon your company’s individual needs. see Admin | General | Employee Settings | Employee Mandatory Fields to select whether this field is made mandatory or not. By default it is set to optional. When selected as mandatory, an * will be displayed next to it’s label on screen to show this. If a value isn’t entered, an error message will be displayed in red indicating that the field must be completed. see Admin | General | Employee Settings| Ethnic Origin for more information about configuring the values available for selection in this drop-down list. |
|
Religion |
Controlled by Consent Given -The Religion of the Employee, normally obtained from an internal document. To choose a Religion, select one from the drop-down list shown. 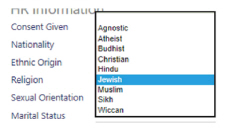
The Religion Description will be shown in the drop-down list. Click anywhere on the desired line to select. The Religion selected will be shown on the screen. This field can be set to either mandatory or optional, depending upon your company’s individual needs. see Admin | General | Employee Settings | Employee Mandatory Fields to select whether this field is made mandatory or not. By default it is set to optional. When selected as mandatory, an * will be displayed next to it’s label on screen to show this. If a value isn’t entered, an error message will be displayed in red indicating that the field must be completed. see Admin | General | Employee Settings| Religion for more information about configuring the values available for selection in this drop-down list. |
|
Sexual Orientation |
Controlled by Consent Given -The Sexual Orientation of the Employee, normally obtained from an internal document. To choose a Sexual Orientation, select one from the drop-down list shown. 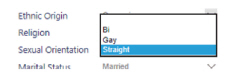
The Sexual Orientation Description will be shown in the list. Click anywhere on the desired line to select. The Sexual Orientation selected will be shown on the screen. This field can be set to either mandatory or optional, depending upon your company’s individual needs. see Admin | General | Employee Settings | Employee Mandatory Fields to select whether this field is made mandatory or not. By default it is set to optional. When selected as mandatory, an * will be displayed next to it’s label on screen ti show this. If a value isn’t entered, an error message will be displayed in red indicating that the field must be completed. see Admin | General | Employee Settings| Sexual Orientation for more information about configuring the values available for selection in this drop-down list. |
|
Marital Status |
The Marital Status of the Employee, normally obtained from a Legal Document. To choose a Marital Status, select one from the drop-down list shown. 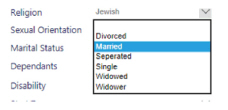
The Marital Status Description will be shown in the list. Click anywhere on the desired line to select. The Marital Status selected will be shown on the screen. see Admin | General | General Maintenance | Marital Status Maintenance for more information |
|
Dependants |
The number of children that the Employee supports |
|
Disability |
Controlled by Consent Given -Check the box to indicate that the Employee has a disability, an optional description of the disability can be given |
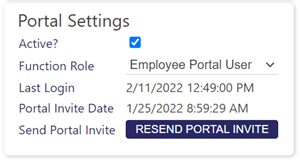
Portal Settings
Version Specific Content: This content is relevant to Timegate only.
This section will enable the administrator to set up an employee so that they have access to the Employee Portal.
Screen Layout and Fields
|
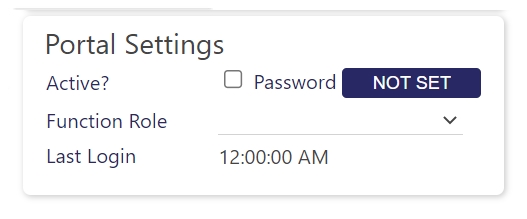
Active? |
Check the box to give the Employee access to the Employee Portal. The Employee must have an email address in order to use the portal. |
|
Password |
Press the NOT SET button or the SET button to resend a password reset for the Employee. The Employee can also request a password reset from the Portal Login Page by entering their email address and pressing the Forgotten Your Password button |
|
Function Role |
The Security Function Role that will control what the Employee can see and do on the Employee Portal. Different groups of Employees may have access to more functionality within the Employee Portal than others. It is the Function Role that will control this. To choose a Function Role, select one from the drop-down list. see Admin | Engagement | Portal Functional Role for more information about setting up functional roles for the Employee Portal. |
|
Last Login |
Will show the last date and time that the Employee logged into the Employee Portal |
| Portal Invite Date |
The date and time that an email was sent to the employee containing a link to the employee portal |
| Send Portal Invite |
Select to send / resend the portal invite. The appropriate description will be shown on the button in capital letters |
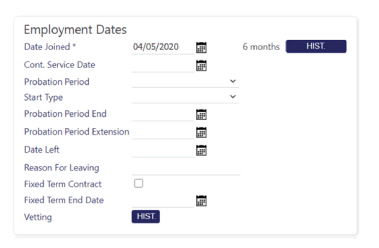
Employment Dates
This section will tell the system to allow the Employee access to the Subscription Service Employee Portal.
Screen Layout and Fields
|
Date Transferred/Cont Service Date |
A date selection is available to set the date that the Employee started at their previous employer before joining your company. This should only be set where the Employee have been TUPE transferred into your company. This is used in their calculation of Holiday Entitlements along with the Date Joined and Date Left fields |
|
Probation Period |
The Probation Period of the Employee, normally obtained from an internal document. It is used to identify the length of probation the Employee must perform before being offered a permanent contract. This is an information only field and not used to calculate the Probation End Date. To choose a Probation Period, select one from the drop-down list shown: 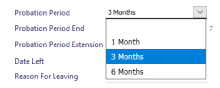
The Probation Period Description will be shown in the list. Click anywhere on the desired line to select. The Probation Period selected will be shown on the screen. see Setup | Employees | HR for more information |
|
Start Type |
The Start Type of the Employee, normally obtained from an internal document. General set to Standard or TUPE Employee but could be used to state the source of the Employee such as Agency, Recruitment Drive etc. To choose a Start Type, select one from the drop-down list shown: 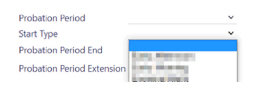
The Start Type Description will be shown in the list. Hovering over the row will highlight then click anywhere on the line to select. The Start Type selected will be shown on the screen. see Admin | General | General Maintenance | Start Type Maintenance for more information |
|
Probation Period End |
A date selection is available to set the date that the Employees Probation Period will end and is manually added and not calculated from the Probation Period selection above. This field is for information only and does not limit the Employee from working |
|
Probation Period Extension |
A date selection is available to set a date that the Employee Probation Period has been extended to. This field is for information only and does not limit the Employee from working |
|
Date Left |
A date selection is available to set a date that the Employee is to leave your company. Note: The Date Left should be set to the day after the finish date time of the last duty performed by the Employee. For example, if the last duty worked was on the 6th July at 19:00 to 7th July 07:00 then the Date Left should be set to the 8th July. The system will always assume 00:00 on for the Date Left so setting it to the 7th July will remove their last duty as it overlaps the Date Left of 7th July at 00:00 Once the employee Date Left is applied the employee is then terminated, but should the user wish to reinstate the employee a Reemploy button will be available on the toolbar when the record is saved |
|
Reason For Leaving |
Free format description of the reason that the Employee has left your company |
|
Fixed Term Contract |
Check the box if the Employee is on a Fixed Term Contract |
|
Fixed Term End Date |
A date selection is available to set a date that the Employees Fixed Term has ended |
|
Vetting |
A pop-up window is available by pressing the HIST button that will show the progress on an Employee through the recruitment application. 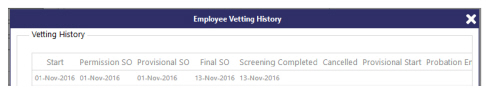
The screen will show the screening stages that the Employee has gone through with the date that the stage was passed |
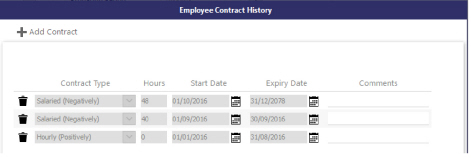
Contract History
This section is used to store information about the Contract that the Employee is employed on. In most businesses, an Employee may move around Sites on a permanent basis as well as increasing to decreasing their weekly contracted hours. You can store the history of these movements here. A report 01-05-40 Employee Contract History is also available.
Screen Layout and Fields

|
Contract Type |
The current Contract Type that the Employee is on based upon today’s date and the Start Date and Expiry Dates entered within the History pop-up window |
|
Hours |
The current Weekly Hours |
|
Expiry Date |
The current Expiry date |
|
Hist Button |
Clicking the button will show a pop-up window of the Employee Contract History |
Employee Contract History Window
This is where the Employee Contract History can be maintained.
Screen Layout and Fields
|
Contract Type |
The Contract Type is used to identify the type of contract that the Employee has been employed on. Quite often, an Employee will join as a TUPE Employee and throughout their career with a company may move to different terms and conditions having different Hours associated with them. This is for information purposes only. There are no validation checks on the hours that an Employee physically works per week. To choose a Contract Type, select one from the drop-down list shown. 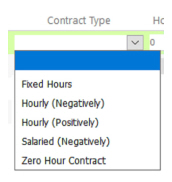
The Contract Type Description will be shown in the list. Click anywhere on the desired line The Contract Type selected will be shown on the screen. see Admin | General | General Maintenance | Contract Type Maintenance for |
|
Hours |
The Weekly Hours for the Contract Type |
|
Start Date |
A date selection is available to set a date that the Employee Started on the Contract |
|
Expiry Date |
A date selection is available to set a date that the Contract Expires for the Employee. If this is open-ended, then set the Expiry Date to a date in the future such as 31/12/2078 |
|
|
Note: The Start Date and Expiry Dates cannot overlap and therefore on adding a new Contract Type, the previous Expiry Date would need to be changed to the date before the start of the new Contract Start Date. 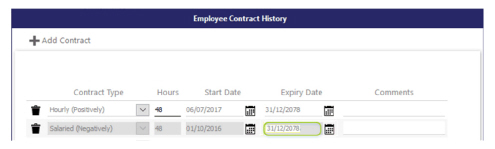
So in the above example, the existing last Contract Expiry Date highlighted would need to change to the date before the new line which would be 05/06/2017 |
|
Comments |
The reason for the Contract Type change |
Screen Actions
|
Add Contract |
Click the Add Contract button at the top of the screen to create a new row at the top of the list. A row must be completed before a new Contract type can be added |
|
Delete |
Click the Bin Icon to the left of the Contract Type. A Contract Type cannot be removed if it is in use |
|
Close |
Close window and return to the Employee HR Tab |