Setup: Employees - Document Library
The following video reviews the Document Library tab on an employee record.
How to get there: Setup | Employees | Document Library tab
-
This is used to store both personal (e.g. identification or proof documents) or general documents and images for the Employee. Documents that are uploaded from the Employee Portal may appear here. Files from the Right Check App (used by some customers) that are used to carry out instantaneous Passport and Visa checks are stored here.
-
To upload a general document, select +Add (under General Documents) to open a pop-up window where the document can be uploaded. More information about this can be found in the section Uploading a General Document below.
-
To upload a personal document, select +Add (under Personal Documents) to open a pop-up window where the document can be uploaded. More information about this can be found in the section Uploading a Personal Document below.
General Documents can be converted into Personal documents by selecting the . See the Converting a General Document into a Personal Document section below for more information.
If a user selects the next to the document, the system will open a new window and the document will be shown.
The screen is controlled by the Timegate Security Function Role assigned to the user. If the personal documents security item or the Recruit license is disabled, then the Personal Documents panel on the page will not be shown.
The key areas for this are shown and detailed below.
Screen Layout and Fields
General Documents |
|
|
Document Date Time |
Date and time that the document was uploaded (automatically updated) |
|
User |
User that uploaded the document (automatically updated) |
|
Notes |
Document notes entered when the document was uploaded - this is a mandatory field and must be completed when uploading documents |
|
Media |
Type of document uploaded (automatically updated) |
|
|
Delete the document |
|
|
View the document |
|
|
Convert a General document into a Personal one - see section below about how to do this |

Personal Documents
|
Document Type |
Type of document, selected from drop-down list (mandatory) |
|
Document Number |
The document number (optional) |
|
Reference |
Document reference (optional) |
|
Issue Date |
Date that the personal document was issued (optional) |
|
Expiry Date |
Date that the person document becomes invalid (optional) |
|
Categories |
System generated (as applicable via PASS from Right Check). |
|
Source |
System generated |
Screen Actions
|
Save |
Select to Save Employee changes |
|
Delete Employee |
Delete the Employee from the system. Note: If the Employee is a leaver, then do not Delete the Employee. Instead, set their Date Left on the HR Tab |
|
Refresh |
Select to revert to the unsaved state |
|
View Diary |
Select to view Employee Monthly Diary screen |
|
View Branch |
Select to view Branch information screen |
|
View Tasks |
Select to view Employee Help Desk Tasks screen |
|
+Add (General) |
Selecting +Add will open a pop-up where the document can be selected. See Uploading a General Document below |
|
+Add (Personal) |
Selecting Add Document will open a pop-up where the document can be selected. See Uploading a General Document below |
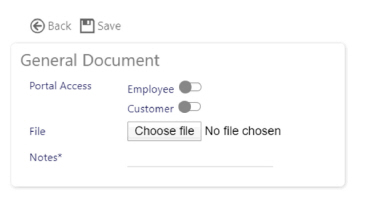
Uploading a General Document
Selecting +Add from under the General Document heading will open a pop-up where the document can be selected
Screen Layout and Fields
|
Portal Access |
Note: This is not an active field. |
|
File |
Select Choose File. Use your operating system’s in-built file navigator to find the general document that you wish to upload. Once selected “No file chosen” will be replaced by the file name |
|
Notes |
This mandatory field must be completed. Enter a description of the file that is being uploaded |
|
Save |
Select to Save |
|
Back |
Return to previous screen |
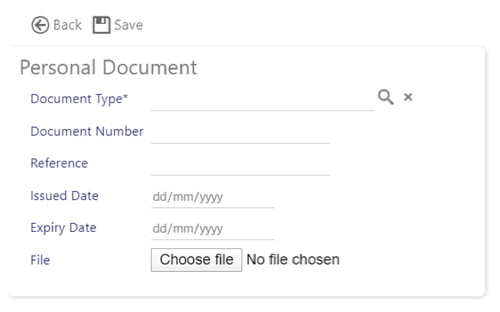
Uploading a Personal Document
Selecting +Add from under the Personal Document heading will open a pop-up where a personal document can be selected and uploaded, and it’s details entered.
Screen Layout and Fields
|
Document type |
Select from the drop down list using the (mandatory) |
|
Document Number |
The document number (optional) |
|
Reference |
Document reference (optional) |
|
Issued date |
Date that the personal document was issued (optional) |
|
Expiry Date |
Date that the person document becomes invalid (optional) |
|
File |
Select Choose File. Use your operating system’s in-built file navigator to find the general document that you wish to upload. Once selected “No file chosen” will be replaced by the file name |
|
Save |
Select to Save |
|
Back |
Return to previous page |
Converting a General Document into a Personal Document
When a user selects next to a document in the General Documents area, a pop-up window will be launched which will enable them to covert a general document into a personal one.
Screen Layout and Fields
|
Document type |
Select from the drop down list using the (mandatory) |
|
Document Number |
The document number (optional) |
|
Reference |
Document reference (optional) |
|
Issued date |
Date that the personal document was issued (optional) |
|
Expiry Date |
Date that the person document becomes invalid (optional) |
|
Save |
Select to Save |
|
Back |
Return to previous page |