Setup: Contacts - General
How to get there: Set Up | Contacts | General
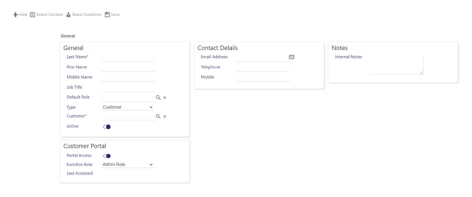
From this page, the Contact General tab, you are able to set up a new Contact. Your contacts can be assigned to a variety of things within Timegate including:
-
Customers
-
Branches
-
Sites
-
Incidents
-
Tours
-
Escalation Groups
Screen Layout and Fields
|
Last Name |
Surname of contact (mandatory) |
|
First Name |
Forename of contact |
|
Middle Name |
Middle name (as applicable) |
|
Job Title |
The contact’s job title |
|
Default Role |
The default role of the contact - select from the drop down list. This value has been defined in the Admin | General | Other Settings | Contact Role |
|
Type |
Select the contact type from either Customer or Other. Note: If Other is selected, the contact is cannot be selected on a Site or for Customer. You may choose to use of Other (i.e. a non-customer contact) to capture information about a third-party contractor who is not limited to a single customer but may still be related to a site and customer.) |
|
Customer |
Customer Name selected from the drop down list. This list is populated with values of existing Customers (mandatory) |
|
Customer History |
History of which Customers the contact has been assigned to |
|
Active |
Select to enable the contact for use elsewhere within Timegate |
|
Portal Access |
This is not an active field |
|
Function Role |
This is not an active field |
|
Last Accessed |
This is not an active field |
|
Email Address |
Contact’s email address |
|
Telephone |
Contact’s telephone number |
|
Mobile |
Contact’s mobile telephone number |
|
Created Date |
Date that the Contact record has been created |
|
Created By |
The name of the user that has created the Contact |
|
Internal Notes |
Any internal notes pertaining to the Contact |
Screen Actions
|
Add |
Create a new contact |
|
Select Contact |
Select multiple contacts - this enables you to scroll through them using the arrow keys detailed below and modify as required |
|
Select Customer |
Select the customer associated with the contact |
|
Save |
Save the contact |
|
Delete |
Delete the contact |
|
</> |
Navigate between contacts (from left to right) |
|
Down Arrow |
When selected, displays a drop down list of those contacts you have already selected in order for you to quickly access their records, by selecting the name of the contact you are interested in |