Setup: Branches - General
How to get there: Set Up | Branches | General
Branches form part of the systems “Client Hierarchy”. These are best described as being at a business unit level e.g. a division or a line of business. Branches can group together operations (for example, Sites and Employees by geographical areas)
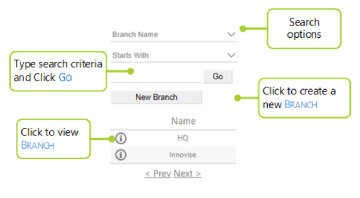
Screen Layout and Fields - Searching for Branches
A previously created Branch can be accessed by clicking on the information icon from the list provided on the left-hand side of the screen. Search for Branches, by either:
-
Entering a search criteria in the Search bar and selecting Go
-
Scrolling through the Branches using < Prev and Next >
If a Branch has not been created or there is a need to create a new one, select New Branches
The search box and New Branch are shown in the screen shot below:
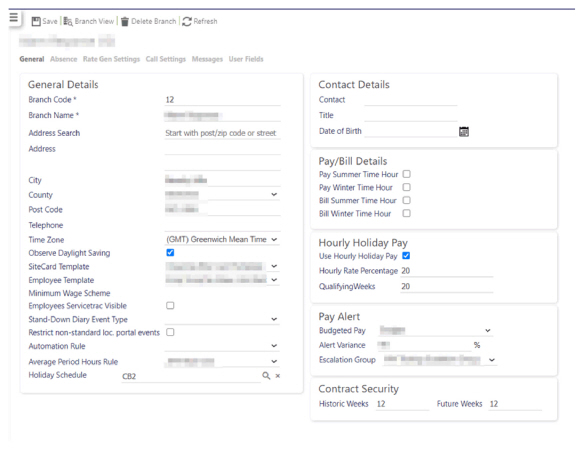
The first page that is presented within the Branches page is the General Tab. From this tab, the general details can be configured. These include the contact details of the Branch that is being set up. These details are covered in-depth in the next section.
Screen Layout and Fields - Branches General Tab
|
Branch Code |
Unique code to identify the Branch |
|
Branch Name |
The name of the Branch |
|
Address |
The address of the Branch (two lines) |
|
City |
City that the Branch is located in |
|
County |
County that the Branch is located in |
|
Post Code |
The postcode for the Branch |
|
Telephone |
Telephone number for the Branch. If Click-To-Call has been enabled, the telephone icon will appear next to the Telephone number. Select to launch the dialler and caller the number |
|
Time Zone |
This is the time zone in which the Branch is located. Use this to choose the correct time zone from the drop-down list |
|
Observe Daylight Saving |
This determines whether the Branch observes daylight saving times |
|
Site Card Template |
Templates are produced to speed up data loading when adding new sites and employees. This is where the templates are stored for each Branch. For example, one branch can be a cleaning branch. They may have multiple templates, for example, one for a cleaning type sites and another for their Employees. Meanwhile, a branch could be a security branch and use security site and another for their employee templates |
|
Employee Template |
Template used for storing Employee information (see information explaining this in the SiteCard template) |
|
Minimum Wage Scheme |
Minimum wage schemes (Minimum Pay Rates) are assigned to a branch from Timegate version 20.4 onwards form the Admin | Finance | Pay Scheme Rules screen. Their name is shown he when assigned to a branch. Previously these had been assigned using a drop-down at the branch level. For more information about setting up Minimum Pay Rates see Admin | Finance | Pay Scheme Rules |
|
Stand-Down Diary Event Type |
This drop-down list will look like the one shown below. Use this to define how stand-down events will be recorded within the diary. The three choices provided are: 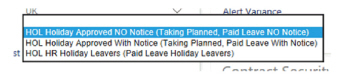
|
|
Restrict non-standard Loc. Portal Events |
When selected, events will be displayed in the standard location before any other location first when using the Portal. |
|
Automation Rule Profile |
Select a branch level automation rule that will override the default, Timegate wide automation rule set. The automation rule profile that is assigned is created in Admin | Engagement | Automation Rules. This command governs the ability of self-service users within the Employee App to either swap a duty, give away a duty or pick up a duty. |
|
Average Period Hours Rule |
This setting is used as a fall back for the Employee Average Period Hours Duty Check. The Average Period Hours Duty Check firstly checks the Employee average period hours and, if they are not set, uses the Branch average period hours details for the check. Select the average period hours rule from the drop down list. see Admin | General | Employee Settings | Average Period Hours Rule, Admin | System | Duty Checks and Setup | Employees | Ops. for more information |
|
Holiday Schedule (and magnifying glass) |
Select to choose an appropriate holiday profile for the Branch. Holiday rules are set up under General | Settings | Holiday Schedules. Select the magnifying glass to launch the following window from which you can select the profile of choice as shown: 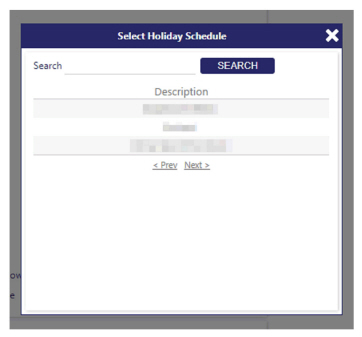
|
|
Contact |
Name of the contact at the Branch |
|
Title |
The title of the contact at the Branch |
|
Date of Birth |
Date of birth of the Branch i.e. the date that the branch was set up on the system |
|
Pay Summer |
This setting determines if an Employee is paid for the hour that is not worked when the clocks go forward at the start of summer |
|
Pay Winter Time Hour |
This setting determines if an Employee is paid for the extra hour that he or she must work when the clocks go back in the winter |
|
Bill Summer |
This setting determines if a Customer is billed for the hour that is not worked when the clocks go forward at the start of summer |
|
Bill Winter Time Hour |
This setting determines if a Customer is billed for the extra hour that is worked when the clocks go back in the winter |
|
Use Hourly Holiday Pay |
When selected (enabled) at a branch level, it enables those employees who are unable to take their annual leave because of their specific role, to gain an uplift on their hourly rate. this is to compensate for the loss of annual leave. The uplift will only be applied to those employees who have Use Hourly Holiday Pay selected in their Employee Record. If the employee record has this enabled but it is not enabled at a branch level, the uplift wont happen. If the branch record has the feature enabled, but an employee does not, the uplift will not be applied. For the uplift to be applied, it must be specified at both a branch and employee level. This feature works in conjunction with Hourly Rate Percentage and Qualifying Weeks below. See Employee | General, Use Hourly Holiday Pay for further information
|
|
Hourly Rate Percentage |
The percentage uplift that is applied to an employees hourly rate if the Hourly Holiday Pay functionality has been enabled (See details in Use Hourly Holiday Pay) e.g. if 11.67% is entered here, an eligible employee’s hourly rate will increase by 11.67% to compensate for them not being able to take annual leave
|
|
Qualifying Weeks |
The amount of weeks that the employee will have needed to work for the company before they qualify for the percentage uplift on their hourly rate to compensate for their inability to take their annual leave entitlement because of their role (See details in Use Hourly Holiday Pay and Hourly Rate Percentage)
|
|
Pay Alert - Budgeted Pay |
From this drop-down list, choose whether to charge between Contracted or Budgeted pay to alert against |
|
Pay Alert -Alert Variance |
The percentage of variance at which point an alert is triggered to the Escalation Group |
|
Pay Alert -Escalation Group |
An Escalation Group comprises a list of system users that will get notified of certain events. In this instance, the Escalation Group for Pay Alerts is being selected. This can be used as follows to send alerts to those members of the given groups:
Escalation Groupsare set up under Admin | General | Escalation Groups |
|
Historic Weeks |
Number of weeks in the past that the system stores duties of those who were on the site team. These settings fall under the banner of “Contract Security” as Contract Users in the system are only allowed to look at certain sites. They are then allowed to look at Employees that are in the teams for those sites |
|
Future Weeks |
Number of weeks that Timegate looks forward at duties, to determine who is on the site team. These settings fall under the banner of “Contract Security” as Contract Users in the system are only allowed to look at certain sites. They are then allowed to look at Employees that are in the teams for those sites |
Screen Actions
|
Save |
Select to Save the Branch record |
|
Branch View |
Select on this to launch Branch View |
|
Delete Branch |
Select to Delete the Branch record. Before being able to Delete the content, a screen similar to the one below will be displayed detailing how many records are linked to the Branch record. To Delete, select OK to confirm, otherwise press Cancel 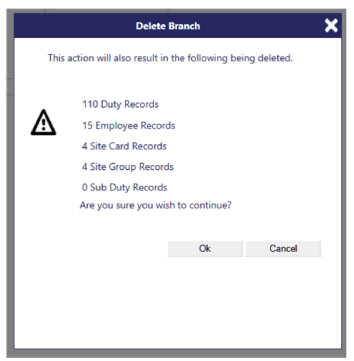
|
|
Refresh |
Select to Refresh the screen and discard any unsaved changes |