Plan: Site Teams
How to get there: Plan | Site Teams
The Site Teams screen available within the web client, is designed to be used as an alternative scheduling screen to the Site View screen. For many scenarios, it offers several advantages over the Site View screen:
-
Diary Events are shown for employees who are scheduled for the period being viewed
-
A user-defined date range can be used to show more than one week
-
Employees who may have worked on the site but are not currently working for the period being viewed, are visible and they can be assigned to duties
-
Budgeting figures are shown as a total of the period and day
-
Most Site View operations can be performed on this screen
Accessing Plan Site Teams
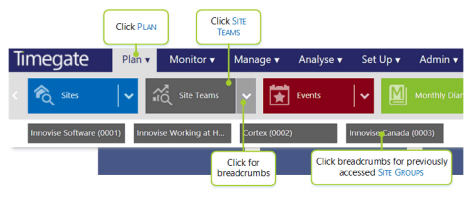
From the main menu, the user must:
-
Select Plan
-
Select Site Teams or
-
Select the down arrow next to the Site Teams button to view the breadcrumbs and select the site to be loaded
Select Sites Team to display the details of the last site viewed by default, along with the names of all the Sites in a pick list. Select the information button next to the Site Name in the pick list to see the Sites Team View for that site.
An example screen is shown over the page with the duty legend:
Depending upon how the site has been configured, users may see a bold red message at the top of the page, next to the name of the site as shown:
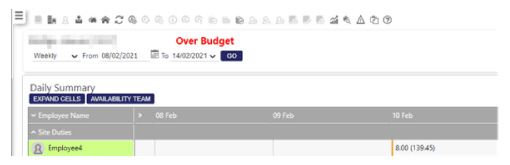
The message may read either “Over Budget” or “On Budget”. This message is shown when companies have decided to help schedulers prevent a site from going over budget for a selected period of time (from between 1 to 4 weeks). Every time a duty is added, the site budget is checked to ensure that it is on budget or that it is not over budget. If it is, the appropriate message is displayed, letting schedulers know that it is time to take action as appropriate (e.g. deletion of a duty). The feature is implemented at an individual site level, and not at a Timegate-wide level. Further details about using this feature can be found in Admin | Finance | Site Budget.
Search Function
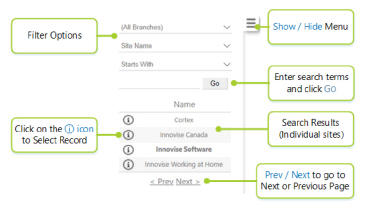
To search for a site that is not displayed in the pick list, use the Search Function. From the drop-down lists, make choices about the search being undertaken, then enter several characters into the search field then select Go.
Screen Layout and Fields
|
Name |
The name of the site |
Screen Actions
|
(All Branches) |
Select Branches to search across |
|
Site Name |
Select what to search for from Site Name, Site Code, SIN, Address 1, Address 2, City, Post Code, Telephone and Contract Manager |
|
Starts With |
From this drop-down list, select search type i.e. Starts With, Ends With, Contains or Exact Phrase |
|
Blank Search Box |
Enter search term in here |
|
Go |
Select to initiate the search |
|
Information Icon |
Select to open the Site Team |
|
< Prev |
Move backwards through list of results |
|
Next > |
Move forwards through list of results |
Site View Toolbar
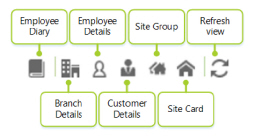
The Toolbar provides the user with quick access to other parts of the system and to undertake actions on the selected duty/duties. Each button is shown and briefly explained below.
Screen Layout and Actions
|
Employee Diary |
Select an employee on a duty, select this option to go straight to that employee’s monthly diary - See Plan | Monthly Diary for more information |
|
Branch Details |
Select an employee on a duty, select this option to go straight to that employee’s Branch - see Set Up | Branches | General for more information |
|
Employee Details |
Select an employee on a duty, select this option to go straight to that employee’s details - See Set Up | Employees | General Tab for more information |
|
Customer Details |
Select to go straight to the Customer record - see Set Up | Customers | General for |
|
Site Group |
Select to go straight to the Site Group record - see Set Up | Site Groups | General for |
|
Site Card |
Select to go straight to the Site Card record - See Setup | Sites | General Tab for |
|
Refresh View |
Select to refresh the screen |
|
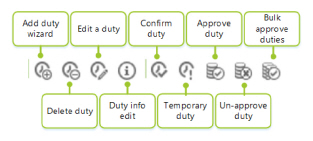
Add Duty Wizard |
Select an empty post and select this option to the add duty wizard (see the “Add a Duty Wizard” in the Plan | Sites section of this guide for more information) |
|
Delete Duty |
Select to delete a duty (see the “Delete a Duty” subsection in the Plan | Sites section of this guide for more information) |
|
Edit a Duty |
Select to edit a duty (see the “Site View - Edit a Duty” subsection in the Plan | Sites section of this guide for more information, along with the Duty | Edit part of this guide) |
|
Duty Info Edit |
Select single or multiple duties to edit their information. The following dialog box is loaded when the icon is pressed (it looks similar to the Duty Info tab in Duty | Edit): 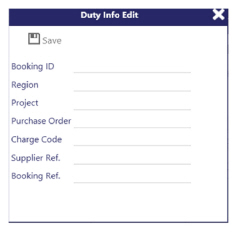
The dialog contains a form with seven editable text box fields (in some cases Supplier and Booking references may be hidden as they require extra user privileges). The content of each text box can be:
Placing the cursor on any of the text boxes containing the “Multiple Values” place holder will cause Clear to appear. When using Duty Info, it can also be used for deleting the value from the field. If no changes are made the save action won't make any changes to that field on any of the duties. Select Save to save the new values for each duty. This action applies changes to all duties. Select X to cancel the operation These items can be made mandatory for a given hour type, using the settings found in Admin | Finance | Hour Types |
|
Confirm Duty |
Selecting a single or series of duties and by clicking on this icon will confirm the selected duties, the font will change to bold (see the “Scheduling in Site View - Scheduling - Confirm a Duty” subsection in the Plan | Sites section of this guide) |
|
Temporary Duty |
Selecting a single or series of duties and by clicking on this icon will set the selected duties to the temporary status; the font will change to italic (see the “Scheduling in Site View - Scheduling - Confirm a Temporary Duty” in the Plan | Sites section of this guide) |
|
Approve Duty |
Selecting a single or series of duties and by clicking on this icon will set the selected duties to the Approved Duty status; this icon will appear next to the duty (see the “Scheduling in Site View - Scheduling - Duty Approval” in the Plan | Sites section of this guide) |
|
Un-approve Duty |
Selecting a single or series of duties and by clicking on this icon will set the selected duties to the Un-approved status and remove the icon from the duties (see the subsection “Un-approve Duties in Duty Filter” in the Plan | Sites section of this guide) |
|
Bulk Approve Duties |
Select to Bulk Approve all the Rate generated duties in the weekly view and lock them to prevent further editing |
|
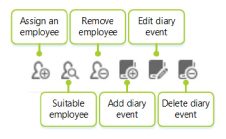
Assign an Employee |
Selecting a duty (normally an open post) and clicking on this icon will bring up a picklist of employees that you can assign to the duty |
|
Suitable Employee |
Selecting a duty (normally an open post) and clicking on this icon will bring up a picklist of suitable employees, based upon a series of checks and balances that you can assign to |
|
Remove Employee |
Selecting a duty that has an employee assigned and by clicking on the icon will remove the employee from the duty |
|
Add Diary Event |
Select to create a diary event to be added |
|
Edit Diary Event |
After selecting a diary event, select to edit it |
|
Delete Diary Event |
After selecting a diary event, select to delete it |
|
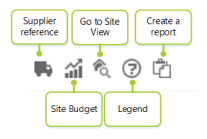
Supplier Reference |
Select a duty, then select to add a supplier’s reference to the duty - (See Scheduling Suppliers Reference section in the Plan | Sites part of this guide) |
|
Site Budget |
Select to access the Site Budget page - see Admin | Finance | Site Budget for |
|
Site View |
Select to view the Site View page - See Plan | Site for more information |
|
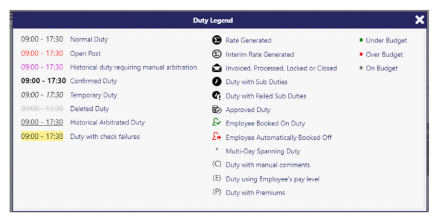
Legend |
Select to load the legend for the Site Teams: 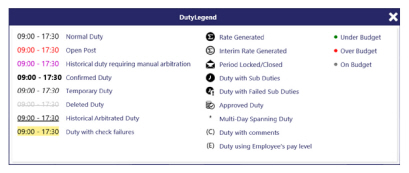
|
|
Reports |
Roll over this option to create either an Incident Report or a Duty Compliance Report by selecting the appropriate link: 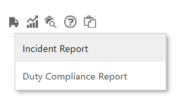
The Site Incident Report lists all site incidents recorded for the site in a date range in chronological order. The Duty Compliance Report (with two thresholds held as a System Setting) for Contract /Budget variance and Average worked variance. |
Total Summary
Screen Layout and Fields
Each column on the screen shows the budgeted and actual hours/amount. There are, however, no row totals. Therefore, this summary section has been added to the screen to show:
-
Hours
-
Actual Variance
-
Estimated Variance
-
Amount
-
Actual Amount
-
Estimated Amount
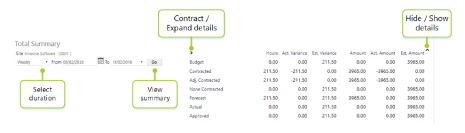
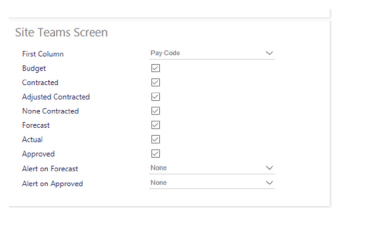
Details to be included in the summary table are selected in the User Settings from the main menu:
|
Site |
Name of the site |
|
Budget |
Calculated by adding up the hours and amounts using the site card ID and the budget date where the date falls within the selected date range |
|
Contracted |
Contracted amount of hours or financial amount. This will total up all contract phase rate generated records for the duration. It will include deleted duties (because Timegate does not remove contract phase records when a duty is deleted). It will not include meal breaks as Timegate does not rate generate meal breaks. This value does not include any open post rota loaded duties as open post duties cannot be rate genned. |
|
Adjusted Contracted |
Those hours or financial amounts that are contracted and have been adjusted. This will show exactly the same as Contracted above, with the exception being that it won’t show deleted duties. |
|
None Contracted |
Those hours or financial amounts that are not contracted. This will show total rate generated hours for the latest rate generation phase available (pay/bill if duty is arbitrated, scheduled if future, etc). It will not include meal breaks and it also will not include any duties where the duty has contract start and end times, i.e., if it’s a contracted duty. |
|
Forecast |
This will show total rate generated hours for the latest rate generated phase available (pay/bill if duty is arbitrated, scheduled if future, etc). it will not include meal breaks and it also will not include duties if the employee Salaried Staff check box is selected. It includes any rota loaded and non-rota loaded duties. This also includes any deleted duties. Calculated by retrieving all duties whose slot date falls within the selected date range and then working out the latest phase rate generated data available and adding up the hours and amounts. |
|
Actual |
This will show all total rate generated hours for the pay/bill phase only. It will not include meal breaks. It will not include duties either if the employee Salaried Staff check box is selected. It includes any rota loaded and non-rota load duties. Deleted duties will be excluded because there is no pay/bill phase rate generation data for a deleted duty. Calculated by retrieving all duties whose slot date falls within the selected date range and then only totalling up the hours and amounts from pay/bill phase rate generation data |
|
Approved |
Hours approved. This is exactly the same as Actual above except it only shows duties that have been finance approved |
|
Est. Variance |
Calculated by subtracting the “Forecast” from the “Budget” figures above to give either a positive (over budget) or negative (under budget) |
|
Variance |
Calculated by subtracting the “Actual” from the “Budget” figures above to give either a positive or negative |
Screen Actions
|
Weekly/Daily |
Select summary period - either daily or weekly |
|
From |
Start date selected from drop-down list |
|
To |
End date selected from drop-down list |
|
Go |
Select to populate the Total Summary table |
|
Ʌ/V |
Show or hide the details in the summary |
|
</> |
Expand or contract details in the summary |
Worked example 1
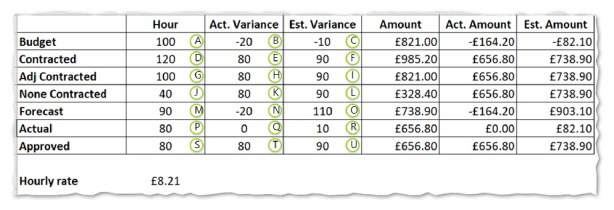
The following example shows how the values in the Total Summary table above are calculated. The example looks at the Hours, Actual Variance and Estimated Variance. See the key under the example to understand how each field is calculated. The Amount, Act. Amount and Est. Amount are calculated in the same way as the aforementioned but for financial values, rather than hours. For the purpose of this illustration, the amount values have been calculated on an £8.21 hourly rate.
|
A - Budget Hours B - Budget Actual Variance C - Budget Estimated Variance D - Contracted Hours E - Contracted Hours Actual Variance F - Contracted Hours Estimated Variance G - Adjusted Contracted Hours H- Adjusted Contracted Hours Actual Variance I - Adjusted Contracted Hours Estimated Variance J - None Contracted Hours |
K - None Contracted Hours Actual Variance: L - None Contracted Hours Estimated Variance M - Forecast Hours N - Forecast Hours Actual Variance O - Forecast Hours Estimated Variance P - Actual Hours Q - Actual Hours Actual Variance R - Actual Hours Estimated Variance S - Approved Hours T - Approved Hours Actual Variance U - Approved Hours Estimated Variance |
Worked Example 2
In this example, a rota loaded week has been set up in the Timegate database:
The Total Site Contract Times Hours is 263.5 hours for the site
One rota loaded duty has been deleted (which was an hour in length)
A new adhoc duty has been created (which was three hours in length)
There are five open post duties in the contract (each 8.5 hours long)
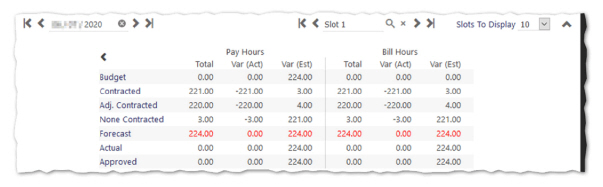
As mentioned previously, there are five open post duties. They are 8.5 hours each. Between them, that equates to 8.5 hours x 5 days = 42.5 hours.
Therefore, 263.5 hours – 242.5 hours = 221 rota loaded/contracted hours. This value is shown in the Contracted Total field.
The 1 rota loaded duty which was an hour in length reduces this 221 hours - 1 hour = 220 hours. This is shown in the Adj. Contracted Total” field.
The manually added a 3 hour duty can impacts the Forecast Total field. The 3 hours are added to the rota loaded/contracted hours (Contracted Total) of 221.0 hours. Therefore, the value is 221 hours + 3 hours = 224 hours.
This is a future week. As a result, the Actual and Approved Totals are both zero.
The Var (Act) and Var (Est) fields are calculated as follows;
-
Var (Act) – Actual hours – Total Hours for each row
-
Var (Est) – Forecast hours – Total Hours for each row
For example, for the contracted row, the calculation would be as follows;
-
Var (Act) = Actual Total Hours (0 hours) – Contracted Total (221 hours) = -221.00 hours
-
Var (Est) = Forecast Total Hours (224 hours) – Contracted Total (221 hours) = 3 hours
Note: The data displayed is built from rate generated data. If a handful of duties are edited (i.e. they are given a change of duration), then when returning to Site View, Rate Generation may not yet have picked up the duties to re-rate generate them. The figures seen may be based on slightly older rate generation data.
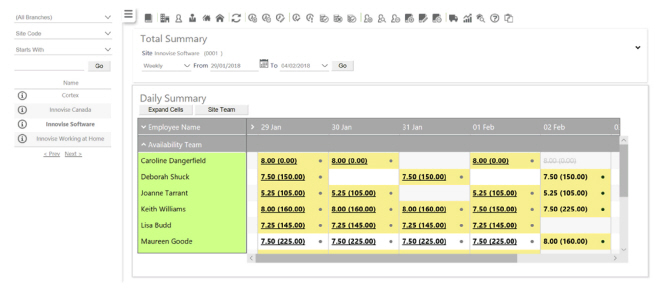
Daily Summary
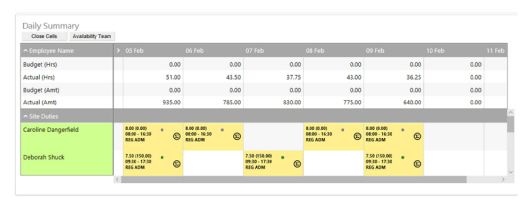
Close Cells view:
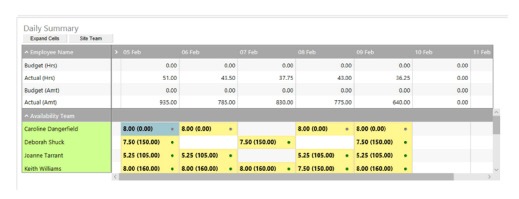
After Expand Cells has been selected:
Screen Layout and Fields
|
Employee Name |
Name of the employee that the duty is allocated to |
|
Site Duties |
This view shows the employee on the site that has duties in the selected period of time. It only includes those employees with site duties. Select the duty to get to the Duty |
|
Availability Team |
The various duties of the different employees on the site. The Availability Team view includes employees in the given time period that do not have duties assigned to them. Select the duty to get to the Duty Edit screen |
|
Budget (Hrs) |
The weekly or daily budget for a specific year in hours |
|
Budget (Amt) |
The weekly or daily budget for a specific year, as a monetary amount |
|
Actual (Hrs) |
The actual weekly or daily actual hours for a specific year |
|
Actual (Amt) |
The actual weekly or daily money earnt for a specific year |
|
Diary Events |
Any diary events for the period are shown in their own section under the Availability |
Screen Actions
|
Close/Expand Cells |
Toggle views with more or less information as shown above |
|
Availability Team/ |
This button enables the user to switch between a view that shows all team members and their scheduled duties and those members with no scheduled duties in the selected period. The Availability Team view is particularly useful to fill open posts by moving staff to/from other sites to best-fit staff to work. This may involve a range of moves to achieve the optimal fit and a single screen/section showing “who is doing what” within a date range is highly useful when undertaking this task. In effect, this is a multiple employee diary view to allow the user to identify the best fit for any scheduling gaps |
|
Right mouse button click on grid |
Clicking the right mouse button on the grid brings up a variety of options for the user in terms of actions: 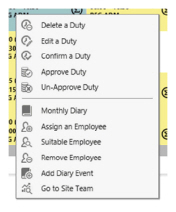
These options have been detailed previously when explaining the toolbar functionality ( see above) |