Plan: Sites
How to get there: Plan | Sites
Before starting to schedule any duties, the basic information about those duties must have been set up on the system. All sites on which duties are to be performed must have been set up, as per the Set Up section of this guide. Although it is possible to schedule work on a site without contracted duties, these should be entered before you start to schedule (RotaLoad and Auto-Scheduling uses contracted duties). The task of planning sites will be significantly easier if the site holds all possible information. Examples of this include qualifications required, the number of weeks in its scheduling cycle, zones, competency levels and whether trained employees should be used.
All employees that will be scheduled to work must have been set up in the Set Up section of this guide. Again, the more detail provided at that point in time, the easier planning will be.
To undertake scheduling, the user will need to go to the operations screens, particularly Site View, where RotaLoading can take place (scheduling duties “n” weeks at a time, where “n” is the number of duties in rotation).
In this section of the guide, all areas of Site Planning are covered.
Accessing Plan Sites
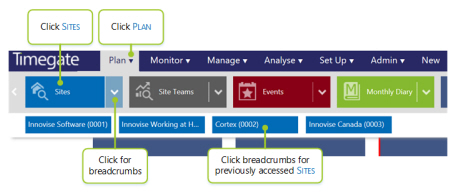
From the main menu, the user must:
-
Select Plan
-
Select Sites
-
Or select the down arrow next to Sites to view the breadcrumbs and select a previous site to be loaded
A screen similar to the one following will be displayed. It comprises five sections:
-
Site Search
-
Site View Toolbar
-
Pay and Billing Hours
-
Site View Header
-
Site View Grid
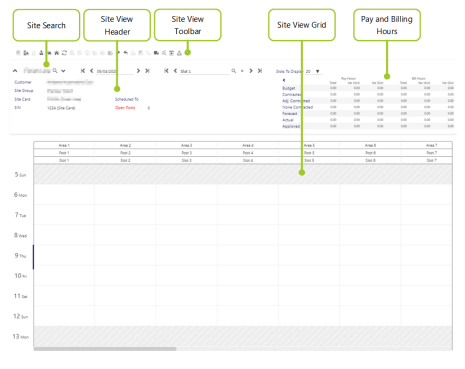
When a user first opens this page, it is fully expanded, with all five areas in view. If a user decides to hide content on the screen by pressing next to the Site Name search bar, the next time that they come to load the screen, the content will
be minimised. When Sites is selected, by default, the last site that was viewed is loaded. To view other sites, the user must search for them using the search bar.
Depending upon how the site has been configured, users may see a bold red message at the top of the page, next to the name of the site as shown:
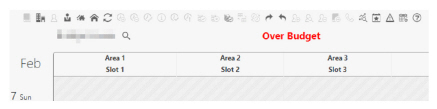
The message may read either “Over Budget” or “On Budget”. This message is shown when companies have decided to help schedulers prevent a site from going over budget for a selected period of time (from between 1 to 4 weeks). Every time a duty is added, the site budget is checked to ensure that it is on budget or that it is not over budget. If it is, the appropriate message is displayed, letting schedulers know that it is time to take action as appropriate (e.g. deletion of a duty). The feature is implemented at an individual site level, and not at a Timegate-wide level. Further details about using this feature can be found in Admin | Finance | Site Budget.
Site Search
The Site Search bar can be split into two parts, one for searching for Sites, the other for searching for specific Slots on
given days.
Searching for a site is simple using the Site Search functionality. From the tool bar, select either:
-
- to show a list of previously visited sites in a drop down menu. Select the site of choice from the list.
-
- to open the Select Site window, as shown below:
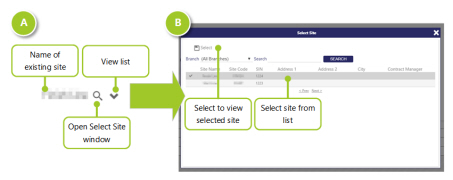
Select a Site from the list of those available. Once chosen, select Select
Select Site Screen Layout, Actions and Fields
|
(All Branches) |
Select Branches to search across |
|
Search |
Enter search term in here |
|
Search |
Select to initiate the search |
|
< Prev |
Move backwards through list of results |
|
Next > |
Move forwards through list of results |
|
Site Name |
The name of the site |
|
Site Code |
Unique Site Code |
|
SIN |
Site ID number |
|
Address1 |
First line of address for the site |
|
Address2 |
Second line of the address for the site |
|
City |
City where site is located |
|
Contract manager |
Contract Manager’s name for the site |
Select Site Days and Slots Layout, Actions and Fields
The second part of the search toolbar is used to find slots on given days. It looks as follows:
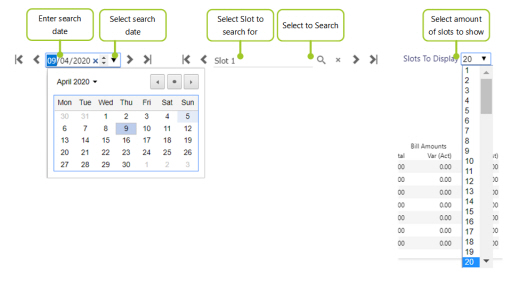
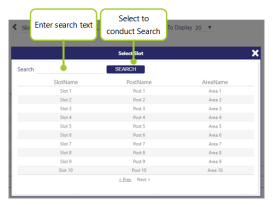
Select the Date that you wish to search on/from and an appropriate the Slot. By selecting the the Select Slot dialog will load up as shown:
Once you have chosen, select Search. The results will then be shown on the screen.
You can also choose how many slots that you display on the screen at any one time (using the Slots To Display drop-down list). By default, this is set at 20.
Site View Toolbar
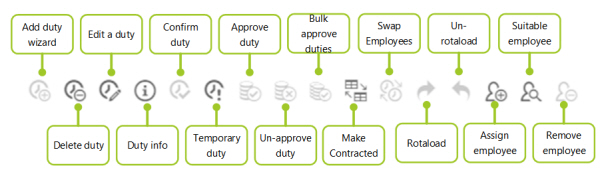
The toolbar provides the user with quick access to other parts of the system and to undertake actions on the selected duty/duties. The toolbar is shown in one piece, then broken down into several different sections:

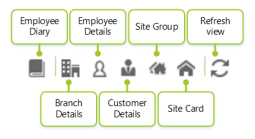
Each button is shown and briefly explained.
|
Employee Diary |
Select an employee on a duty, then select Employee Diary to open that employee’s diary - See Plan | Diary for more information |
|
Branch Details |
Select an employee on a duty, then select Branch Details to open that employee’s Branch - See Set Up | Branches | General for more information |
|
Employee Details |
Select an employee on a duty, then select Employee Details to open that employee’s details - See Set Up | Employees | General Tab for more information |
|
Customer Details |
Select to go straight to the Customer record - See Set Up | Customers | General for more information |
|
Site Group |
Select to go straight to the Site Group record - See Set Up | Site Groups | General for more information |
|
Site Card |
Select to go straight to the Site Card record - See Setup | Sites | General Tab for more information |
|
Refresh View |
Select to refresh the screen |
|
Add Duty Wizard |
Select an empty post , then select Add Duty Wizard to add a duty (See the “Add a Duty Wizard” subsection below for more information) |
|
Delete Duty |
Select to delete a duty (See the “Delete a Duty” subsection below for more information) |
|
Edit a Duty |
Select to edit a duty (See the “Site View - Edit a Duty” subsection below for more information, along with the Duty | Edit parts of this guide) |
|
Duty Info |
Select when selecting multiple duties to edit their information. The following dialog box is loaded when the icon is pressed (it looks similar to the Duty Info tab in Duty | Edit): 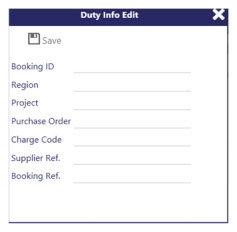
The dialog contains a form with seven editable text box fields (in some cases Supplier and Booking references may be hidden as they require extra user privileges). The content of each text box can be: 1. Empty – All selected duties have empty records for that field. 2. Concrete value – All selected duties have the same value for that field. 3. “Multiple Values” – The selected duties have different values for that field. Placing the cursor on any of the text boxes containing the “Multiple Values” place holder will cause a Clear button to appear. When using Duty Info, it can also be used for deleting the value from the field. If no changes are made the save action won't make any changes to that field on any of the duties. Select Save to save the new values for each duty. This action applies changes to all duties. Select X to cancel the operation These items can be made mandatory for a given hour type, using the settings found in Admin | Finance | Hour Types |
|
Confirm Duty |
After selecting a single or series of duties, select Confirm Duty to confirm the selected duties. The font will change to bold (See the “Scheduling in Site View - Scheduling - Confirm a Duty” subsection of this guide) |
|
Temporary Duty |
After selecting a single or series of duties, select Temporary Duty to set the selected duties to the temporary status. The font will change to italic (see the “Scheduling in Site View - Scheduling - Confirm a Temporary Duty” subsection of this guide) |
|
Approve Duty |
After selecting a single or series of duties, select Approve Duty to set the selected duties to the Approved Duty status. The approve duty icon will appear next to the duty (see the “Scheduling in Site View - Scheduling - Duty Approval” subsection of this guide) |
|
Un-approve Duty |
After selecting a single or series of duties, select Un-approve Duty to set the selected duties to the Un-approved status and remove the icon from the duties (see the subsection “Un-approve Duties in Duty Filter” in this guide) |
|
Bulk Approve Duties |
Select to bulk approve all the Rate Generated duties in the weekly view and lock them to prevent further editing |
|
Make Contracted |
Select an adhoc duty to make it contracted. The duty times, along with employee details are then scheduled in the future |
|
Swap Employees |
Select two duties on the grid and select Swap Employees to switch their duties |
|
Rotaload |
Select to Rotaload |
|
Un-rotaload |
Select to Un-rotaload |
|
Assign Employee |
Selecting a duty (normally an open post) and select this icon to bring up a picklist of employees that you can assign to the duty. see the Assign An Employee section of Plan | Duty Edit for further information |
|
Suitable Employee |
Selecting a duty (normally an open post) and select this icon to bring up a picklist of suitable employees, based upon a series of checks and balances that you can assign to the duty. see Plan | Duty Edit | Suitable Employee for further information |
|
Remove Employee |
Selecting a duty that has an employee assigned and select this icon to remove the employee from the duty |
|
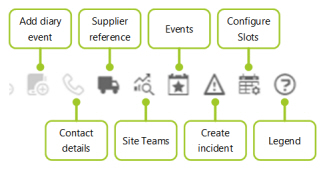
Add Diary Event |
Select to create a diary event to be added |
|
Contact Details |
Select a duty and Contact Details to view the employee’s contact details |
|
Supplier Reference |
Select a duty and select Supplier Reference to add a supplier’s reference to the duty |
|
Site Teams |
Select to view the Site Teams page - See Plan | Site Teams for more information |
|
Events |
Select to view the Events page, to add or view events - See Plan | Events for more information (Events Overview and Plan Events in this guide) |
|
Create Incident |
Select to create an Incident |
|
Configure Slots |
Select to Configure Slots of the grid - See Configuring the Area/Post/Slot headings below |
|
Legend |
Select Legend to load a legend for the Site View Grid (as shown in the screenshot): 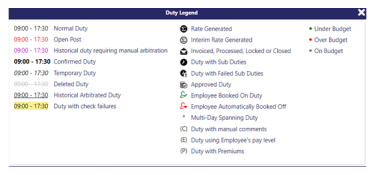
|
Pay and Billing Hours
This collapsible part of the screen provides summary information including budgeted hours, contracted hours, adjusted contracted hours, forecasted hours, actual hours and approved hours. This is for both pay and bill hours. The same type of information can be accessed in the Site Teams view. Using this information, you can track spending and undertake budget reviews. Access to this functionality is controlled by a security item, so it can be turned on and off for specific roles. By default, budget information is not expanded (shown on screen) - it can take a while to load and also takes up a large proportion of the screen. The Pay and Billing Hours part of the screen is shown below in both its compact, default view (A) and it’s extended view (B):
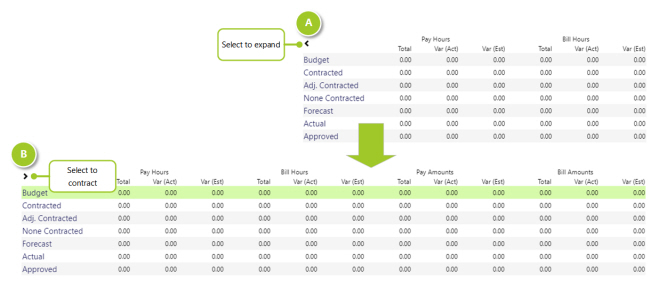
The first column contains the names of the different rows. These are as follows:
|
Budget |
Calculated by adding up the hours and amounts using the site card ID and the budget date where the date falls within the selected date range |
|
Contracted |
Contracted amount of hours or financial amount |
|
Adj. Contracted |
Those hours or financial amounts that are contracted and have been adjusted |
|
None Contracted |
Those hours or financial amounts that are not contracted |
|
Forecast |
Calculated by retrieving all duties whose slot date falls within the selected date range and then working out the latest phase rate gen data available and adding up the hours and amounts |
|
Actual |
Calculated by retrieving all duties whose slot date falls within the selected date range and then only totalling up the hours and amounts from pay/bill phase rate generation data |
|
Approved |
Hours approved |
The Pay Hours, Bill Hours, Pay Amounts and Bill Amounts have three values against the different rows as follows:
|
Total |
Total pay/bill hours/amounts |
|
Est. Variance |
Calculated by subtracting the “Forecast” from the “Budget” figures above to give either a positive (over budget) or negative (under budget) |
|
Variance |
Calculated by subtracting the “Actual” from the “Budget” figures above to give either a positive or negative |
Worked example
The following example shows how the values in the Total Summary table are calculated. The example looks at the Hours, Actual Variance and Estimated Variance. See the key under the example to understand how each field is calculated. The Amount, Act. Amount and Est. Amount are calculated in the same way as the aforementioned but for financial values, rather than hours.
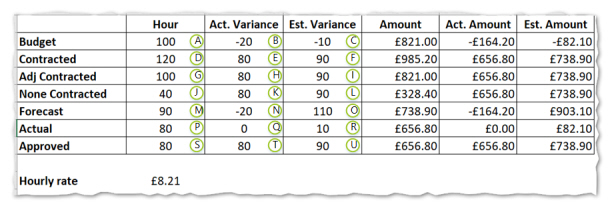
For the purpose of this illustration, the amount values have been calculated on an £8.21 hourly rate
|
A - Budget Hours B - Budget Actual Variance C - Budget Estimated Variance D - Contracted Hours F - Contracted Hours Estimated Variance J - None Contracted Hours |
K - None Contracted Hours Actual Variance: L - None Contracted Hours Estimated Variance M - Forecast Hours N - Forecast Hours Actual Variance O - Forecast Hours Estimated Variance P - Actual Hours Q - Actual Hours Actual Variance R - Actual Hours Estimated Variance S - Approved Hours T - Approved Hours Actual Variance U - Approved Hours Estimated Variance |
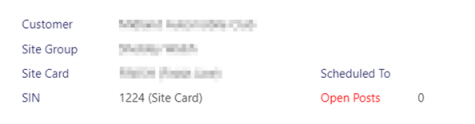
Site View Header
The Site View Header is shown as follows:
|
Customer |
Name of the Customer |
|
Site Group |
Name of the Site Group |
|
Site Card |
Name of the Site being displayed |
|
SIN |
Unique Site Identification Number. The SIN can be entered on the Sites Maintenance screen. It can either be added manually or allocated automatically by the system |
|
Scheduled To |
This is the last date to which RotaLoad has been completed. Each time RotaLoad is run, the Schedule To date gets updated to the end of that week. |
|
Open Posts |
This shows the number of open posts for the week currently displayed. An open post is a duty that does not have an employee allocated to it. |
Site View Grid
This grid shows a whole week of duties for a site. Down the left hand side of this grid are the days and dates for the week being shown. Today's date is highlighted with a blue line. Along the top of the screen are the duty slot numbers 1, 2 etc. (or headers, depending upon how they have been configured). Each duty slot (shown as a “cell” that’s underlined) holds details for one duty. It shows start time, finish time, hour’s type, pay level and employee allocated to that duty. A duty, or multiple duties can be selected by clicking on them with the left-mouse button. Once selected, they can be actioned using the context sensitive choices on the toolbar (see Site View Toolbar for more information). A context sensitive right-hand mouse button option list is available too. This comprises those actions that can be undertaken on the selected duty/duties. Additionally, drag-and-drop is supported. For example, a duty can be selected with the left-hand mouse button and dragged into another slot. Any necessary validation will take place regardless of how duties are modified/added etc. A screenshot of the Site View Grid is given below:

Configuring the Area/Post/Slot headings
Timegate displays the Site View grid, when you open a site in its planning view (Plan | Site) as described above. From here, you can see a week of duties for a site. Down the left hand side of the grid are the days and dates for the week. Along the top of the screen are the Areas/Post/Slot Headings (e.g. Area 1, Post 1, Slot 1 and Area 1, Post 2, Slot 2 etc.). Each duty slot holds details for one duty.
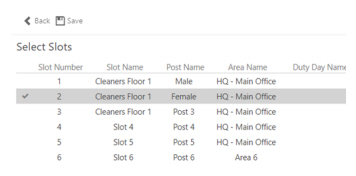
From within the Select Slots settings page, accessed by selecting Configure Slots on the toolbar, the user can rename the area, post and slot heading into something that is more suitable for their business as shown:
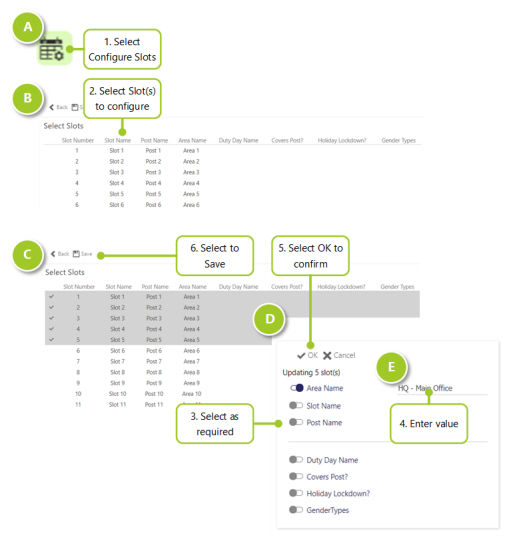
1. Select Configure Slots on the toolbar
2. Select the slot(s) that require configuration. Select one or more slots using the left-hand mouse button
3. Select the various values that you wish to update.
4. Enter the values as required. The Area Name, Slot Name and Post Name can be updated separately (depending upon how the user wishes to model their areas/slots/posts), for example, they may have 5 slots in the same Area, spread across two Posts, with different labels and settings for each Slot. This is shown in the screenshot below:
The user may wish to enter values for/enable the following cell options too. By default they are are all disabled:
-
Duty Day Name - Select the Duty Day Type from the selection available through the pop up dialog box
-
Covers Post? - Select to display the Covers Post? flag
-
Holiday Lockdown? - Select to display the Holiday Lockdown? flag
-
Gender Types - Select the Gender Type for the slot from the selection available through the pop up dialog box. This ensures that only people of the selected gender are able to fill the slot
5. Select OK to update your changes. The user should repeat tasks 2 through 5 until the structure meets with their business need
6. Save the settings for the site by selecting Save
Add a Single Duty
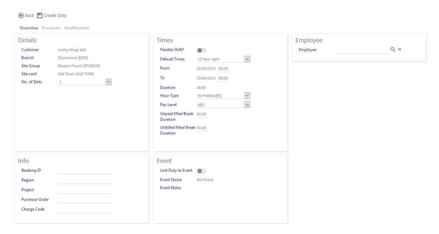
Select an empty post/slot and select Add A Duty. Alternatively, double click with the left-hand mouse button onto the empty slot to add a duty, or right-click the duty and select Add A Duty. The Add A Duty page is displayed as shown below. Fill in any fields that need completing, either typing in the necessary values, or choosing from the drop-down lists. Flexible Shifts can be created here. For more information about these, see the next section (Flexible Shift). The Add A Duty page comprises three pages:
-
Overview
-
Premiums
-
Qualifications
Overview Tab
Screen Layout and Fields
|
Customer |
Name of the customer |
|
Branch |
Name of the branch |
|
Site Group |
Name of the Site Group |
|
Site Card |
Name of the Site |
|
No of Slots |
Number of slots that this duty will run across - i.e. how many people are needed in terms of posts/positions for the duty |
Details
|
Flexible Shift |
Select if this shift is flexible. A Flexible Shift has a flexible start and finish time, but is allocated a number of hours within a given window of time for example a shift must be two hours long between 09:00 and 15:00 hours on 31st January 2018. When ticked, the To field is replaced with a Completed By field. For more information, see the “Flexible Shift” subsection of this guide below. |
|
Default Times |
Predefined timed in a drop-down list that can be used to populate the hours components of the From and To/Completed By boxes |
|
From |
Enter the start date and time |
|
To/Completed By |
Enter the end date and time |
|
Duration |
Calculated duration of the shift |
|
Unpaid Meal Break Duration |
Length of unpaid break for lunch in HH:mm format |
|
Unbilled Meal Break Duration |
Length of unbilled break for lunch in HH:mm format |
|
Hour Type |
Type of hours are allocated from the drop-down list for example regular, overtime etc |
|
Pay Level |
Pay details are allocated from the drop-down list for example administrator, manager etc |
Times
Info
|
Booking ID |
Booking ID for the duty (depending upon how the details for the duty’s specific hour type have been configured in Admin | Finance | Hour Types, this field may be mandatory) |
|
Region |
Region that this duty relates to (depending upon how the details for the duty’s specific hour type have been configured in Admin | Finance | Hour Types, this field may be mandatory) |
|
Project |
Name of the project that this duty is part of (depending upon how the details for the duty’s specific hour type have been configured in Admin | Finance | Hour Types, this field may be mandatory) |
|
Purchase Order |
The purchase order that this duty forms part of the deliverables (depending upon how the details for the duty’s specific hour type have been configured in Admin | Finance | Hour Types, this field may be mandatory) |
|
Charge Code |
Charge code that will be charged for paying for the duty (depending upon how the details for the duty’s specific hour type have been configured in Admin | Finance | Hour Types, this field may be mandatory) |
|
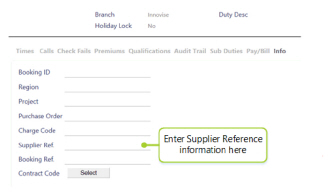
Supplier Ref |
Reference supplied by customer (depending upon how the details for the duty’s specific hour type have been configured in Admin | Finance | Hour Types, this field may be mandatory) |
|
Booking Ref |
Booking reference number for the duty (depending upon how the details for the duty’s specific hour type have been configured in Admin | Finance | Hour Types, this field may be mandatory) Note: The Booking Ref. field has a specific security item. It will only be available on the Duty Add page if the Timegate User has read/write access. Note: The Booking Ref field has a system setting (AutoGenBookingReference) to auto generate the booking reference based on the Slot information. If this option is enabled, then the Booking Ref field will not be displayed on this, the Duty Add page and will be auto generated regardless of the Mandatory Duty Info setting. |
|
Contract Code |
Select a contract code from the pop-up menu box that is displayed once Select has been clicked. The pop-up menu is shown below: 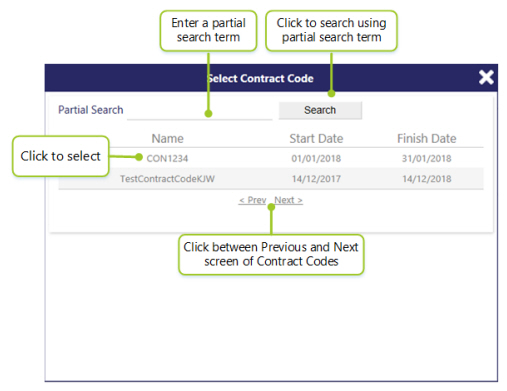
To search for a specific contract code, type a character/part of the Contract Code name in the Partial Search box and then click on the Search button. Select <Prev and Next> to scroll through multiple pages of contract codes Note: Contract Code is the only field on the Info page that cannot be made mandatory. The reason for this is that if this mandatory option was enabled while Contract Code were available to choose it would work fine. but Contract Codes have a finish date and if contract codes were to expire but were set to mandatory, it would prevent Duty Add working. This is a lesser used field so this option was left out for simplicity. |
Employee
|
Employee |
Select an employee to be assigned to the duty from the dialog box that is shown: 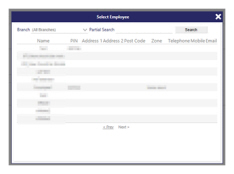
Note: Only one employee can be added to a duty |
Event
|
Link Duty to Event |
Select if you wish for the duty to be attached to an event - when selected, more fields are displayed as shown: 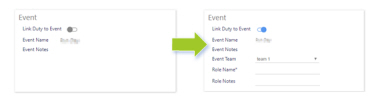
|
|
Event Name |
Enter the name of the event |
|
Event Notes |
Enter any notes relating to the event |
|
Event Team (only visible if linked to an event, as above) |
Name of the team that the duty is/duties are going to be created within - select from the drop down list |
|
Role Name (only visible if linked to an event, as above) |
Name of the role that the duty is/duties are associated with |
|
Role Notes (only visible if linked to an event, as above) |
Any notes associated with the role |
Action Buttons
|
Back |
Return back to the previous (Site Planning) page |
|
Create Duty |
Select to save the changes made and in turn to create a duty. When selected, a validation messages box may appear, giving the user details of the tests that have failed for example if an employee is not trained for the site. The user should select Accept to add the duty or Reject to stop the process. The user can also add a comment. Following acceptance, the user will be returned to the screen from which they came with the duty displayed in the appropriate place |
Premiums Tab
Screen Layout and Fields

|
Code |
Premium Code |
|
Description |
Premium Description |
|
Applies To? |
Premium Type of Employee or When Matched |
|
Per |
Premium Shift or Hourly |
|
Phase Employee |
Premium Duty Rate Generation Phases that the Premium is applied to, Default is all phases |
|
Start Time |
Premium Only applied when a Duty Times span this time |
|
Finish Time |
Premium Only applied when a Duty Times span this time |
|
Minimum Hours |
Premium Only applied when a Duty duration is greater or equal to this time |
|
Ignore Minimum Hours |
Ignore the Minimum Hours when determining whether to assign the Premium |
|
Pay Amount |
Premium Amount Payable to the Employee |
|
Bill Amount |
Premium Amount Billable to the Site |
|
Manual Pay |
Over ride the Pay Amount with this value |
|
Manual Bill |
Over ride the Bill Amount with this value |
|
Pay Column |
Premium Post Pay Column where Pay Amount is defined |
|
Bill Column |
Premium Post Pay Column where Bill Amount is defined |
|
Applies Day? |
Premium Days of Week it is applied, available options are All, Mon, Tue, Wed, Thu, Fri, Sat, Sun, Weekday, Public Holiday |
|
Min Shift Pay |
Premium Minimum Amount payable for the Premium |
|
Min Shift Bill |
Premium Minimum Amount billable for the Premium |
|
Trash Icon |
Delete Premium from the Employee |
Action Buttons
|
Back |
Return back to the previous page |
|
Create Duty |
Select to create a duty |
|
+ Select Premium |
Select to add premiums to a duty. A pop-up list of all premiums will be shown. Select the Premium(s) from the list, |
Qualifications Tab
Screen Layout and Fields

|
Qualification Code |
Unique identification code for the qualification |
|
Qualification Description |
Description of the Qualification |
Action Buttons
|
Back |
Return back to the previous (Site Planning) page |
|
Create Duty |
Select to save the changes made and in turn to create a duty. When selected, a validation messages box may appear, giving the user details of the tests that have failed for example if an employee is not trained for the site. The user should select Accept to add the duty or Reject to stop the process. The user can also add a comment. Following acceptance, the user will be returned to the screen from which they came with the duty displayed in the appropriate place |
|
+ Select Qualifications |
Select to add qualification(s) to a duty. A pop-up list of all qualifications will be shown. Select the Qualification(s) from the list |
Flexible shift
Flexible Shifts can be added to the schedule or adhoc type scheduling. This is very useful where the employee only works a few hours within a contracted duty.
Adding a flexible shift
When a user wishes to create a flexible shift, the start and end dates they enter will indicate the overall time window in which the duty can be worked. They select Flexible Shiftand enter duration.
For example, an employee is scheduled to work a two hour shift at some point between 18:00 and 06:00.
The user would select the flexible shift check box. They would then create a From time of 18:00 and a Complete By of 06:00 (defining the overall window). Finally, the scheduler would enter 02:00 into the Duration field
If a single cell in the Site View is selected when the Duty Add option is selected, then the Slot drop-down list will change to a Slot From drop-down list.
A further drop-down list (Called No. of Slots) will appear underneath, containing a list of numbers from 1 to the maximum slots in the system.
What the user can then do is change this default from “1” to “10” (for example) and when the Create Duty option is clicked, multiple duties will be created from the starting slot to the number of selected slots. Where a duty already exists in a slot, then this is skipped and the duty is created in the next available slot.
Flexible shift processing
Ticking the Flexible Shift check box will result in several things will happening:
-
The To label will change to Complete By
-
A new label (Duration) and Time selection will appear to the right of the Complete By date/time fields.
When a normal (i.e. non-flexible shift is created), this duration field will show the calculated duration based on the start and finish times and will not be editable.
New Processing Warning
Currently, when creating a manual duty, it will be created in the slot that the user selected from Site View. If the week is then subsequently RotaLoaded, the manual duty will be moved to the right to make room for the contracted duty. The slot heading is also changed to say Conflicting Duty.
If a slot is due to hold a contracted duty, a new piece of text is displayed (Contracted Duty) next to the Post name in the drop-down list. A user has the choice of still using that slot or selecting the next available one that will not hold a contracted duty.
If the user chooses a Number of Slots other than 1, when Save is clicked, 2 checks will be performed. Firstly, if a duty is already occupying a slot, then the processing will move over this slot and create the duty in the next available slot. Similarly, if a slot is marked as a contracted duty slot, again, the processing will move over this slot.
Flexible Shifts cannot be created in the Duty Edit View but you can change the duration.
Arbitrating a Flexible Shift
The settings for arbitration are global in the Arbitration Settings Tab or can be configured at Site level.
See the following sections for further information.
-
Admin | System | System Settings | Arbitration (This page contains the default settings for Arbitration profiles)
-
Set Up | Sites | Call Settings | Arbitration Settings (Auto arbitration settings specific to each site)
-
Admin | General | Arbitration Profiles (Arbitration profiles are created from here)
Flexible Shifts in the Site Contract Wizard
In order that flexible shifts can be RotaLoaded, when maintaining a site contract within the Contract Wizard window, the Flexible? check box must be selected and the Completed By field must contain the time for the end of the allowable shift window. The following is an example of a flexible shift that is to be completed by 23:00:
Adding Multiple Duties
Follow these steps to add multiple duties
-
Select an empty post/slot
-
Press CTRL on your keyboard
-
Select another empty post/slot
-
Continue the above steps until all of the empty posts/slots you wish to add duties to are selected
-
Select Add A Duty. Alternatively, right-click one of the duties and select Add A Duty.
-
The Add A Duty page is displayed . Fill in any fields that need completing, either typing in the necessary values, or choosing from the drop-down lists (see above for further information)
Assigning a single employee to multiple duties
If you wish to assign a single employee to multiple duties (across different days):
-
Either select the duties or select the empty posts/slots where you want to create the duties
-
Check the duty details / enter the new duty details
-
Select Single Assign - note how the word Employees changes to Employee as shown:
-
Select an Employee from the pop-up displayed when pressing the magnifying glass
-
Select Save / Create Duty
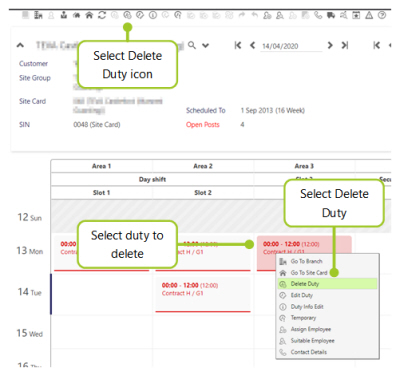
Site View - Delete a Duty
There are two ways to delete a Duty.
The first is as follows: Select duty to be deleted, then select Delete Duty. A validation dialog box, will be displayed. Enter any comments and select the Delete Duty button to remove the duty. Alternatively, select the duty to be deleted. Select with the right-hand mouse button. Select Delete Duty from the menu. A validation dialog box, will be displayed. Enter any comments and select the Delete Duty to remove the duty.
Both deletion methods are seen in the screen-shot below.
Once the duty is deleted, it will be shown as grayed out with a line through it. This shows that there was a duty added to the contracted/scheduled hours but it has been removed.
When a user clicks on the edit duty icon, a full duty audit trail will be created.
Site View - Edit a Duty
The Edit a Duty content is documented within the Plan | Duty Edit part of this guide. refer to that section of the manual for more information.
There are three ways to edit a duty:
-
Double-click on the duty within the grid with the left-hand mouse button
-
Right-click on the duty within the grid and select Edit a Duty
-
Click on the duty within the grid and then click on the Edit a Duty icon in the button bar at the top of the screen
By default, the Duty Edit | Times Tab is loaded:
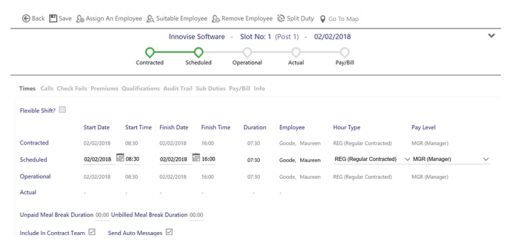
Edit - The Times Tab
see Plan | Duty Edit | Times Tab for further information.
Edit - Assign an Employee
see Plan | Duty Edit | Assign An Employee for further information.
Edit - Find a Suitable Employee
see Plan | Duty Edit | Suitable Employee for further information.
Edit - Duty Calls Tab
see Plan | Duty Edit | Calls Tab for further information.
Edit - Duty Check Fails Tab
see Plan | Duty Edit | Check Fails Tab for further information.
Edit - Duty Premiums Tab
see Plan | Duty Edit | Premiums Tab for further information.
Edit - Duty Audit Trail Tab
see Plan | Duty Edit | Audit Trail Tab for further information.
Edit - Duty Pay/Bill Tab
see Plan | Duty Edit | Pay/Bill Tab for further information.
Edit - Duty Split Function
see Plan | Duty Edit | Split Duty for further information.
Edit - Duty Split Function
This tab is not displayed above as it is only available if you license Service Delivery. see Plan | Duty Edit | Service for further information.
Scheduling - Multi Duty Edit
To enable Multi-Duty Edit, the following settings need to be enabled:
-
Within Admin | System | System Settings | Scheduling, under the Scheduling Settings the Enable Multi Duty Edit check box needs to be selected
-
For each user, within the User Settings, under the Defaults Tab, Enable Multi Duty Edit needs to be selected (this setting can only be changed using the Desktop Client)
To allow more than one duty to be selected for editing, the following rules must be obeyed:
-
All Duties selected must be “scheduled” (not started)
-
Or all duties must be historic (booked on and booked off)
-
No duties that are locked or closed can be part of multi-duty edit
When multiple duty cells are selected within the Site View Screen, the user is given the option to open the Duty Edit screen.
Select a series of duties by holding down the [Ctrl] key on the keyboard when clicking on each individual duty using the left-hand mouse button.
When a user selects multiple duties in the Site View Screen’s grid, the pop-up menu hides the Edit a Duty option if the business rules (outlined above) for editing are not obeyed and more than one duty is selected.
Note: Within the system, if an invalid multi-duty selection is made, the user will see the following message alert after the toolbar option is clicked:
Scheduling in Site View
Scheduling - Confirm a Duty
Select the duty or series of duties by holding down the [CTRL] key on the keyboard and click on the icon to confirm the duties. Alternatively, right click on the mouse and click on the Confirm a Duty option. The font style will change to bold to illustrate it is confirmed.
Scheduling - Temporary Duty
Select the duty or series of duties and click on the icon to confirm the duties. The font style will change to Italic.
Scheduling - Duty Approval
The system can approve a duty or a set of duties once they have been through the rate generation process. The ability to approve or unapprove is security controlled. Access to this functionality is granted or denied on a function role basis which is applied user-by-user.
Once a duty has been approved, it cannot be edited in any way (i.e. the start/finish time, premiums, meal breaks, premiums, sub duties etc. cannot be edited).
For an approved duty to be edited, it must first be un-approved.
The Approval status could be used as part of a pay interface to enforce strict process compliance, or used by management for compliance overview.
Where strict compliance is required and when using third-party pay interface exports (such as for Sage), the Approval status allows the extraction of pay information for approved duties.
In the Strict Compliance mode, if a previously un-approved duty is approved once the pay extract has been run, then this duty would be picked up in the next pay extract run.
Click on the Bulk Approve icon to approve all arbitrated and unapproved duties. The following screen will be displayed:
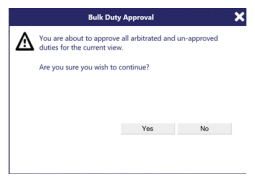
The screen will now update and the Approval icon will be shown on every duty (it looks the same as the Approval Button in the button bar at the top of the screen).
When a duty is approved an approval date/time will be written to the duty. The pay extract will use this date to decide what duties have been approved since the last time the process ran and only pick up ones approved since.
If an historic duty is then approved, the approved date will be greater than the last extract run time and so will be picked up in the next extract run.
Period Lock and Unlock - Duty Edit
When a duty has been “Period Locked”, it can only be edited if a user has security permission to “unlock” it to make a change.
If the user does have security permission, then they will see the Adjust Pay button. As soon as they click this, the pay fields become editable with all the “normal” options. This enables the user to make the necessary changes to the dates, times, hour type, pay level etc.
Once the user clicks OK the duty is submitted back onto the rate generation queue and any rate generation information that was locked (against the transaction number) will remain. A negative and then positive set of financial figures will be created to reflect the new change. Additionally, the duty approve flag will be removed from the duty, i.e. it will no longer be approved.
Plan Menu - Site View - Scheduling Swap Employees
There may be a situation where employees need to be swapped within the same site or between sites. Swaps within the same site are carried out in the Site View. For swaps between sites then the Duty Filter or Branch View is used.
Both duties need to be in the scheduled phase (not started) and both duties need to have different employees allocated before the process will run.
To swap two employees:
-
Select the site in Site View
-
Select the employees that require swapping (click the left-hand mouse button on the first one, press the [CTRL] key and then click the left-hand mouse button on the second employee)
-
Select Swap Employees
-
After a short delay you will be presented with the Employee Swap dialog box that will display information about the 2 duties which are being swapped. If there are any conflicts, these will be shown. At this point you can change the Hour Types and Pay Levels. Add any comments, then select Swap Employees. To cancel the swap, close the window using the [X]
RotaLoad
RotaLoad copies both duties and scheduling information for one or more (source) weeks into the empty duty slots in subsequent weeks.
This allows users to follow a scheduling pattern week after week, only making changes when staff are not available, or when duty requirements change. This saves significant amounts of time during the scheduling process.
It is imperative to ensure that each site has been set up with contracted duties before RotaLoading takes place, as it is these contracted duties that get copied from the source. RotaLoad will not work for a site unless it has contracted duties.
It makes no difference which week is being viewed when the RotaLoad button is selected - the next schedule will be added in the correct place.
As well as being able to schedule contract duties, RotaLoad allows the scheduling of Non-Contract Until Further Notice (UFN) Duties. Typically, these are duties which are not part of the contracted hours for the site, but are worked upon on an ongoing, regular basis.
UFN duties can be set up on the UFN Tab on the Site Card maintenance screen of the Desktop Client, but can be viewed in the Web Client at Set Up | Sites | UFN Tab.
Scheduling RotaLoad by Site
Screen Layout and Fields
Click on the RotaLoad button from the Plan | Site page. The screen below will be displayed:

|
Customer |
Customer code |
|
Customer Name |
Name of the customer |
|
Site Group |
Site Group code |
|
Site Group Name |
Name of the Site Group |
|
Site |
Site code - Check that the Site named is the correct one |
|
Site Name |
Name of the Site |
|
Sin |
Site Identification Number - unique to the site |
|
Contract Start/Finish |
Start date of the contract |
|
Contracted Duties - RotaLoad |
Tick to RotaLoad the Contract Duties when the RotaLoad button is pressed |
|
Contracted Duties - Scheduled to |
Taken from the Site, this is the current date that the duties have been scheduled to |
|
Contracted Duties - From |
Taken from the Site, the From date will be the day after the Scheduled To date and should be the start day of the calendar week for example Monday |
|
Contracted Duties - To |
The To date will default to the week ending date of the number of weeks forward specified in the Default Rotation field on the Site |
|
Contracted Duties - Allocate Employees |
Tick this box to allocate employees to the new RotaLoaded duties. When RotaLoading from a previous period, then the employees will be taken from the duties in the period. If RotaLoading from contracted hours, then the employees will be taken from the duties on the contract times set up against the Site |
|
Contracted Duties - Rotation |
The rotation, in terms of weeks (i.e. 1 means 1 week schedule to be RotaLoaded, 2 means a 2 week schedule to be RotaLoaded etc.) |
|
Contracted Duties - From Where |
Choose the source of the RotaLoaded duties. To RotaLoad from duties in a previous period, then choose “Using Period” from the From Where drop-down list. To RotaLoad from the contract times set up on the Site, choose “Contracted Hours” from the From Where drop-down list |
|
Contracted Duties - Using Period |
If RotaLoading “Using Period” then the site's “Weeks in schedule” determines how many weeks to go back, to find the source week. If “Weeks in schedule” is 1, then last week is the source week. If “Weeks in schedule” is 2, then the week before last is the source week etc. Alternatively, select a specific week to use as the source week, by selecting “From” out of the drop-down list options. Up to 20 previous weeks are available |
|
UFN Duties - RotaLoad |
To Rota Load UFN duties, then make sure that the Rota Load check box in the UFN frame is checked. UFN fields are completed in a similar fashion to the Contracted Duties frame. Note: Users will not be able to fill in the From Where and Using fields in the RotaLoad frame, as the source for RotaLoaded UFN duties will always be the UFN duties entered in the Site Card created in the Desktop Client |
|
UFN Duties - Scheduled to |
Current date that the UFN duties have been scheduled up to |
|
UFN Duties - From |
The From date will be the day after the Scheduled To date and should be the start day of the calendar week for example Monday |
|
UFN Duties - To |
The To date will default to the week ending date of the number of weeks forward specified in the Default Rotation field on the Site record |
|
UFN Duties - Allocate Employees |
Tick this box to allocate employees to the new RotaLoaded duties. |
|
UFN Duties - Rotation |
The rotation, in terms of weeks (i.e. 1 means 1 week schedule to be RotaLoaded, 2 means a 2 week schedule to be RotaLoaded etc.) |
|
UFN Duties - Using Period |
If RotaLoading “Using Period” then the site's “Weeks in Schedule” determines how many weeks to go back, to find the source week. If “Weeks in Schedule” is 1, then last week is the source week. If “Weeks in Schedule” is 2, then the week before last is the source week etc. Alternatively, select a specific week to use as the source week, by selecting “From” out of the drop-down list options. Up to 20 previous weeks are available |
Action Buttons
|
Back |
Return to Plan | Site page |
|
RotaLoad |
Click the RotaLoad button to start the RotaLoad process. The busy symbol will appear while the system is RotaLoading. RotaLoad copies the Contracted/UFN Duties into the next unscheduled week(s), and allocates the appropriate employees. Once RotaLoad has completed the user will be returned to the Operations, Site View screen. RotaLoad copies the Contracted/UFN Duties into the next unscheduled week(s), and allocates the appropriate employees The duties that have just been scheduled using RotaLoad will be displayed. If the RotaLoad undertaken passes the current week, then using the scroll arrows on the left-hand side of the screen the user will be able to move forward to see the week they have scheduled to. Remember, this date is the Scheduled To date. If an employee has any non-override failures, the duty will be created as an unallocated (open post), but when an employee fails the check, the employee value will be set to the employee who previously worked the duty. The duty will be highlighted with a yellow background, to indicate the check failures. Details of the failures will show on the Checks Tab when the duty is edited. If duties have been manually added into the period that is being RotaLoaded, then the RotaLoad process will move these manually added duties to the next available slot (for the same date), and mark the column heading as “Conflicting Duties”. This ensures that the RotaLoad process takes precedence, but you still can manually add duties in the future. |
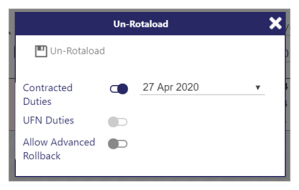
Un-RotaLoad
When the Un-RotaLoad button is pressed the user is presented with a series of options to choose from that will enable the RotaLoad to be rolled back/undone (i.e. Duties that have been scheduled on a site can be removed).
The system will undo the schedule selected for the site. The operation can only be performed on future duties. It cannot be used to remove duties that are historical or fall before the current date/time unless the Allow Advanced Roll Back check box is selected.
Screen Layout and Fields
|
Contracted Duties |
Select to enable. Select a date to roll back contracted duties to from the drop-down list |
|
UFN Duties |
Select to enable. Select a date to roll back UFN duties to from the drop-down list |
|
Allow Advanced Rollback |
Select to allow Advanced Rollback. This allows the user to roll back the current weeks duties from the schedule if selected. This is a database setting. |
Screen Actions
|
Un RotaLoad |
Un-RotaLoad based upon the options selected |
Scheduling Suppliers Reference
This is used normally to mark the duty with some form of identification. For example, a new duty has been added and the user wishes to mark the duty with a reference from their customer.
Select the duty and then select Supplier Reference.
The following screen is displayed, into which the user can enter a Supplier Reference (for example CleaningCo123). Once entered, select OK. Alternatively, press Cancelto go back to the main Plan | Site screen. Depending upon how the details for the duty’s specific hour type have been configured in Admin | Finance | Hour Types, this field may be mandatory.
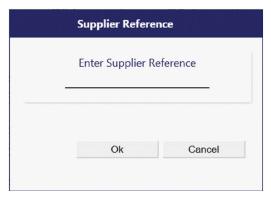
An alternative way of adding Supplier Reference information is from within the Duty itself. Select the Duty. Within the Duty | Info Tab, enter the reference information into the Supplier Ref. field and select Save to commit the changes.