Plan: Duties
How to get there: Plan | Duties
The different Duty related screens have a variety of purposes including searching for and editing duties over a date range by Branch, Customer, Site Group and Site. Additionally, duties can be searched for and edited by employee and type of duty. In this part of the guide, the following areas will be covered:
-
Searching for duties using the Duty Filter Wizard
-
The Duty Filter
-
Configuring the Duty Filter using the Configure Grid
Searching for duties using the Duty Filter Wizard
There are several different ways to search for duties using the Duty Filter Wizard which is launched when you open the Manage | Duties or Plan | Duties pages or select New Search on the Duty Filter page. These are by “Employees”, “Site”, “Date Range”, “Duty Types”, “Pay and Bill” and “Events”. Each of the following subsections looks at the various search options that can be found within their associated tabs from within the Duty Filter Wizard.
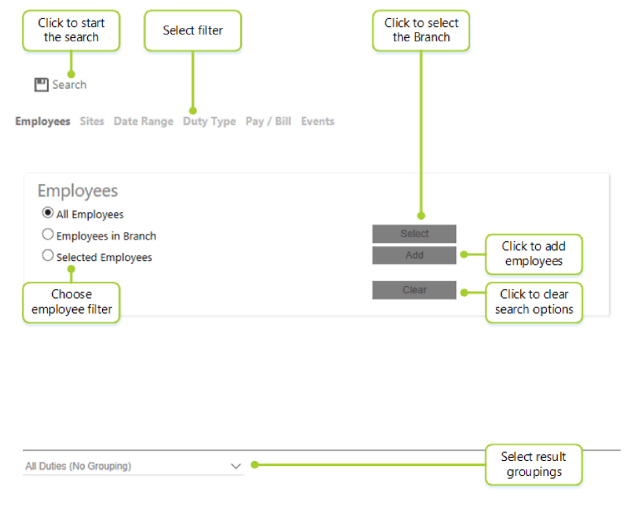
Employees
The default tab on the Duty Filter Wizard is Employees. This enables the user to search for duties assigned to a single or multiple employees. The All Employees radio button is already selected to quickly view all of the duties assigned to all of the employees but further search options in this tab are Employees in Branch and Selected Employees. Select, Add and Clear are disabled until either the search by Employees in Branch or the Selected Employees are selected.
Screen Layout and Fields
Screen Actions
|
Search |
Select to search for duties using the criteria defined |
|
Menu bar |
Select a filter name to access its options. Select from Employees, Sites, Date Range, Duty Type, Pay/Bill and Events |
|
Employees Radio Buttons |
Choose the filter required from the choice of three:
|
|
Select |
If Employees in Branch is selected Select becomes active. Select a Branch to filter duties |
|
Add |
If Selected Employees is selected, Add becomes active. Select to add those employees that will be used to filter duties |
|
Clear |
Select to clear all search options selected |
|
All Duties (No Groupings) |
Choose how to group the results of the filtering. There are three choices:
|
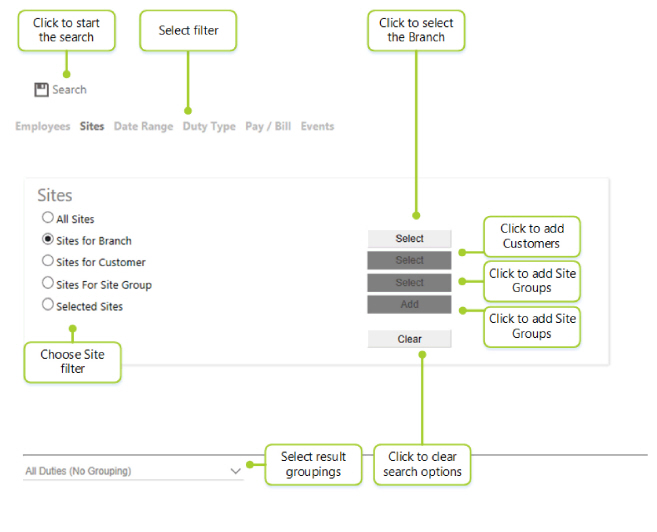
Sites
Screen Layout and Fields
Screen Actions
|
Search |
Select to search for duties using the criteria defined |
|
Menu bar |
Select the filter name to access its options. Choose from Employees, Sites, Date Range, Duty Type, Pay/Bill and Events |
|
Sites Radio Buttons |
Choose the filter required from the choice of four/five (depending on implementation):
|
|
Select (Sites for Branch) |
If Sites for Branch is selected, Select becomes active. Use this to Select a Branch/Branches to filter duties |
|
Select (Sites for Customer) |
If Sites for Customer is selected, Select becomes active. Use to Select a Customer/Customers to filter duties |
|
Select (Sites for Site Group) |
If Sites for Site Group is selected, Select becomes active. Use this to Select a Site Group to filter duties. Note: This option is only available if Site Groups have been used in initial configuration of the system |
|
Add |
If Selected Sites is selected, this button becomes active. Select to add those sites that will be used to filter duties |
|
Clear |
Select to clear all search options selected |
|
All Duties (No Groupings) |
Choose how to group the results of the filtering. There are three choices:
|
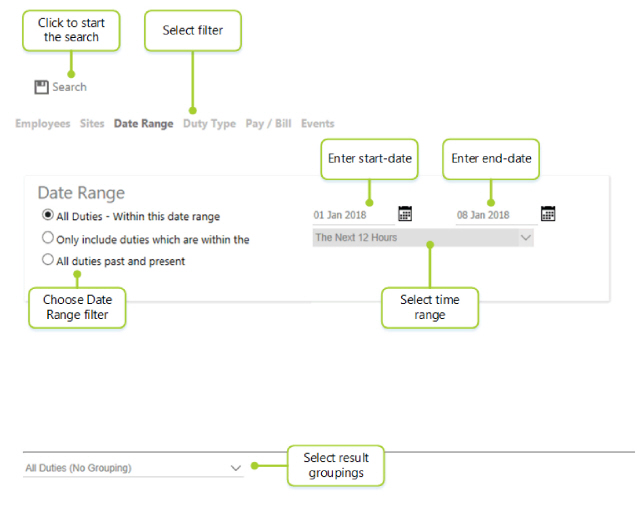
Date Range
Screen Layout and Fields
Screen Actions
|
Search |
Click here to search for duties using the criteria defined |
|
Menu bar |
Click on the filter name to access its options. Select from Employees, Sites, Date Range, Duty Type, Pay/Bill and Events |
|
Date Range Radio Buttons |
Choose the filter required from the choice of three:
Note: By using the “All duties past and present” option, all duties ever created on the system will be displayed. This can be very time consuming in terms of processing the information and may take a long term to run |
|
Start & End Date (All Duties Within this Date Range) |
When the All Duties Within this Date Range filter option has been selected, enter the date range using the start- and end-date drop-down calendar |
|
Time Range (Only include duties which are within the) |
When the Only include duties which are within the filter option has been selected, use the drop-down list to select one of the following options:
|
|
All Duties (No Groupings) |
Choose how to group the results of the filtering. There are three choices:
|
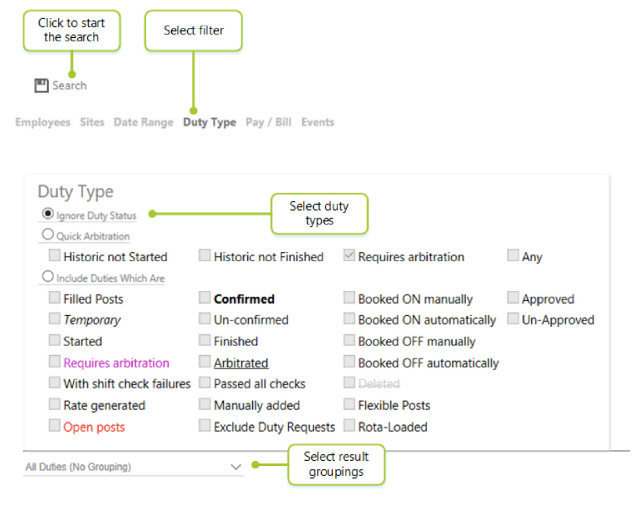
Duty Types
Screen Layout and Fields
Screen Actions
|
Search |
Select to search for duties using the criteria defined |
|
Menu bar |
Select filter name to access its options. Choose from Employees, Sites, Date Range, Duty Type, Pay/Bill and Events |
|
Duty Type Radio Buttons |
Choose the filter required from the choice of three:
|
|
Quick Arbitration - check boxes |
Use the check boxes to qualify the Quick Arbitration Duty Type filter. Multiple values can be selected to be added to the filter |
|
Include Duties Which Are - check boxes |
Use the check boxes to qualify the Include Duties Which Are Duty Type filter. Multiple values can be selected to be added to the filter. Those values that are used frequently are color coded so that they stand out onscreen for example Requires Arbitration and Open Posts. The values are as follows:
Note: When making a selection, ticking more than one box will modify the search. For example, if Open Posts and Confirmed Duties are selected, the search will display only Confirmed Open Posts, not all Open Posts and all Confirmed Duties. |
|
All Duties (No Groupings) |
Choose how to group the results of the filtering. There are three choices:
|
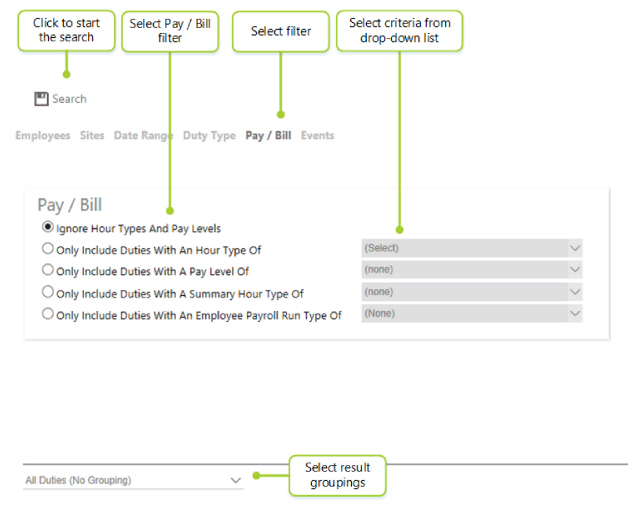
Pay/Bill
Screen Layout and Fields
Screen Actions
|
Search |
Select to search for duties using the criteria defined |
|
Menu bar |
Select the filter name to access its options. Choose from Employees, Sites, Date Range, Duty Type, Pay/Bill and Events |
|
Pay/Bill Radio Buttons |
Choose the filter required from the choice of five:
|
|
Only include duties with an hour type of (Select) |
If Only include duties with an hour type of is selected, this drop-down list becomes active. Click on it to select the hour type to filter duties by. |
|
Only include duties with a pay level of (None) |
If Only include duties with a pay level of is selected, this drop-down list becomes active. Click on it to select the pay level to filter duties by |
|
Only include duties with a Summary hour type of (None) |
If Only include duties with a Summary hour type of is selected, this drop-down list becomes active. Click on it to select the summary hour type to filter duties by |
|
Only include duties with an employee payroll run type of (None) |
If Only include duties with an employee pay roll type of is selected, this drop-down list becomes active. Click on it to select the employee pay roll type to filter duties by |
|
All Duties (No Groupings) |
Choose how to group the results of the filtering. There are three choices:
|
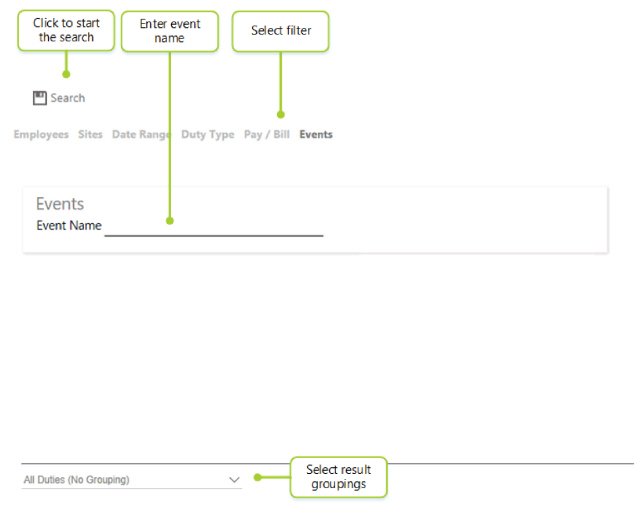
Events
Screen Layout and Fields
Screen Actions
|
Search |
Select to search for duties using the event name entered lower down the screen |
|
Menu bar |
Select the filter name to access its options. Choose from Employees, Sites, Date Range, Duty Type, Pay/Bill and Events |
|
Event Name |
Enter in the name of the event to filter by |
|
All Duties (No Groupings) |
Choose how to group the results of the filtering. There are three choices:
|
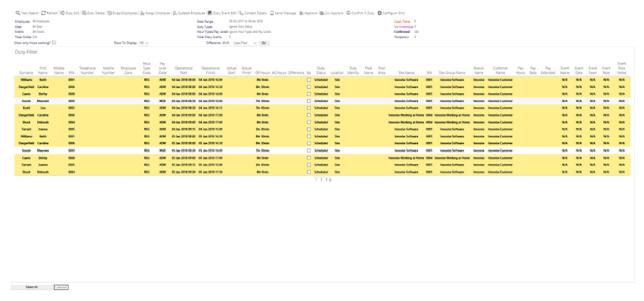
The Duty Filter View
After a search has taken place, the Duty Filter view is displayed onscreen. From the Duty Filter view, the user can access the functions associated with duties in addition to seeing all duties that meet the criteria that was entered when initially searching for duties.
The Duty Filter view is shown below in it’s entirety. It comprises a menu, a summary banner and the duties. These are individually detailed below:
Summary Banner
Screen Layout and Fields
The Summary Banner shown below details the specifics of the search that was made using the Duty Filter Wizard:

|
Employees |
Details of which employees are being searched upon |
|
Sites |
Details of which sites are being searched upon |
|
Events |
Details of which events are being searched upon |
|
Date Range |
The date range that the search covers |
|
Duty Types |
Shows the duty type filters that apply to the search |
|
Hour Types/Pay Levels |
Shows the hour type and pay level filters that have been applied to the search |
|
Total Duties |
Number of duties overall |
|
Total Diary Events |
Number of diary events |
|
Open Posts |
Number of duties that have no employee assigned to them |
|
Un-Arbitrated |
Number of duties that have yet to be arbitrated |
|
Confirmed |
Number of duties that show that the employees have agreed their scheduled duties |
|
Temporary |
Number of non-contracted duties |
Screen Actions
|
Show only those working? |
Tick this box to view only those duties currently being worked upon at that precise moment, not old duties or future ones. By clearing this box, the user will return to the previous view |
|
Rows To Display |
Select how many rows of duties to display on the screen between 10 and 200 |
|
Difference |
The Difference filter enables the user to filter based on the time difference between the scheduled and worked hours. For example, to look at where there is up to a thirty-minute difference:
The Duty Filter will display any duties that are under the contracted/scheduled hours by thirty-minutes. To show duties over thirty-minutes use the same approach us outlined above, but choose Greater Than rather than Less Than in the Less Than/Greater Than drop-down list |
|
- Less than/Greater than |
|
|
- Go |
The Duty Filter Results
Screen Fields and Actions

Many of the fields within the Duty records can be clicked upon in order to access other records, such as the Site Card Record, Employee Record or Duty Record for the given duty. Details are listed below.
Note: All titles on this part of the screen can be clicked on to sort the Duty Records in ascending or
descending order.
|
SIN |
The Site Identification Number. Click on it to view Site Card Record (for more information, see Setup | Sites | General Tab) |
|
Site Name |
The name of the Site. Click on it to view Site Card Record (for more information, see Setup | Sites | General Tab) |
|
PIN |
The employee’s unique personal ID. Click on it to see Employee Record (for more information, see Set Up | Employees | General Tab) |
|
Surname |
The employee’s surname. Click on it to see Employee Record (for more information, see Set Up | Employees | General Tab) |
|
Middle Name |
The employee’s middle name. Click on it to see Employee Record (for more information, see Set Up | Employees | General Tab) |
|
First Name |
The employee’s forename. Click on it to see Employee Record (for more information, see Set Up | Employees | General Tab) |
|
Telephone Number |
The employee’s telephone number. Click on it to see Employee Record (for more information, see Set Up | Employees | General Tab) |
|
Mobile Number |
The employee’s mobile telephone number. Click on it to see Employee Record (for more information, see Set Up | Employees | General Tab) |
|
Employee Zone |
The zone within which the employee works. Click on it to see Employee Record (for more information, see Set Up | Employees | General Tab) |
|
Hour Type Code |
The type of hours for the duty for example regular, overtime etc. |
|
Pay Level Code |
The pay level for the specific duty for example Security Guard Level 1, Administrator etc. |
|
Operational Start |
Scheduled start time for the duty. Click on it to see Duty Record (for more information, see Plan | Duty Edit | Times Tab) |
|
Operational Finish |
Scheduled end time for the duty. Click on it to see Duty Record (for more information, see Plan | Duty Edit | Times Tab) |
|
Actual Start |
The time the duty actually started based upon when the employee clocked on. Click on it to see Duty Record (for more information, see Plan | Duty Edit | Times Tab) |
|
Actual Finish |
The time the duty actually ended based upon when the employee clocked off. Click on it to see Duty Record (for more information, see Plan | Duty Edit | Times Tab) |
|
OP.Hours |
The amount of hours that the duty is scheduled to take (the time elapsed between the operational start and operation finish time) |
|
AC.Hours |
The amount of hours that the duty actually took (the time elapsed between the actual start and actual finish time) |
|
Pay Hours |
The number of hours that the employee will be paid for completion of the duty |
|
Pay Rate |
The standard hourly pay rate for the duty |
|
Pay Extended |
Total pay of the duty including items such as overtime |
|
Difference |
The difference between the Op. Hours and Ac. Hours |
|
SEL |
Click on it to select the duty/multiple duties ready for action with the menu buttons outlined in the next section |
|
Duty Status |
Status of duty for example Scheduled, Rate Generated etc. |
|
Location |
Name of the location where the duty is being undertaken/has been completed |
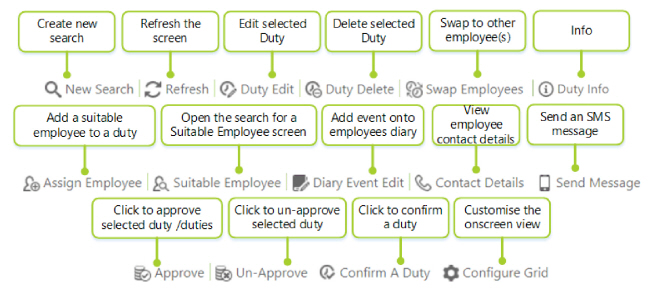
The Duty Filter Menu
Note: In order to use the menu functionality, select the record(s) to action before clicking on the menu button. To select an item, tick the Sel button for each record being actioned.
Screen Actions
|
New Search |
Select New Search at the top of the screen to relaunch the Duty Filter Wizard |
|
Refresh |
Select Refresh to update the view with the latest information |
|
Duty Edit |
Enables the user to edit the selected user. See Plan | Duty Edit | Times Tab for more details |
|
Duty Delete |
Select a duty and then select Delete Duty to delete it. Confirm the deletion, using the pop-up dialog box that is displayed |
|
Swap Employees |
Select two duties and then select this option to swap employees between shifts. See Plan | Duty Edit | Swap Employees for more details |
|
Info |
Select when selecting multiple duties to edit their information. The following dialog box is loaded when the icon is pressed (it looks similar to the Duty Info tab in Duty | Edit: 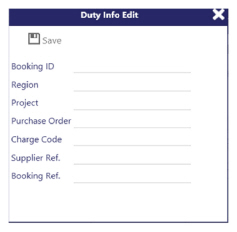
The dialog contains a form with seven editable text box fields (in some cases Supplier and Booking references may be hidden as they require extra user privileges). The content of each text box can be:
Placing the cursor on any of the text boxes containing the “Multiple Values” place holder will cause a Clear button to appear. When using Duty Info, it can also be used for deleting the value from the field. If no changes are made the save action won't make any changes to that field on any of the duties. Select Save to save the new values for each duty. This action applies changes to all duties. |
|
Select X to cancel the operation These items can be made mandatory for a given hour type, using the settings found in Admin | Finance | Hour Types |
|
|
Assign Employee |
Select a duty and select Assign Employee to assign an employee to a duty from a picklist. See Plan | Duty Edit | Assign an Employee for more details |
|
Suitable Employee |
Select a duty and select Suitable Employee to find a suitable employee for a duty from a list of options provided. See Plan | Duty Edit | Suitable Employee for more details |
|
Diary Event Edit |
See Plan | Monthly Diary | Diary Event for more details |
|
Contact Details |
Select to open a pop-up box that shows the employee telephone number, employee mobile telephone number and the site telephone numbers for the selected |
|
Send Message |
Select to send a message to the Employees on the selected Duties. Once clicked the following dialog box is displayed: 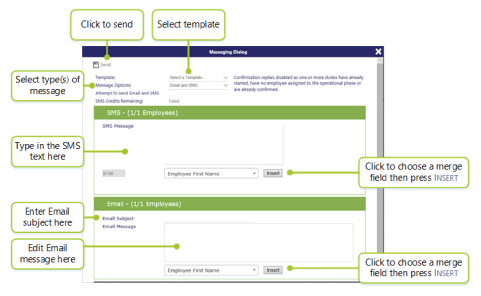
To send a message:
Note: If sending an SMS message, the amount of credits remaining is shown on the screen. To purchase more credits, speak to your TEAM Software representative |
|
Approve |
Select duty/duties and then press Approve to approve and lock them |
|
Un-Approve |
Select duty/duties and then press Un-Approve to un-approve them |
|
Configure Grid |
Select Configure Grid to modify the way that the Duty records are shown within the grid displayed on the page. See section below for more details about configuring the view |
|
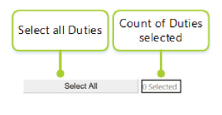
Select All/Clear All |
Select all Duty records or deselect all selections (the button toggles between Select All/Clear All). The amount of duties selected is shown in the window next to the Select All/Clear All button |
|
SEL |
Select Sel to select an individual Duty record |
|
Click on Employee Details |
Loads up the Employee’s details (for more information, see Set Up | Employees | General Tab) |
|
Click on Site Details |
Loads up the Site information (for more information, see Setup | Sites | General Tab) |
|
Click on Duty Details |
Loads up the details of the Duty in the Duty Edit view (for more information, see Plan | Duty Edit | Times Tab) |
|
Page numbers |
Select page numbers to navigate through the Duty records |
Using Configure Grid to Customise Duty Filter View
Screen Layout and Fields
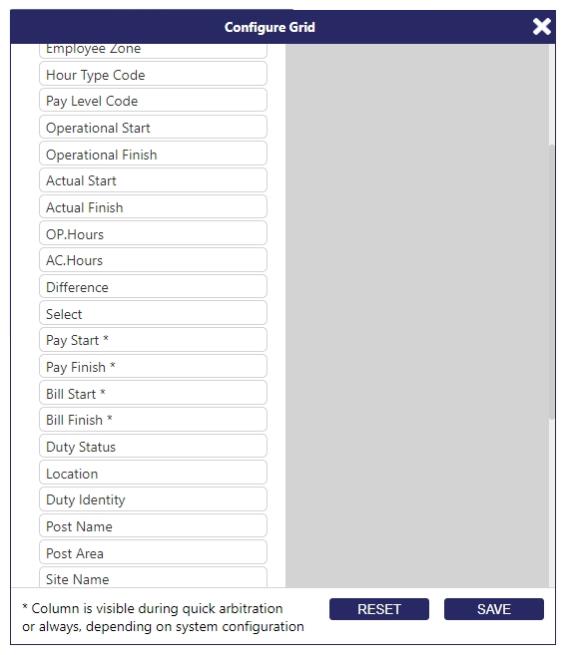
The Configure Grid button when pressed accesses a screen that is used to customise the columns displayed in the Duty Filter screen ensuring the content is relevant to the system user. The first time you enter the Configure Grid screen, you will see all the Visible Columns on the left and no Hidden Columns - an example of a configured screen is shown below:
|
Visible Columns |
The area within which columns that will be displayed in the Duty Filter are dragged to |
|
Hidden Columns |
The area within which columns that will not be displayed in the Duty Filter are |
Screen Actions
|
Column Names |
These names can be dragged and dropped between the two sides of the screen (the Visible Columns and the Hidden Columns). The view is set up as follows
|
|
Reset |
Select Reset to reset their configuration at any time |
|
Save |
Select Save to keep changes |