Plan: Diary
How to get there: Plan | Diary
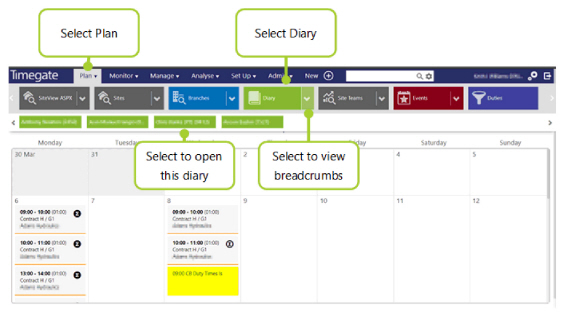
Every employee has a diary. From within the diary, the user can view and edit weekly, monthly or yearly and schedules. They can also log and record any events such as a disciplinary, a duress call or an accident. The diary is also used to record non-availability of work for example holidays and sickness. Click on Plan and then click on Diary to open the diary screen. System breadcrumbs show the names of those diaries recently viewed for quick access to their diary:
The Diary can also be accessed by selecting the employee on a duty in Site View and then clicking on the diary shortcut icon.
To find out more about setting up Diary Event Categories see Admin | General | General Maintenance | Diary Events
To assign Diary Event Categories see Admin | General | General Maintenance | Diary Events
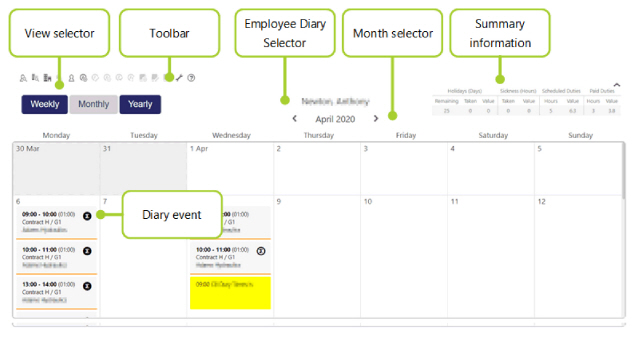
The screenshot below shows the six components of the diary screen:
In the yearly view, there is also an additional section, at the end of the diary view after the days of the months entitled Totals. The two numbers included are as follows:
The top total value is the Remaining Scheduled Hours i.e. total hours contracted for the month minus the Worked Hours (both completed and already scheduled)
The bottom total value is the Worked Hours i.e. actual hours scheduled to work/already worked
Diary View Selector
There are three diary views that can be accessed:
-
Weekly
-
Monthly
-
Yearly
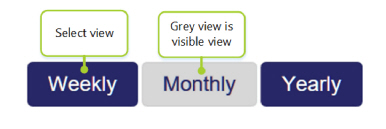
The current view is grayed out - in the example above, the Monthly view would be the one visible.
Diary Toolbar
Roll over the buttons to view the bubble text describing what each individual button does. These buttons control the main functionality that is held within this screen.
Screen Layout
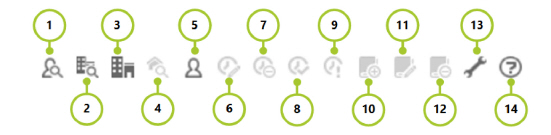
Screen Actions
Note: Actions are context sensitive. If an icon cannot be used it will appear grayed out.
|
1. Select Employee |
Select to search for an employee/different employees whose diary you wish to view (see section below) |
|
2. Select Branch |
Select a branch of your choice using the pop-up screen |
|
3. Go To Branch |
Select to go to the Branch that the employee works within |
|
4. Go to Site View |
Select to go to the Site View where the duty is located |
|
5. Go To Employee |
Select to go to the Employee View |
|
6. Edit a duty |
Click to edit the selected duty. The following screen will be shown where changes to the duty can be implemented: 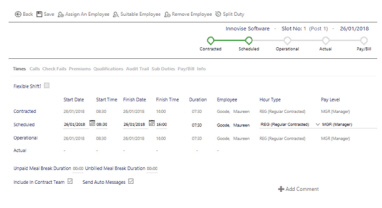
|
|
7. Delete a duty |
Click to delete the selected scheduled duty (historical, underlined duties cannot be deleted). Once clicked, the Duty Validation screen below is loaded. Enter a comment and then select Delete Duty to finalise the process: 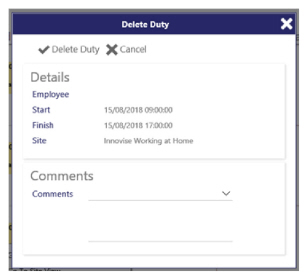
Note: This will instantly delete the duty without giving a final confirmation screen |
|
8. Confirm Duty |
Select a duty/series of duties and click this icon to confirm it/them. Confirmed duties are displayed in BOLD |
|
9. Temporary Duty |
Select a duty/series of duties and click this icon to make it/them temporary. Temporary duties are displayed in ITALICS |
|
10. Add Diary Event |
Select to add a new diary event (see below for more details) |
|
11. Edit Diary Event |
Select a diary event. Select to edit the diary event (see below for more details) |
|
12. Delete Diary Event |
Select to delete a diary event (see below for more details) |
|
13. Recalculate Shift Pattern |
Select to recalculate shift pattern |
|
14. Legend |
Select to display the legend: 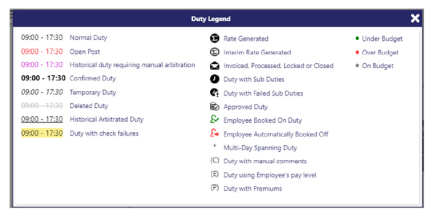
|
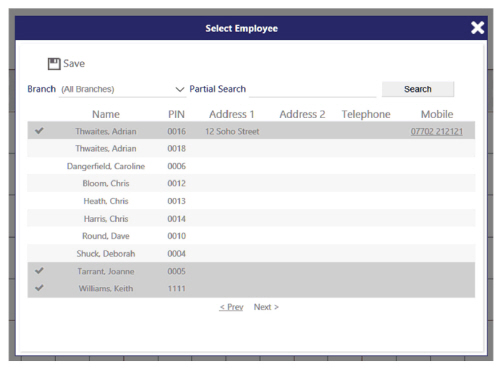
Select Employees
Screen Layout and Fields
|
Name |
Full name of the employee. Select this to view the diary (selection is indicated with a tick to the left of it as shown on the screenshot |
|
PIN |
The PIN number for the employee |
|
Address 1 |
First line of employees address |
|
Address 2 |
Second line of employees address |
|
Telephone |
Telephone number for employee |
|
Mobile |
Employee’s mobile telephone number |
Screen Actions
|
(All Branches) |
Use drop-down list to select the Branch to search upon |
|
Partial Search |
Enter attribute that you wish to search upon from the drop-down list |
|
Search |
Select to start search |
|
Save |
Select after choosing an employee/employee(s) whose diary you wish to view |
|
< Prev or Next > |
Select these buttons to scroll between the different pages of names that are stored in the system |
Employee Diary Selector
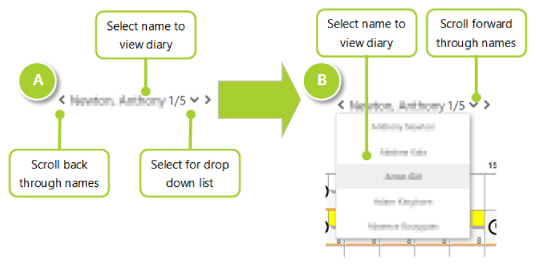
From this part of the screen, the user is able to select a diary from those employees that have already been selected using the employee selector. The number to the right of a persons name shows which number from the selected employees they are. In the example below, the employee is the first of three employees selected. The user can click the < left and right > arrows to navigate through the employees, or select the down arrow, to open a drop down list of employees to select:
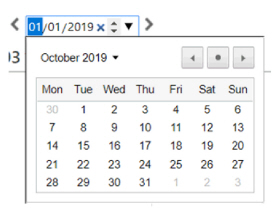
Date Selector
The way this control works is dependent upon, whether Weekly, Monthly or Yearly view has been selected - as shown in the three screen-shots shown below:
If weekly view has been selected, the user can select a date in the DD/MM/YYYY format to view. This can be selected from a drop down list or typed in. Alternatively the user can select the < left and right > arrows to navigate backwards or forwards through the weeks
If monthly view has been selected, the user can select a month - this can be selected from a drop down list. Alternatively the user can select the < left and right > arrows to navigate backwards or forwards through the months
If yearly view has been selected, the user can select a year to view based on a date in the DD/MM/YYYY format to view. This can be selected from a drop down list or typed in. Alternatively the user can select the < left and right > arrows to navigate backwards or forwards through the weeks. In this view, there is also the option to select Holiday Year Start Date - this defaults the diary to start at the start of the year that is used to calculate holiday allowance

The following is an example of the drop down menu that can be used to select a date from:
Summary information
The Summary information screen shows the information that is displayed below for the employee:
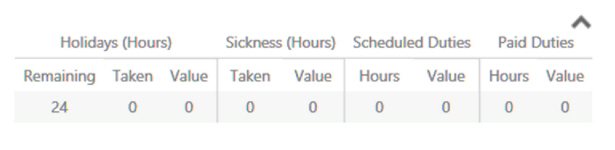
The values change between the different views (with the exception of holidays which remain constant). They show totals for the view in terms of hours.
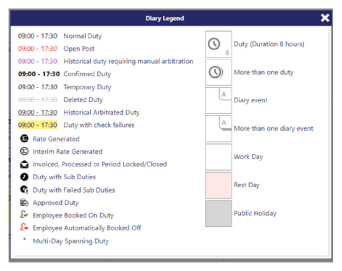
Legend
The diary legend (below) shows the meanings of all graphics shown on screen:
Add a diary event
Select a date in the grid and then select Add Diary Event (either from the toolbar or right click on the grid where you wish to create the diary event):. The following window will be displayed:
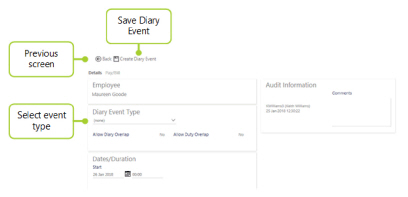
From the Diary Event Type drop-down list, select the type of event required. This will modify what the user sees on screen, based upon the information needed for the diary event (this is configured in the Diary Event Categories part of the system.
see Admin | General | General Maintenance | Diary Event Categories for more information). Some events may need a range of dates, others a single date for example a holiday or sickness will cover one or more days, where as a verbal warning will be an event that is captured on a single day.
In the screen shot below, “HOL Holiday Approved with Notice” has been selected for the Diary Event type, As a result of this, on the right-hand side of the wizard, Entitlement Breakdown is displayed, detailing the employees holiday entitlement and usage to date:
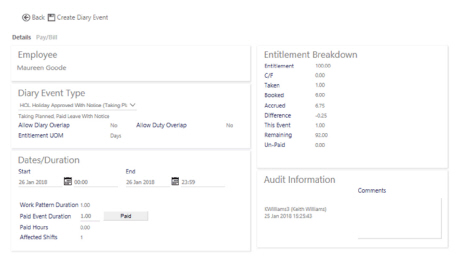
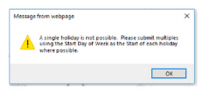
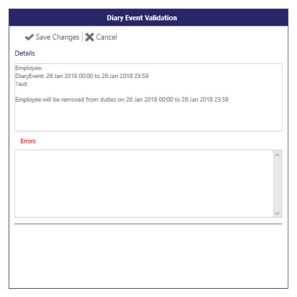
Paid is used to calculate the Holiday paid for this event and is used in the Timegate Absence Management Module. More detail can be found about this feature within the relevant manual. Once the Start Date, End Date and Comments have been complete, the user must press the Create Diary Event button to save the diary event. If the system is set to prevent holiday absence being created across more than one week, then when Save Changes is selected, the user will see the following message:
If the absence event is valid. the system will provide a warning saying “the employee will be removed from scheduled duties” which the user should click Save Changes:
Edit a diary event
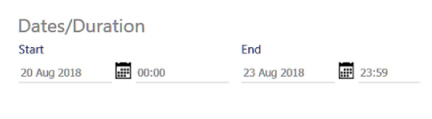
To edit a diary event, select the event and either select the Edit Diary Event button or right-click the mouse button and select Edit Diary Event. The following diary entry is to be modified so that holiday is extended by one day, to four days total:

Make the changes and then click on the Save Changes button. Changes are shown in the screenshot below:
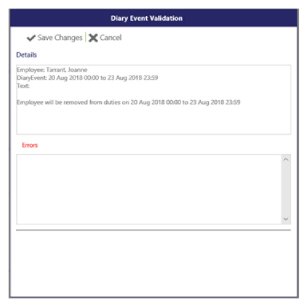
The system will validate the event in the same way that it does when it sets up a new event. Click Save Changes on the next screen too, in order to confirm changes.
The changes will be shown in the employees diary if there are no errors, as shown in the example below:

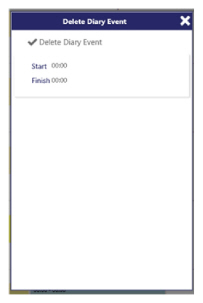
Delete a diary event
Select the item in the employees calendar to delete, select Delete Diary Event. In this example, an illness item has been added by mistake on 30 August 2018 that needs to be removed. Once selected, click on the Delete Diary Event button to delete (or right click on the diary entry and select Delete Diary Event as shown in the screenshot below:
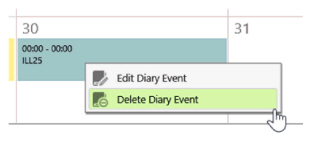
The following screen will load. Select Delete Diary Event:
Once confirmed, the event is deleted and this is reflected in the employees diary as shown: