Plan: Branches View
How to get there: Plan | Branches
Branch View is a scheduling screen like Site View and Site Teams but at the branch level. System users will be able to see all employee's working on a selected Branch for a specified week, as well as diary events for these employees and any open posts on a Site. Users will be able to filter results depending on a selection of sites (within the branch), employees, hour types and pay levels, along with a few other options that allow the user to follow customise their search.
The Plan Branches page enables system users to view a weekly schedule for an entire branch. This will support most of the standard scheduling functionality found in other parts of the system for example Site View, Site Teams etc. The page comprises three sections, the:
-
Search Bar Tool
-
Toolbar
-
Weekly Schedule Panel
The Plan | Sites page should be referred to for information about the various duty, employee and diary related events that can be accessed through this page.
The three sections of the page are shown below and detailed in the sections that follow:
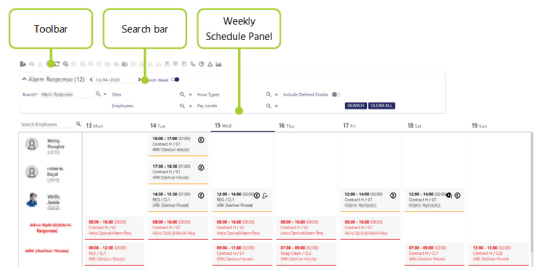
Search Bar Tool
Screen Layout and Actions
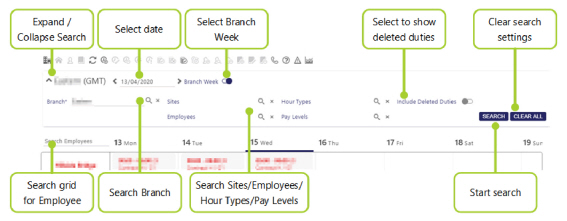
When a user clicks on Plan | Branches they will be presented with a collapsible Search Bar Tool. Using this tool, they can refine their search criteria to get customised results.
Note: All selectors within the Search Bar Tool are multiple selectors apart from the Branch selector which is singular.
|
|
Expand or collapse the search bar |
|
< Date > |
The date for the week being shown onscreen |
|
Branch Week |
This option controls the ordering of the days in the results grid / weekly schedule panel. If Branch Week is selected (default setting), the first day of the week will correspond with the currently selected Branch's day of the week. For example, if the user searches on a date that is a Wednesday, but the Branch's start of the week is Monday, the user will be shown the week starting from the Monday in which that date falls. This is shown below: 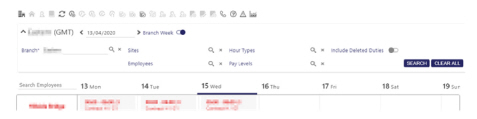
If the Branch Week is not selected, the first day of the week would be Wednesday in the example given and as shown below: 
Note: The Branch Week setting is used in the Histogram view ( see Plan | Branches | Histogram for more information) |
|
Branch |
The user should click on the [...] button to select a Branch. If the user has recently viewed Branches and clicks on one of them, the page will load the current week for the branch with no other criteria set |
|
Sites |
Select the Site. This filters depending on the selected Branch. This means that a Branch will need to be selected before any Sites are visible to be selected |
|
Employees |
This is used to select Employees from a pop-up window |
|
Hour Types |
Used to select hour types from a pop-up window |
|
Pay Levels |
Used to select pay levels from a pop-up window |
|
Included Deleted Duties |
The Include Deleted Duties check box, enables the user to select whether deleted duties are visible in the results. By default, this is ticked |
|
Clear All |
Clears the search filters |
|
Search |
Select to search |
|
Clear All |
Select to clears all search filters |
Branches View Toolbar
Screen Layout and Actions
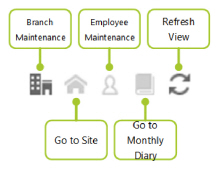
The Toolbar (shown below in its entirety) provides the user with quick access to other parts of the system. It lets them undertake actions on the selected duty/duties.

Each button is shown and briefly explained:
|
Branch Maintenance |
Select an employee on a duty, click on the icon to go straight to that employees Branch - See Set Up | Branches | General for more information |
|
Go To Site |
Select a site or a duty to go to the appropriate site |
|
Employee Maintenance |
Select an employee on a duty, click on the icon to go straight to that employees details - See Set Up | Employees | General Tab for more information |
|
Go to Monthly Diary |
View the monthly diary for the employee of the selected duty |
|
Refresh View |
Click on this icon and it will refresh the screen |
|
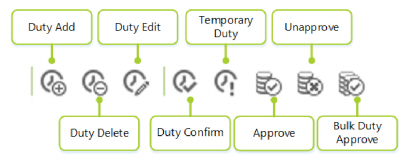
Duty Add |
Select an empty post and click on this icon takes you to the add duty wizard (See the “Add a Duty Wizard” subsection within the Plan | Sites part of the system guide for more information) |
|
Delete Duty |
Click on this icon and you can delete a duty (See the “Site View - Delete a Duty” subsection within the Plan | Sites part of the system guide for more information as the functionality is identical) |
|
Edit a Duty |
Click on this icon and you can edit a duty (See the “Site View - Edit a Duty” subsection within the Plan | Sites part of the system guide for more information as the functionality is identical) |
|
Confirm Duty |
Selecting a single or series of duties and by clicking on this icon will confirm the selected duties, the font will change to bold |
|
Temporary Duty |
Selecting a single or series of duties and by clicking on this icon will set the selected duties to the temporary status; the font will change to italic |
|
Approve |
Selecting a single or series of duties and by clicking on this icon will set the selected duties to the Approved Duty status |
|
Unapprove |
Selecting a single or series of duties and by clicking on this icon will set the selected duties to the Un-approved status and remove the icon from the duties |
|
Bulk Duty Approve |
When the user has clicked on this option, the Bulk Duty Approval dialog will now ask for a Site, a "From" and a "To" date. The Sites for selection are narrowed down to the selected Branch. The dates are populated with the week currently visible to the user, however these are editable fields and the user is free to choose any date range. 
|
|
Make Contracted |
Select an adhoc duty to make it contracted. The duty times, along with employee details are then scheduled in the future |
|
Swap Duties |
Swap the employees of the selected duties (requires two different duties of two different employees to be selected). For further information, see: Admin | System | System Settings | Shift Swap and Plan | Duties | Swap Employees |
|
Assign Employee |
Selecting a duty (normally an open post) and select this icon to bring up a picklist of employees that you can assign to the duty. see the Assign An Employee section of Plan | Duty Edit for further information |
|
Suitable Employee |
Selecting a duty (normally an open post) and select this icon to bring up a picklist of suitable employees, based upon a series of checks and balances that you can assign to the duty. see Plan | Duty Edit | Suitable Employee for further information |
|
Remove Employee |
Selecting a duty that has an employee assigned and select this icon to remove the employee from the duty |

|
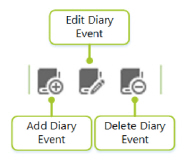
Add Diary Event |
Select to create a diary event to be added. See Plan | Monthly Diary for more information about how to add diary events |
|
Edit Diary Event |
After clicking on a diary event, click on this icon to edit a diary event. See Plan | Monthly Diary for more information about how to edit diary events |
|
Delete Diary Event |
After clicking on a diary event, click on this button to delete the diary event. See Plan | Monthly Diary for more information about how to delete diary events |
|
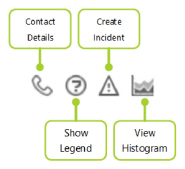
Contact Details |
Select to show the contact details for the selected employee |
|
Show Legend |
The screen legend is displayed when Show Legend is selected. The legend is shown below: |
|
Create Incident |
Select to Create an Incident against the selected duty |
|
View Histogram |
Select to be taken to the histogram view of the given data set. This will load up dynamically. For more information about the Histogram, |
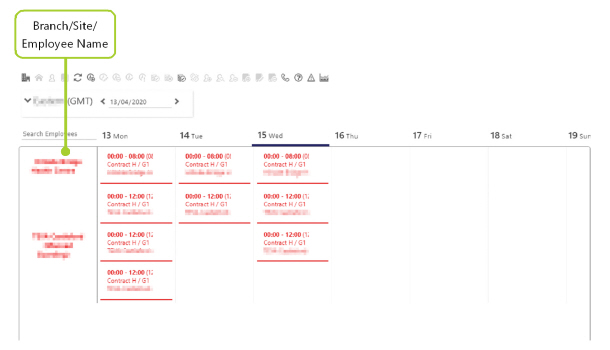
Branches View Weekly Schedule Panel
-
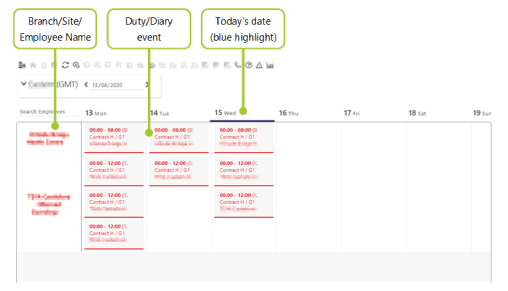
The Weekly Schedule Panel shows a table of active employees in the branch, along with their diary information (duties and diary events).
-
Each employee will have a row in the table, if an employee has more than one duty or diary event on a given day they then will have multiple rows assigned to them.
-
If lots of employee details are returned, there will be multiple pages of results.
-
The employees are ordered alphabetically in the format “Surname, First name, (PIN)”.
-
The table header comprises a series of dates. These will be fixed when scrolling through the data.
-
Employees will be in the left most column.
-
In the main body of the table the duty and diary events will be displayed. A duty will be shown along with the times (and duration), pay level code, hour type code and the site name.
An example screenshot is shown below:
Cells and their selection
There are 5 types of cell in the results grid in Branch View. Left/right clicking and holding control whilst clicking across cells will enable and disable different options depending on the type of cell selected and the cell’s state (relevant for Duty cells):
-
Left-hand mouse button clicking on a cell will “select” it, and update the toolbar to show all the actions available for a cell of that type
-
Right-hand mouse button clicking on a cell will open a context menu, which mirrors the actions available on the toolbar
-
Holding the control [CTRL] key and left-hand mouse button clicking on a group of cells to form a selection will limit the number of actions available to the user. This is mostly recommended for performing either a “Multi Duty Edit” or a “Shift Swap” action
Branch, Site and Employee Cells
On the left-hand side of the grid the Branch, Employee and Site cells are located.
Generally, interactions with these cells will be minimal. Users can choose to go to maintenance pages or add a duty from either a Site or Employee cell.
Diary Event Cells and Empty Cells
Diary Event cells will only give Diary Event and Employee related options such as Go to Employee and Edit Diary Event and will visually display according to the color scheme set in the Diary Events maintenance screen.
Selecting Empty Cell(s) will give different options depending on the parent row.
In an Employee row, an Empty cell will give the additional options of going to the Employee maintenance page and adding a Diary Event.
Choosing to add a Diary Event will take the user to the Add Diary Event page with the Employee pre-populated and will create the Diary Event for the current day. Note: This doesn’t take the date of the cell like Add Duty does.
Duty Cells
Duty cells are shown in the same way as in the Site and Site Teams Views with very little difference.
All icons and colors are explained in the Duty Legend on the toolbar.
Selecting a single or a selections of Duty cells will enable all Duty related actions.