Monitor: Note Log
How to get there: Monitor | Note Log or Monitor | Calls | Note Log
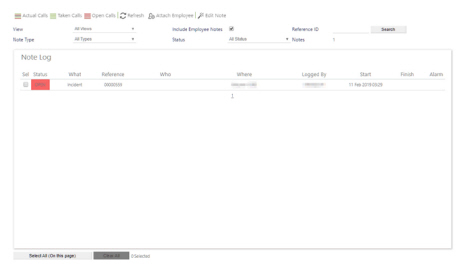
The Note Log is used to view, update and clear any notes created in the Call Monitor that are logged against Employees and/or Sites.
see Admin | General | Note Status for further information about configuring the various notes that are displayed in the note log
Screen Layout and Fields

|
Notes |
Number of notes at the given point in time |
|
Status |
Status of the note (values in here are dependent upon what has been defined in Admin | General | Note Status) |
|
What |
A description of what kind of note has been logged |
|
Reference |
Unique reference number for the note (the same number will be used if the note is logged against both an Employee and a Site) |
|
Who |
Name of the Employee relating to the note |
|
Where |
Site location where the note is logged against |
|
Logged By |
User ID of person creating the note |
|
Start |
Date and time that the note was created |
|
Finish |
Date and time that the note was closed |
|
Alarm |
An indicator to show that an alarm has been set to remind the user to action the note |
Screen Actions
|
Actual Calls |
Select to see All Calls. From the results, the Notes Wizard can be used to create a note for the Call if it has not already been raised |
|
Taken Calls |
Select to see Taken Calls |
|
Open Calls |
Select to see Open Calls |
|
Refresh |
Refresh the view with the latest information |
|
Attach Employee |
Select a Site (tick the SEL check box) and then select Attach Employee in order to add an Employee to a Site note record. See the Attached Employee section below for more information |
|
Edit Note |
Select a note (tick the SEL check box) and then click Edit Note in order to make changes to the note. See the Edit Note section below for more information |
|
View |
Select the type of view (filter the notes shown on screen by the different pre-configured views) - these have been set up in Admin | General | Call Monitor Views |
|
Note Type |
Select the type of note to view (filter the view by these different types of notes) |
|
Include Employee Notes |
Select to view both Employee and Site notes. If this is not ticked, only Site notes will be shown |
|
Status |
Select to filter what type of notes are shown by their note status. The user can choose between All, Open, Closed or Pending |
|
Reference ID/Search |
Type in the unique reference ID for example 00000001 and then select Search to look for a specific note |
|
Sel |
Select the record |
|
Click on Note |
Select a note to see extra information about the note and add further comments |
|
Select all (On this page) |
Select all records on the given page |
|
Clear All |
Select to clear the ticks within the SEL field of selected records |
|
Who field |
Select Employee name under the Who heading to view the related Employee record |
|
Where field |
Select Site under the Where heading to view the related Site record |
|
Alarm Clock Icon |
Roll over the clock icon under the Alarm filed to see what time the alarm is set for |
|
Page Number |
Select page number to view the notes on that page |
Attach Employee
Choose the Site that an Employee is to be attached to by selecting Sel
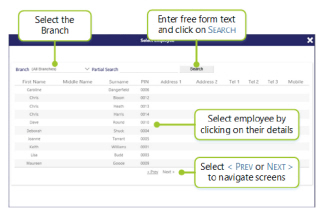
Select Attach Employee. The following screen will be displayed:

Select the Employee from the above screen.
To aid in finding an Employee’s name:
-
Use the <Prev or Next> buttons to scroll through the pages
-
Use the Branch drop-down list to filter
-
Enter a partial name in the Partial Search box and click the Search button
Note: If an Employee has already been added to a Site for a note the following error message is displayed
on screen:
Edit Note
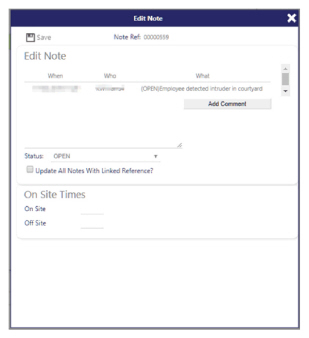
In order to make changes to a Note select the Note (tick the SEL check box) and then click Edit Note in order to make changes as shown. Once changes have been made/comments have been added, select Save.

Adding Comments
To quickly add comments to a Note, select the Note from within the Note Log. This will bring up some further options in the Note Log as follows:

Enter comments as required, choose whether to update the linked notes and select Add Comment (which is no longer “grayed out” when a comment is typed into the Comments box.