Monitor: Maps
How to get there: Monitor | Map or by selecting the View Map option from within a Duty
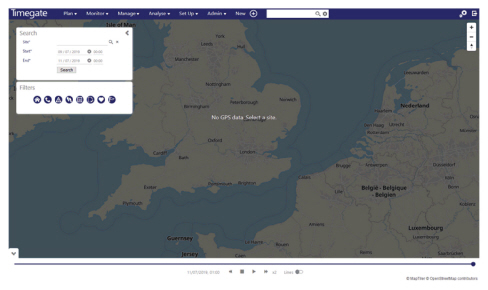
The map screen can be accessed from the Monitor Map menu or alternatively by selecting Go To Map from within any duty. The second of these two ways of accessing the page loads up duty specific information initially. This comprises all activities for that duty. If Monitor | Map is selected, but a Site is not selected, the message “No GPS Data. Select a Site.” is displayed on screen as shown below. To remove this error, select a Site, or multiple sites from within the Search Box as detailed in the “Search box” section. If the Site does not have GPS Coordinates configured, “The selected site does not have GPS coordinates” message is displayed.
Below is an example of the “Map screen” that has details of four employees who have been on duties. The map shows all manner of detail for duties over a selected time period (depending upon what your company has licensed), showing the location of:
-
Sites. In addition to the individual or multiple sites, their Geofences are shown. In the example below, this is the gray circular marker around the site marker. The individual Geofence for each site can been set up under (Set Up | Sites | Call Settings). If the Site Filter is turned off, the Geofence will be hidden
-
Where On/Off/Check Calls are made
-
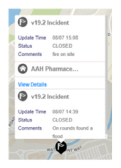
Where Incidents are raised
-
Guard on the Tours
-
Forms as they are being completed
-
Briefing notes as they are being read
-
The employee when a Heartbeat is recorded
-
Where an SOS call is made
Over the following sections, the various parts of the screen will be explained.
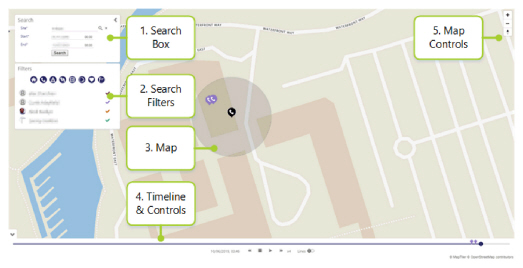
Search Box
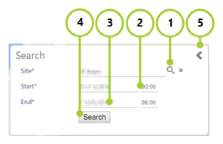
The Search part of the screen enables the user to search for the Site where they wish to view their map data.
-
Select the magnifying glass to search for a Site or multuple Sites. The following screen will be displayed:
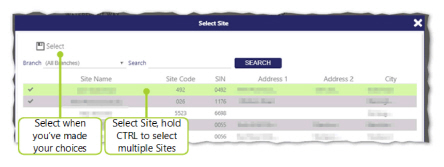
From the screen, select the Site or multiple Sites that you wish to see on the map. To select multiple Sites, select the first Site, then select the other Sites one by one. Each selected Site will be shown with a next to it. Select Select when completed. To deselect a site, simply select it again to remove it from your selection.Some of the selected sites have no GPS Data (in the case of one or more sites not having GPS details configured in Timegate)
All the sites selected have no GPS Data
Note: On returning to the main Search screen, following site selection, there may be one of several error messages displayed depending upon how the sites you have chosen have been configured.
-
Select a Start date
-
Select an End date
-
Select Search
-
Select to expand and hide the Search part of the screen.
Search Filters
The Search Filters part of the screen comprises a series of filters along with a series of employees. Select the employees and filters to show on the map.
Employees are designated a unique color to represent their actions on the map and thus differentiate them from their other colleagues. Multiple employees and their associated activities are shown using a black multi-marker. They share the exact same GPS coordinates (but may be at a different time). Descriptions for each marker are stacked above each other as shown in screenshot below, when the black multi-marker has been selected. Note: Zooming in wont affect those activities.
Sites have a gray marker.
As the list of employees expands, they can be scrolled through down the screen.
The eight filters are as follows:
-
Show Sites
-
Show Calls
-
Show Incidents
-
Show Tours
-
Show Forms
-
Show Briefings
-
Show Heartbeats
-
Show SOS calls
Note: The functionality and availability of filters is dependent upon software licensing. e.g. Tours will require a Service license.
Map
The map is used to show where employees are on duty and various other duty related information. The map can be scrolled around and zoomed in and out of, either by using the mouse wheel or the Map Controls. The Map Controls below further detail navigating around the map. Selection of icons on the map provide further details:
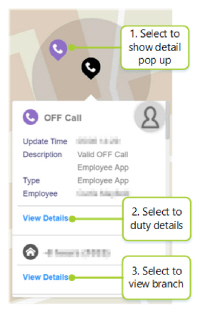
In this example, an OFF Call has been made. The time of the OFF call is recorded, along with a description and the way in which the OFF Call has been made (i.e. via the Employee App). The Employee’s name is also shown, along with links to “View Details”. From here the Duty details can be viewed or the Site details.
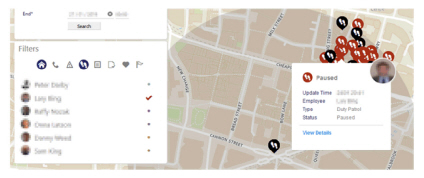
The following screen shot shows a tour being undertaken by a single employee. The brown foot prints illustrate where the tour was paused, the black footprints shown checking in at a check point:
Zooming into this map would enhance clarity significantly.
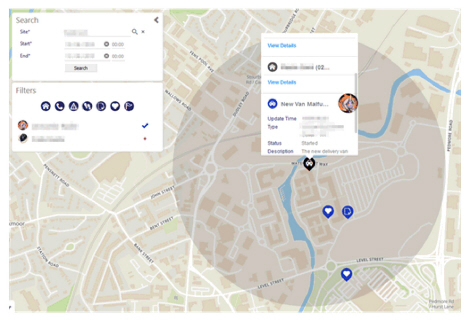
The next screen illustrates heartbeats (checking the employees progress at regular intervals) along with the raising of a form and the creation of an incident for a malfunctioning van:
Timeline & Controls
The Timeline and its associated controls enable the user to step through/play out duty related information on the
map screen.
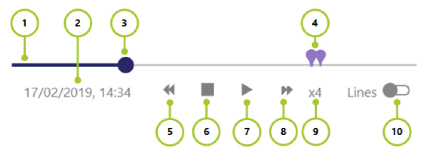
The various parts of the interface are as follows:
-
Timeline - progress is represented using a thick blue bar. Unplayed content is shown as a thin gray line. A user can hover on the timeline to see the time at any point. This is in addition to the time shown below the timeline (2 below).
-
Date and Time - this shows the date and time of the recording. Note: There is an overall duration limit of 30 days for maps
-
The dot indicates the play head. This shows where in the timeline is presently being played. The dot can be selected and dragged along the timeline as required to jump around the duty (i.e. go back/forwards in time)
-
Colored pointers on the timeline relate to when various duty related actions take place (those that you can filter by). The different colors relate to the various employees whose details are being displayed. Each employee has their own unique color
-
Rewind. Select multiple times to toggle the speed of rewinding (e.g. x2, x3 and x4)
-
Stop
-
Toggles between Stop and Pause
-
Fast forward. Select multiple times to toggle the speed of fast forwarding (e.g. x2, x3 and x4)
-
Speed of Fast Forward and Rewind (e.g. x2, x3 and x4)
-
Toggle to add/remove lines to the map between different duty related actions on a duty. Note: The Lines control is disabled when there are more then 100 points or the duration is greater than 24 hours. When the lines are disabled the control will be visible on screen, but when hovered over, it will show a message to why it can’t be enabled
Map Controls
Map Controls are located in the top right corner of the screen. The map can be zoomed in and out, using the + and - options. There is also an option to reset the map bearing to north as shown:
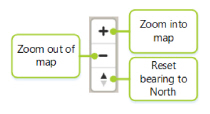
Note: Clustering of markers occurs when a user zooms out far enough.