Monitor: Calls (Call Monitor)
How to get there: Monitor | Calls
Monitor | Calls referred to hereafter as the Call Monitor is the real-time system intended for use by the control room. It displays (and accepts) all book on, book off and check calls at all stages of their progress, from the call being due to the call being finished. Call Monitor provides the functionality to:
-
Manually take a call/series of calls
-
Receive a call via telephone
-
Receive a call via biometrics
-
View the relevant branch, site, employee for a call
-
Filter results based on requirements (e.g. Sites and Call Types)
-
Add a duty
-
Delete a duty
-
Edit a duty
-
Allocate an employee to a duty
-
De-allocate an employee from a duty
-
Allocate most suitable employee
-
Go to duty view or employee diary
-
View employee contact details
-
Raise an incident (requires Service Delivery)
-
Create a note
-
Flag calls that have been escalated to management as being “Manager Aware”
see the following for further information about configuring and setting up Call Monitor:
Admin | General | Call Monitor Views - this page enables the user to set up specific views
Admin | General | Actions- this page enables the user to set up Actions for use in Call Monitor
Admin | System | System Settings | Call Monitor - this page enables the user to configure how Call Monitor works
Admin | General | T & A Monitor Settings - this page allows you to determine how missed duty calls can be automatically taken
see Monitor | Notes Log for more information about viewing and updating Notes, including those that are created in the Notes Wizard (process for creation detailed below)
Call Monitor View
Screen Layout and Fields

|
Total Rows |
This number is the amount of calls that are in the view |
|
Overdue |
This is the number of calls that are overdue |
|
Call Types |
This field indicates what the type of call is. The calls are styled as follows: 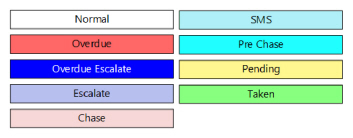
|
|
First Name |
Forename of employee |
|
Surname |
Last name of employee |
|
SIN |
Site ID number |
|
PIN |
Employee PIN number |
|
Pre Time |
Pre time and date of the call |
|
Operational Time |
Operational time and date of the call |
|
Post Time |
Post time and date of the call |
|
Site |
Name of the Site |
|
Site Group |
Name of the Group which the Site is part of |
|
Branch |
Name of the Branch that the Site/Site Group is part of |
|
Hour Type |
The type of hours associated with the Duty the Call is for |
|
Pay Level |
The type of pay associated with the Duty the Call is for |
|
Actual Time |
The actual time of the Call |
|
Event Name |
Name of event |
|
Event Team |
Name of the event team that the employee is a member of |
|
Event Role |
Role the employee is playing in the event |
|
Manager Aware |
Shows whether Manager Aware has been selected |
|
Employee Mobile |
Employees mobile telephone number |
|
Site Telephone |
The telephone number of the Site for the call |
|
Contract Manager |
The name of the Contract Manager for the call |
|
Slot Name |
Name of the slot for the call |
|
Employee Area |
Name of the area that the employee is allocated against |
|
Employee Zone |
Used to categorise the employee and the zone they are assigned to - used in reporting |
|
Site Area |
Name of the area that the site is allocated against |
|
Site Zone |
Used to categorise the site to indicate the area the site is assigned to - used in reporting |
|
Proof of Presence |
Verification of location details. Used to confirm that an employee is present. The status is color coordinated:
|
The previous screen shot shows the default column values. These can be modified using Configure Grid (see below)
Screen Actions
|
View |
Select the Call Monitor view from list provided. By default this is “All Views”. Choices are defined in Admin | General | Call Monitor Views |
|
Time Zone |
Select the Time Zone to display information from, be that the System or Branch |
|
Sites |
Select to search for site(s) to display on screen in the Call Monitor. This will bring up a dialog box from which the selection(s) can be made. |
|
Call Types |
Select using the check boxes, which kind of call you wish to see - be that On calls, Check (CHK) calls and/or Off calls |
|
Auto-Refresh |
Automatically update Call Monitor contents |
|
Mute Beep |
Select to disable the periodic overdue calls system beep |
|
Exclude Open Posts |
Select to ensure currently open posts are not displayed |
|
Search Text |
Enter search string here and select Search |
|
Search |
Select to execute search using criteria in the Search Text |
|
Select All |
Select all records on the page |
|
Left Click On a Call (Row) |
Select the record to action using the Call Monitor Menu (see below) |
|
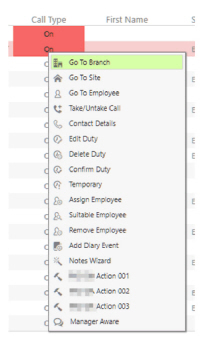
Right Click on a Call (Row) |
Select record and show right-mouse button menu (see below) |
|
Left Click + CTRL |
Select multiple records to action using the Call Monitor Menu/Right Mouse Click Menu (see below) e.g. Select multiple calls and then select Take/Untake Calls to Take/Untake multiple calls. In this example, the following screen is loaded: 
|
|
Double Left Click on Call |
Take the call - loads the following screen to enable the user to take the call and optionally to clear missed calls: 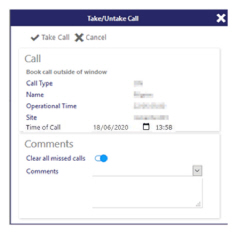
|
|
Double Left Click on any of the Entities |
See entity information (i.,e. Employee, Site, Site Card, Branch) |
|
Up/Down Arrows |
Move up and down through calls table |
|
Select Call, then select Enter |
Take/untake selected call |
|
Column Header |
Select a column header to sort ascending/descending by that column |
As discussed above the menu and right-hand mouse click open up further functionality from within this screen. The menus are context sensitive, therefore, they depend on an appropriate duty or number of duties being selected in order to work. These are detailed in the next few pages of this guide.
Call Monitor Menu
Right Mouse Click in Call Monitor
Screen Actions
|
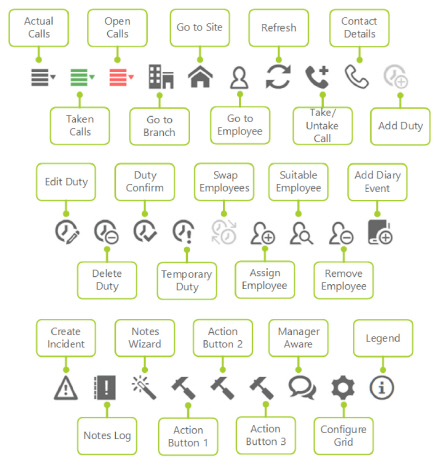
Actual Calls |
Select to display All Calls. This is the default view for Call Monitor. Records will remain on this screen for several minutes after the call has been taken. The duration is specified in System Settings |
|
Taken Calls |
Select to view only Taken Calls. There is a System Setting that can be set to specify the number of hours in the past that the screen will display taken calls for |
|
Open Calls |
Select to view only Open Calls. Open Calls are those duties without an allocated employee. Again, there is a System Setting that can be specified for the number of hours in the future that the system will display Open Calls for |
|
Go to Branch |
Open the branch record for the selected call |
|
Go to Site |
Open the site record for the selected call |
|
Go to Employee |
Open the employee record for the selected call |
|
Refresh |
Select to refresh the view (may not be used if Auto-Refresh has been selected). see below for more information about Auto-Refresh |
|
Take/Untake Call |
Selecting Take/Untake Call enables the user to manually Take or Untake (reject) a call. Select a call row and select Take/Untake Call to either Take or Untake (reject) the Call. If the call is being taken using Take/Untake Call within the On window, the user simply selects Take Call (no further action such as filling in a comment box is required) Meanwhile, if the call is not due to be taken, or is overdue, a validation message box will appear. The user is asked for confirmation that they want to take the call. There is also a space where they must enter a comment (from a drop down list and also free form in a text box). An example of the Take/Untake Call dialog box that is shown, is as follows: 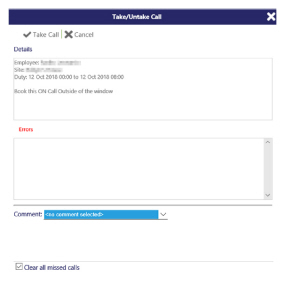
The user may be presented with a Clear all missed calls check-box at the bottom of the screen (when the “Auto-take missed check calls’” system setting is enabled in Admin | General | T & A Monitor Settings.) When Clear all missed calls is selected, if check calls are missed, the user does not have to “clear down” all of the calls, call-by-call for the duty, approving them as necessary. Instead, these missed duty check calls are automatically taken, with the actual time being set to the operational time When Admin | General | T & A Monitor Settings is enabled, Clear all missed calls is by default selected as shown above see Admin | General | T & A Monitor Settings for further information about this setting To Take/Untake (reject) select Take/Untake (this is context sensitive depending upon the type of call selected) When the Call is taken, it turns Green. The Actual Time is then recorded against it If a call is taken by mistake or for some other reason there is a desire to Untake a call, use the same method as for taking the call. the following screen is loaded: 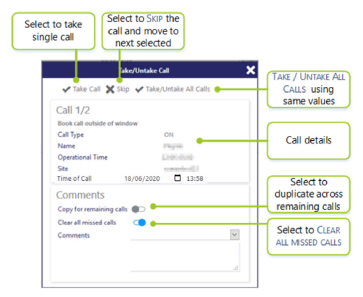
Select whether to Take/Untake All Calls as shown |
|
Contact Details |
Select a call row and select Contact Details to see the Site Telephone number, Employee Telephone number and the Employee number (if they are available) |
|
Duty Add |
Select a call row and select to create a new duty |
|
Duty Edit |
Select a call row and select to edit an existing duty |
|
Duty Delete |
Select a call row and click on this button to delete a duty |
|
Duty Confirm |
Select duty/duties to confirm them |
|
Temporary Duty |
Select duty/duties to flag them as temporary |
|
Swap Employees |
Use this function to swap employees between two duties. Select two duties and select Swap Employees. A validation box will be displayed along with the opportunity to alter Hour Type and Pay Level for both employees involved in the swap. See Plan | Duty Edit | Swap Employees for more details |
|
Assign Employee |
Select a duty/duties to assign an employee to them |
|
Suitable Employee |
Select to find a suitable employee for the duty |
|
Remove Employee |
Select to remove an employee from the chosen duty/duties |
|
Add Diary Event |
Select to add a diary event related to the selected call using from the following screen: 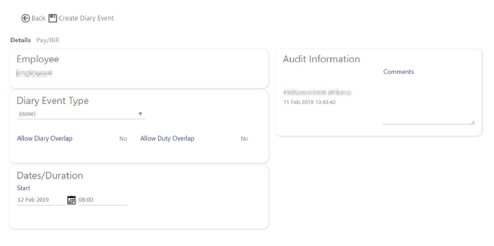
|
|
Create Incident |
Select to create a Service Delivery Incident |
|
Notes Log |
Select to view the Notes Log. This view shows any notes that have been raised in the past. The number of hours in the past that will be displayed is specified in the System Setting. For more information about the Notes Log, look at Monitor | Notes Log |
|
Notes Wizard |
Select to open the Notes Wizard - see “Using the Notes Wizard” below for more details about how to use this function |
|
Action Buttons 1 through 3 |
Three user definable buttons that can be configured to enable the rapid creation of certain types of note/perform actions on duties in the Call Monitor. To run the actions, simply select the duty you wish to run the action against, and press the associated action button. The action buttons will only be available for duties with employees allocated to them - they will not work with open posts. Furthermore, buttons can only be used with a single duty - multiple duty selection is not supported. For further information, see Admin | General | Actions, where you can learn how to configure the buttons. |
|
Manager Aware |
Select a duty/multiple duties and use this option to flag that the problem has been escalated and that a manager is aware. Be aware that there is no functionality associated with this action at time of going to press, it merely works as an indicator to show that it has been raised with management |
|
Configure Grid |
Select to configure the columns that are displayed in Call Monitor. See the “Configuring the Duty Filter using the Configure Grid” section of this guide below for further information about how to use this feature |
|
Information icon |
Select to see the Call Monitor legend to understand the meanings of the different things displayed on the screen: 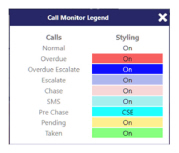
|
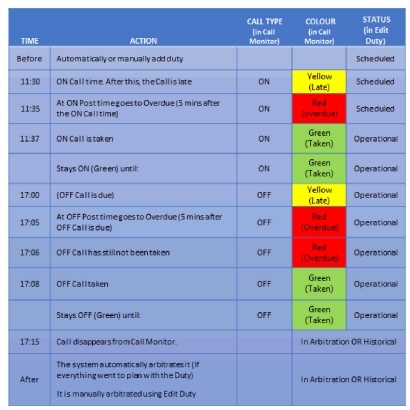
Progressing of a duty
Once a duty has been added (either manually in scheduling automatically from the contracted hours) the ON call will appear in Call Monitor.
After the ON call has been taken either automatically via Clock-in.com or a biometric device, then the next call type that will appear is the OFF call. However, if you have scheduled Check Calls then they will appear before the OFF call does.
Here is an example of how a duty passes from scheduling, through Call Monitor to Arbitration. The example duty is scheduled for 11:30 to 17:00. Assume the ON Pre Time, the ON Post time, OFF Pre time and the OFF Post time are all set as five minutes (configured in the Site | Call Settings Tab). Assume extra OFF time - 10 minutes. (Set in Admin | General | Arbitration Profiles screen).
Using the Notes Wizard
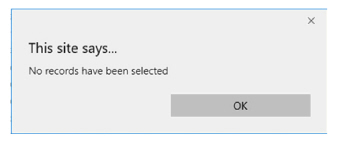
By selecting Notes Wizard, the user can create a note for the selected call. Failure to select a call will result in the following error message being displayed:
Once a call has been chosen, select Notes Wizard The following screen will be displayed, from which a note for the Employee, the Site or both can be created:
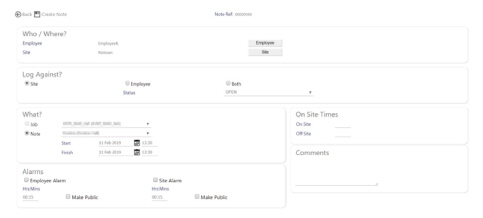
Screen Layout and Fields
|
Note ref |
Unique identifier for the note generated by the system |
Screen Actions
|
Employee |
Add details of the Employee that the Note is to be raised against. Select Employee to open the below dialog box. Select the Employee name with the i icon: 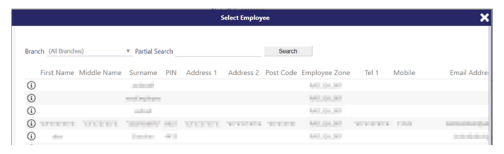
Note: The button for Employee is grayed out unless Employee or Both is selected within the Log Against radio button selector (see below) |
|
Site |
Add details of the Site that the Note is to be raised against. Select Site to open the below dialog box. Select the Site name with the i icon: 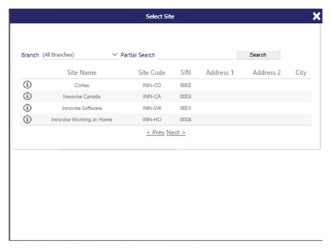
Note: The button for Site is grayed out unless Site or Both is selected within the Log Against radio button selector (see below) |
|
Log Against |
Select whether to log the Note against the Site, Employee or Both |
|
Status |
Select the status of the Note from the drop-down list:
|
|
What |
This radio button is fixed at Note and cannot be changed |
|
Note |
Select the Note type from the drop-down list |
|
On Site/Off Site |
If using Sub Duties, this Note can be associated to a Sub Duty by adding the On Site and Off Site times in the hh:mm format |
|
Alarms |
Setting an alarm will result in an audible and visible alarm being displayed regarding this note. This can be set against the Site or the Employee at a given time. After the notification has been received the user can edit the incident and either snooze or dismiss the alarm. The notifications will continue until the note status is set to Closed |
|
Comments |
Add a comment relating to the note in this space. You must add comments or an error message will be displayed |
|
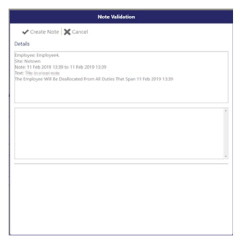
Create Note |
Select Create Note to review and save the note. The following Note Validation screen will be displayed, from which the user can:
|
Configuring the Call Monitor using the Configure Grid
Screen Layout and Fields
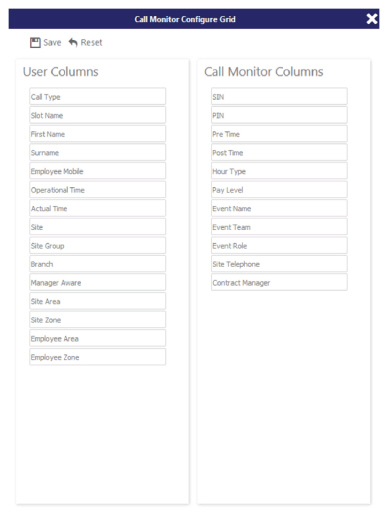
The Configure Grid button when pressed accesses a screen that is used to customise the columns displayed in the Duty Filter screen ensuring the content is relevant to the system user. The first time you enter the Configure Grid screen, you will see all the Visible Columns on the left and no Hidden Columns - an example of a configured screen is shown below:
|
User Columns |
Those values that will be displayed in the Call Monitor view. Drag and drop columns between this and the Call Monitor Columns. Reorder the column values up and down the list to alter the order that they are shown from left to right of the screen |
|
Call Monitor Columns |
Columns that are not being displayed on the screen in Call Monitor |
Screen Actions
|
Columns |
These names can be dragged and dropped between the two sides of the screen (the visible User Columns and the hidden Call Monitor Columns). The view is set up as follows: Using drag and drop, select the column names in the User Columns left hand box that you wish to hide from view and drag them into the Call Monitor Columns right hand box To change the sort order, select the User Columns with the left-hand mouse button. Holding the button, drag the columns into the desired place. Release the mouse button. |
|
Reset |
Select Reset to revert back to the original configuration at any time |
|
Save |
Select Save to keep changes |