Manage: Tasks/Monitor Tasks
How to get there: Manage | Tasks or Monitor | Tasks (both routes of access go to the same screen)
From this screen, the user can view any outstanding tasks or requests from employees that have been created in the Employee Portal. This is normally pertinent to a Manager or Supervisor that manages such items as holiday requests or outstanding Human Resource type tasks.
For further information, look at:
-
Admin | Engagement | Help Desk Task Status where Task Status values are created and configured
-
Admin | Engagement | Help Desk Task Types where Task Types values are created and configured
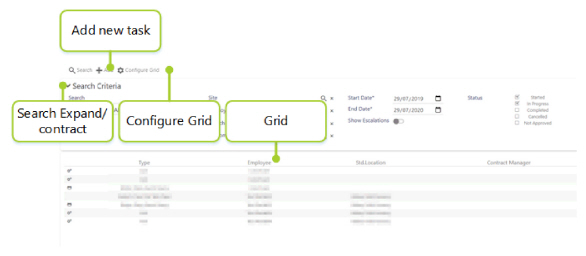
The task management/monitoring screen comprises four pieces of functionality that will be covered as separate subsections. These are:
-
Search Criteria
-
Add a new task
-
Task List Grid
-
Configure Grid
These four areas are shown below:
Screen Layout and Fields - Search Criteria
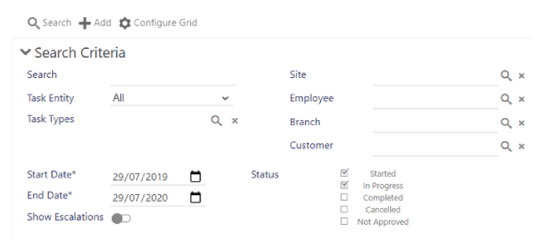
From the Search Criteria part of the screen, the user can search for specific tasks using a series of criterion and filters. This works much in the same way that incidents and duties are searched and filtered.
When the user initially loads the Manage | Tasks or Monitor | Tasks page, the filters are pre-set to show all task types for the last year that are flagged with a status of Started or In Progress, for Both i.e. Employee and Sites.
The Start Date and End Date search option can be used to narrow the list of tasks displayed based on their creation date.
|
Search |
Enter free-form text to search upon |
|
Task Entity |
Select from All (default value), Site, Employee, or Customer |
|
Task Type |
Select to load the Select Task Type dialog box, where one or more Task Types can be selected:. Once selected, press Select to save changes and return: 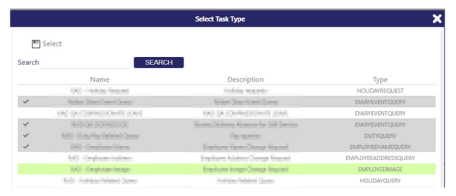
|
|
Site |
Select to load the Select Site dialog box, where a Site can be searched for and then selected. Once selected, if the user wishes to remove the filter, they can select : 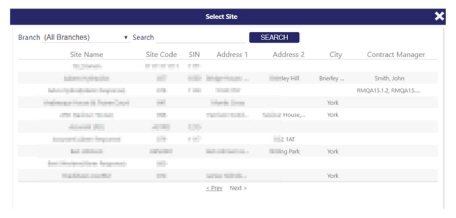
|
|
Employee |
Select to load the Select Employee dialog box, where an Employee can be searched for and selected. Once selected, if the user wishes to remove the filter, they can select : 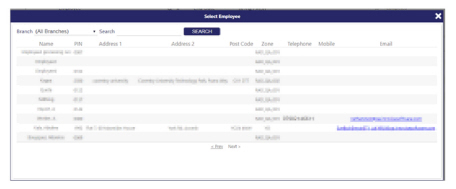
|
|
Branch |
Select to load the Select Branch dialog box, where an Employee can be searched for and selected. Once selected, if the user wishes to remove the filter, they can select : 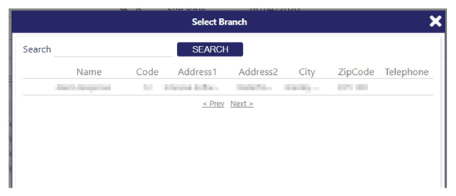
|
|
Customer |
Select to load the Select Customer dialog box, where a Customer can be searched for and selected. Once selected, if the user wishes to remove the filter, they can select : 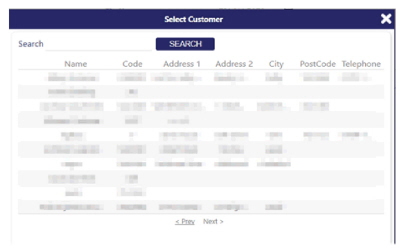
|
|
Start Date |
Enter the search Start Date in the DD/MM/YYYY format or select a date. By default this value is set to a year ago today: 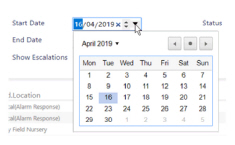
|
|
End Date |
Enter the search End Date in the DD/MM/YYYY format or select a date. By default this value is set as today’s date 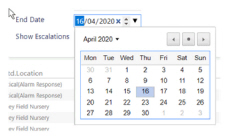
|
|
Show Escalations |
The Show Escalations filter has been added to give the user the option to see any Tier 1 tasks that have been approved, that have a subsequent Tier 2 Escalation Group. In the grid view of the screen, they are indicated in italics with a small bell icon next to them. By default this is not selected |
|
Status |
Select which help desk tasks to show based on their status. The choices that can be selected are: Started, In Progress, Completed, Cancelled, Not Approved. By default, Started and In Progress are selected. Individual help desk task status values are defined in Admin | Engagement | Help Desk Task Status |
Screen Actions - Task Filters
|
Search |
Select to search for tasks meeting with the Search Criteria |
Screen Layout, Actions and Fields - Configure Grid
Select to open the Configure Grid page. A screen similar to that shown below will be opened:
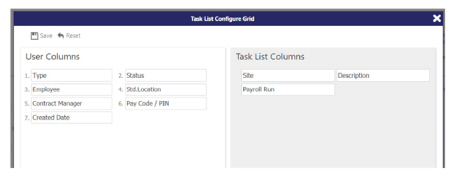
The left-hand side of the screen, entitled User Columns shows those columns that will be displayed on screen in the help desk task grid. Items on this side of the screen can be dragged using the left-hand mouse button onto the Task List Columns side of the screen to remove them from the help desk task grid view. At least one column must be included in this side of the screen. The number next to each column shown above is representative of the order of the columns in the grid - for example, 1. Type will be shown first, where as 7. Create Date will be the last column shown.
The right-hand side of the screen, entitled Task List Columns shows those columns that will not be displayed on screen in the help desk task grid. Items in this list can be dragged using the left-hand mouse button onto the User Columns side of the screen to be made visible.
To save changes, select Save.
Select Reset to reset the values in each column to their default settings (as shown above)
Screen Layout and Fields - New Task
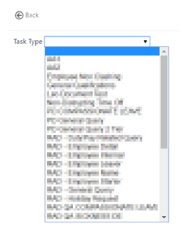
If a user has permission to add a new help desk task, they can do this by selecting Add from the menu. The following screen is presented, from where they should select a Task Type from the drop down list. The items in the list will be specific to each organisation and will have been configured specifically to their wants and needs:
Note: Access to the New Task creation functionality is security controlled.
|
Task Type |
Select the task from the drop-down list. Task Types are defined in Admin | Engagement | Help Desk Task Types Once a Task Type is defined within the Help Desk Task Types screen, to ensure that it is shown in this drop-down list, tick Available to Add in Timegate as shown in the diagram below when setting up the Task Type: 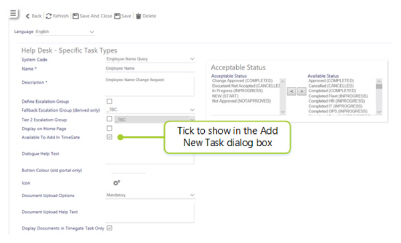
|
Screen Actions - New Task
|
Create |
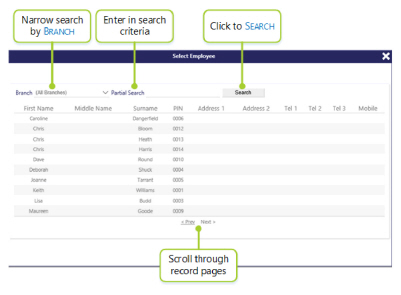
Click on this button once a Help Desk Task Type has been selected to create a New Task. The first stage of setting up a new task is to select an Employee from the dialog box that is displayed on the screen as shown: 
If this was successful, then an email is sent out to the appropriate Escalation Group. An email will also be sent out to the employee informing them that a task has been created on their behalf |
Screen Layout, Fields and Actions - Task List
The Task List part of the screen shows the various tasks stored within the system as shown:

The list, by default will comprise all tasks, however, the tasks shown may have been filtered by the Task Filters. The information on screen can be changed, using the Configure Grid option detailed above. By default, the following columns are shown:
|
Type |
Type of task |
|
Status |
Current status of the task |
|
Employee |
Employee that the task relates to |
|
Std.Location |
Usual location for the employee |
|
Contract Manager |
Name of the contract manager |
|
Pay Code/PIN |
The unique identifier for that individual employee |
|
Created Date |
The date and time that the task was created |
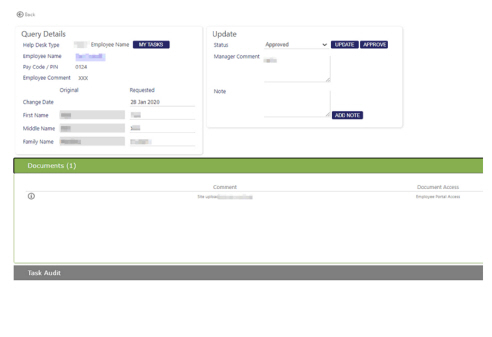
Select a specific task to find out more information about it.
Note: Different tasks will contain different information that is laid out differently onscreen for example a Holiday Request task will look different to a Pay Query task
An example of the kind of information that will be presented to the user is shown in the screenshot below:

Examples showing the creation of New Tasks
Change of Address
After selecting the employee, enter the address change date along with details of the new address.
Click on the comments and enter as appropriate and attach one or more files to support the request as necessary
The screen shot is shown below:
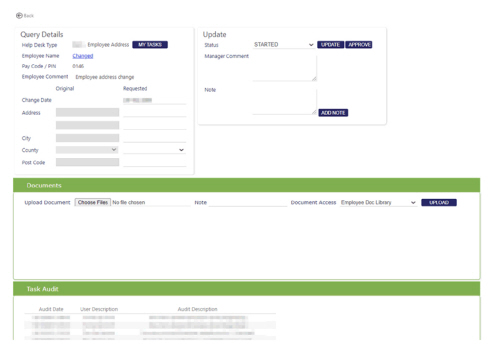
This screen shot shows the supporting document upload section. Users can assign one or multiple documents to the task. Adding more than one document at a time is new from version 20.4 onwards. It is particularly helpful to managers when they are raising tasks on behalf of their employees. For example, if an employee is leaving, there may be a leavers task where a resignation letter (from the employee) and a leaver exit interview form (completed by the manager) need to be attached.
The supporting Documents section includes a Choose Files button. When selected, the Timegate user can select files ready to Upload one or more documents using their browsers built-in file management system.
If you wish to attach the same Comment and/or set the same Document Access to a series of documents, but not all of the documents that are to be uploaded, the uploads can be done in separate batches/individually as required.
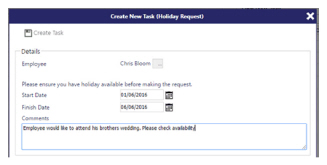
Holiday Request
The user must select an employee before being able to create the task.
Further validation is undertaken once the “Create Task” option is clicked.
The dates are checked to make sure that the Start Date is before the Finish Date.
A further check is performed to make sure the employee has enough free holiday days available.
An email will also be sent out to the employee informing them that a task has been created on their behalf.
Name Change Request
he user must select an employee before being able to create the task.
Once the Create Task option is clicked, the employee details must be entered as required and then any supporting documentation attached. One or more documents can be uploaded using the Choose Files button. The maximum permissible size of each documents is held within the web config file. If the uploaded file(s) exceed this, then a message is shown and the user is prevented from continuing.
An email will be sent to the appropriate users in the corresponding escalation group and an email will also be sent out to the employee informing them that a task has been created on their behalf.
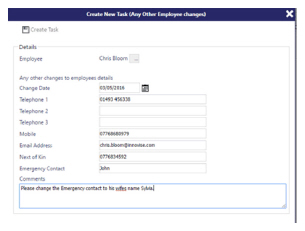
Any Other Employees Change Request
The user must select an employee before being able to create the task.
An appropriate email will be sent out to the escalation group and an email will also be sent out to the employee informing them that a task has been created on their behalf.
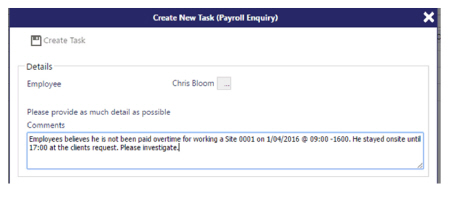
Payroll Enquiry
The user must select an employee before being able to create the task. An email will be sent out to the appropriate escalation group and an email will also be sent out to the employee informing them that a task has been created on their behalf.