Manage: Service Desk
How to get there: Manage | Service Desk
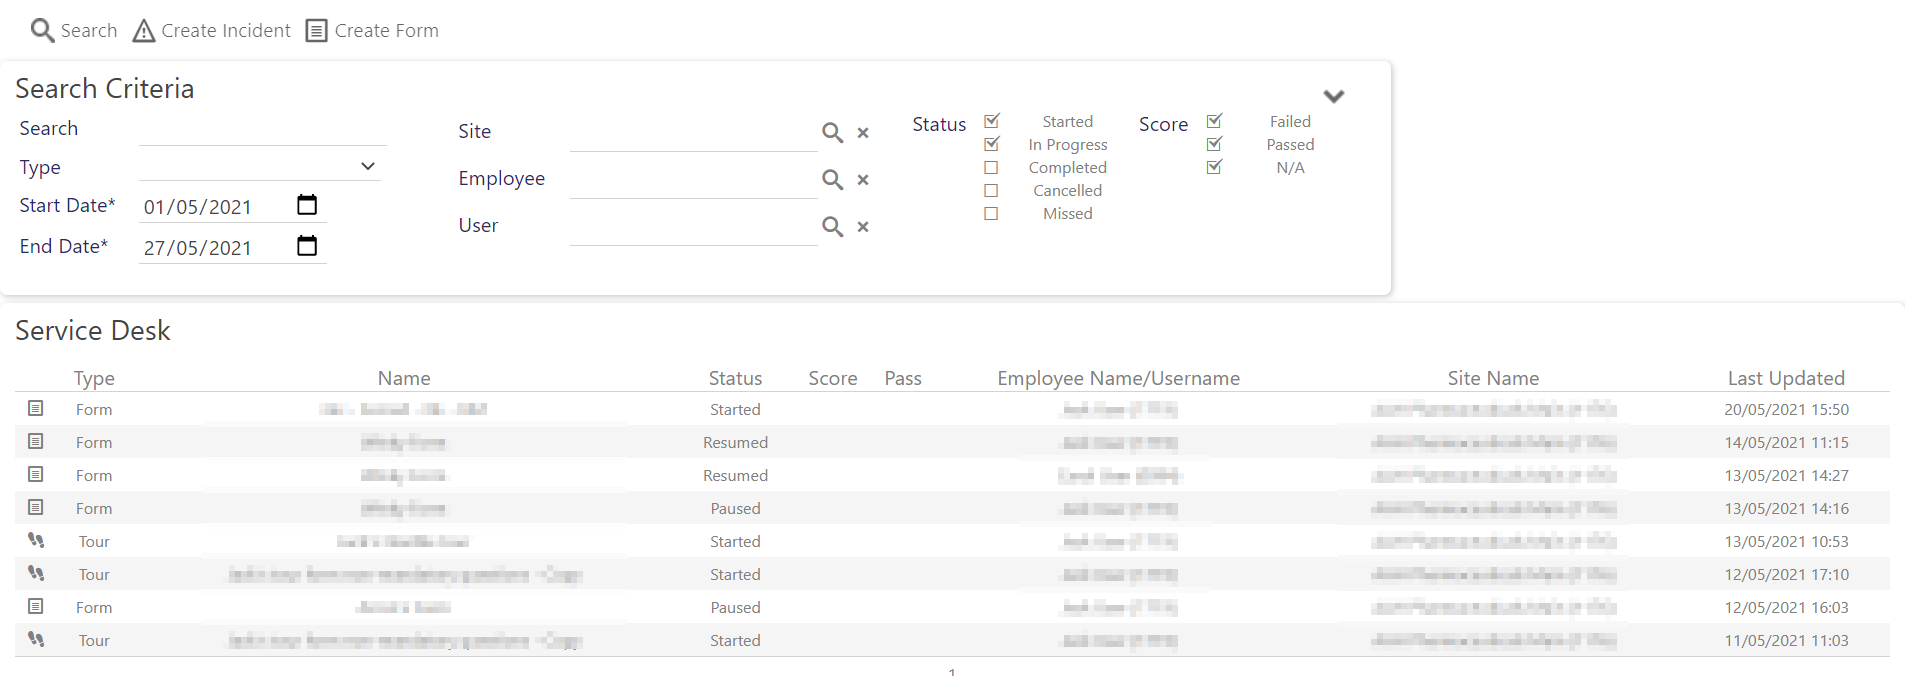
Service Desk View
The Service Desk is used to view and update Incidents and Tours using the Service Delivery functionality of Timegate. Additionally, it used for viewing Forms. All of these items can be searched for using the collapsible search filter at the top of the screen
Screen Layout and Fields
|
Type |
Incident, Tour, Briefing, Heartbeat, or Form - the type to search for. Any other values in this drop down list should be ignored - they have no functionality |
|
Name |
Specific name of the Incident, Tour, Briefing, Heartbeat, or Form |
|
Status |
Status of the item type that you are searching for. Select from one or more of: Started, In Progress, Completed, Cancelled or Missed |
|
Score |
Score from a scorable form completed during a tour/incident |
|
Pass |
Pass/Fail or N/A result indicator for completed forms that have been scored. Be aware that N/A is displayed when a score is not calculated (because N/A has been selected for all answers) and not when a score of 0 is achieved. |
|
Site Name |
Site name the Incident, Tour, Briefing, Heartbeat, or Form has been raised against |
|
Employee Name/Username |
Name of Employee or the User that the Incident, Tour, Briefing, Heartbeat, or Form is related to |
|
Last Updated |
Last time that there was an update to the Incident, Tour, Briefing, Heartbeat, or Form |
Screen Actions
|
Search |
Enter (any) search criteria in here |
|
Type |
Select to search for Incident, Tour, Briefing, Heartbeat, or Form |
|
Start Date |
Start date for Incident, Tour, Briefing, Heartbeat, or Form |
|
End Date |
End date for Incident, Tour, Briefing, Heartbeat, or Form |
|
Site |
Select Site to search by site name |
|
Employee |
Select Employee to search by employee name |
|
User |
Select User to search by user name |
|
Form |
Select Form (only displayed when Type is Form) to find a stand alone Form |
|
Status - Started |
Show types that have been started |
|
Status - In Progress |
Show types that are in progress |
|
Status - Completed |
Show types that have been completed |
|
Status - Cancelled |
Show types that have been cancelled |
|
Status - Missed |
Show types where the associated data is missing |
|
Score - Failed |
Show Incidents/Tours/Form where the score achieved is classified as Failed |
|
Score - Passed |
Show Incidents/Tours/Form where the score achieved is classified as Failed |
|
Score - No Score |
Show Incidents/Tours/Form where No Score is achieved for a form (i.e. forms where scores have not been calculated.) Be aware that Scored Forms where 0 has been achieved as a result are not classified as Score - No Score. |
|
X |
Clear selection (be that Incident, Tour, Briefing, Heartbeat, or Form depending upon selection) |
|
Search |
Select to execute the Search using criteria detailed above |
|
Create Incident |
Select to raise an Incident on behalf of an employee - see below |
|
Create Form |
Select to raise a Form on behalf of an employee - see below |
|
V |
Hide the Search Criteria |
|
Numbers at bottom of screen |
Select a number (where displayed) to navigate through pages of Service Desk entries |
|
Select Incident, Tour, Form, Briefing, or Heart Beat
|
Displays information about the Incident, Tour, Briefing, Heartbeat, or Form with logs and any associated media. If a Form is selected, the user can view, edit and download a copy of the associated form. Furthermore, the update logs and associated media can be viewed. Further details of Form related views and actions can be found in the section “Service Desk Form Actions” later on in this chapter. In the case of Incidents, if the Enable Editing selection has been turned on in the Incident Type and the incident is either Started or In Progress, the incident can be edited from the Incident/Tours screen. note, however, that if the incident is Closed, it cannot be edited. You should also be aware that Tours cannot be edited. Further details of Incident and Tours views and actions can be found in the section “Service Desk Tour and Incident Actions” below |
Service Desk Tour, Incident and Form Actions
Example of an Incident
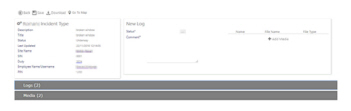
The example provided shows an Incident with Enable Editing turned on. When editing is enabled in the Incident Type, Incidents can be viewed and updated from this screen. Any additional information can be added from this screen, including image files. Logs and Media can be viewed by expanding the sections at the bottom of the incident.
To view a map of the Incident, select Go To Map.
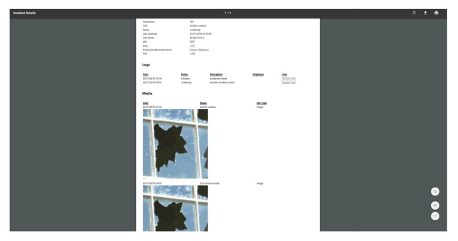
To download an incident as a PDF file, select Download. An example of the style of a Incident PDF that has been opened, ready for downloading is shown below:
Example of a Tour

Tours that are in progress are also visible and are identifiable by a blank End Time field. The number of visited, not visited and failed Locations is denoted in a progress wheel at the bottom of the details panel, as shown above. “Visited” is denoted in green, “Not Visited” is shown in gray, whilst failed visits to locations on a Tour are denoted in red.
Note, “Not Visited” in the context of Tours suggests the Location has not yet been visited. If the Tour is closed and there are locations that haven’t been visited, these will automatically be marked as failed during the arbitration process.
Updates against Tours will be status updates (e.g. Started, Paused), Location updates or Incidents that have been raised whilst on a Tour.
Clicking on an update in the list opens a new panel. This shows further details about the update, including a failure reason if the Location is failed and any attached media. Clicking on the media row opens a preview dialog.
From the Tours, like Incidents, you can download the information (in this case Tours) as a PDF file, select Download.
To view a map of the Tour, select Go To Map.
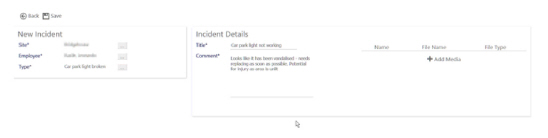
Raise a new incident
In order to raise a new incident, follow these instructions:
-
Select Create Incident
-
Select Site from pop-up dialog box
-
Select Employee from pop-up dialog box. Be aware that only those Employees who work on the selected site, within the next twenty-four hours are displayed for selection in this field
-
Select Type of Incident from selection provided in pop-up dialog box
-
Enter the Incident Details e.g. the Comment and a Title
-
Add any media as required using Add Media to upload from your computer
-
Select Save
An example incident is shown below prior to being saved:
Service Desk Form Actions
The screen shot below shows an example of a Form that has been selected from within the Service Desk:
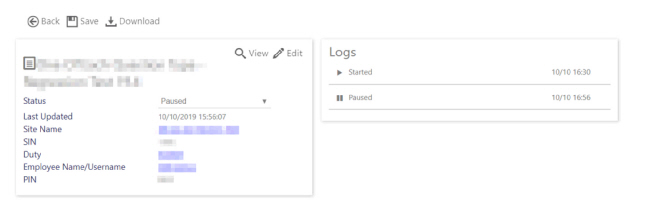
From here, the details of the form completion can be seen (i.e. who has updated the form, when, how and where.)
Additionally, the form can be viewed, downloaded or edited. It is worth noting two items with regard to editing. Firstly, it is controlled by a security feature, so it can be switched off/on based on business need of the individual user. Secondly, it is best practice not to edit whilst the form is in Progress or Paused. Changes may conflict with those being made by the end-user on their mobile device.
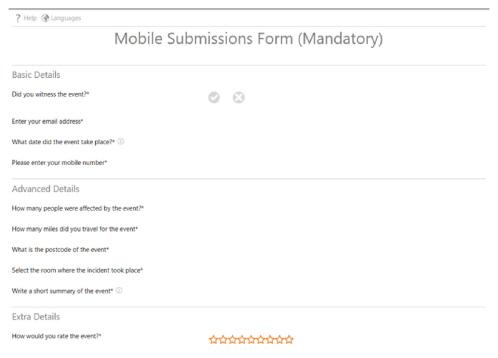
To view a form, select View. The following is an example of what will load in its own, new window in your browser:
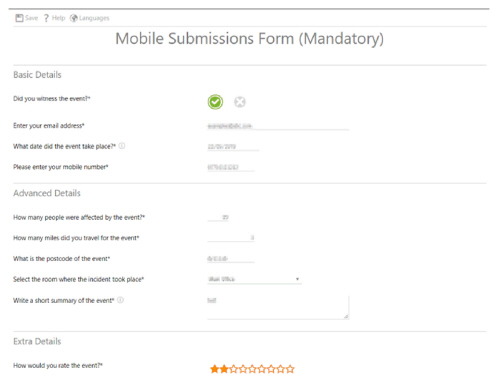
If you wish to edit the form (if you have the correct Function Role access that will enable you to do this), select Edit from the previous screen. In this example, the following screen loads. From here, the answers can be edited. Once changes have been made, select Save:
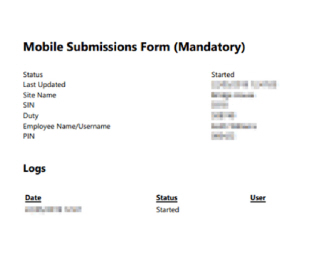
To download a Form as a PDF file, select Download. An example showing the style of an Incident in PDF format, that has been opened, ready for downloading, is shown below:
Raise a new Form
In order to raise a new form, follow these instructions:
-
Select Create Form
-
Select Site from pop-up dialog box
-
Select Employee from pop-up dialog box. Be aware that only those Employees who work on the selected site, within the next twenty-four hours (including those presently on duty) are displayed for selection
-
Select Form from selection provided in pop-up dialog box
-
Select Save
The form will now be loaded. From here, you can complete the form on behalf of the employee or save it for them to complete. Alternatively, the form will now be sent to the employee for their completion
Note: When creating and completing forms, be aware that when the form is synchronised to the employee’s device, it will be sent as a blank form, regardless of how much of the form you have completed for them, unless the form is closed after you make your entries. Therefore, if you are completing the form on behalf of the employee, make sure you close the form after completion. Meanwhile, if the employee has the form, completes it and closes it, you will not be able to make changes to it