Manage: Queues
How to get there: Manage | Manage Queues
When Prior Period Adjustments Functionality (PPA) is enabled on the Web Client 1, you will be able to lock and close both duties and diary events within certain periods, for one, multiple or all branches. Either a free-format date range can be specified or the period can be locked to specific pay periods. Within the specified closed period of time, this prevents the manual creation of duties and diary events. Any duty or diary event that has been closed can only be edited by a user who has the appropriate security rights. If a user does not have this level of security clearance, then they can only view the duty or diary event and cannot edit it.
The same applies to manual rotaloads. When manually rotaloading a site, duties that fall into or out of a closed period will not be created, and a message will be shown at the end of rotaloading explaining this.
The basic principal of the prior period processing (PPA) is that once all duties and diary events have been reconciled for a given period, the user will select the lock screen and lock the period. This lock process will generate a new transaction number and assign it to all records affected within the period (duties and diary events). This ties all duties/diary events together for submission into a third party system. There are two stages to the lock process:
-
Lock This will create the transaction number and assign it to all affected duties and diary events. At this stage, duties and diary events can still be edited and if this results in rate generation information being re-created, then the transaction number is removed from the duty/diary event in question. When the user then re-locks the period, the existing transaction number is once again, written to any changed duties/diary events
-
Close Once everything is reconciled in the period, the user then chooses the close option. This process flags all duties and diary events in the period as being closed. No further editing of affected duties or diary events can be carried out *unless* the user has permission to unlock the duty/diary event to carry out the change. Any duties or diary events that are edited in this way and are subsequently re-rate generated will have the adjustments recorded in the next period
Screen Layout and Fields
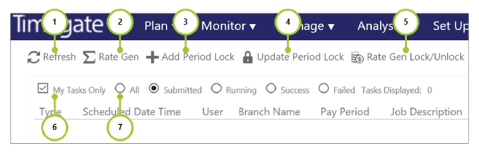
The functionality is controlled via the Manage Queues page. The user is provided with the opportunity to:
-
Refresh the contents of the screen
-
Undertake manual Rate Gen - including viewing the Rate Generation Jobs Queue and scheduling new Rate Generation items to it (the user requires an additional security item to add new items). note that this is security and system setting security controlled
-
Add Period Lock - the user will select the lock screen and lock the period, once all duties and diary events have been reconciled for a given period. This lock process will generate a new transaction number and assign it to all records affected within the period (duties and diary events). This ties all duties/diary events together for submission into a third party system
-
Update Period Lock - When manually rotaloading a site, duties that fall into or out of a closed period will not be created, and a message will be shown at the end of rotaloading explaining this
-
Rate Gen Lock/Unlock - Lock or unlock rate generation
-
Determine which tasks to viewed be that My Tasks Only or those of others (applies only to Rate Generation jobs)
-
Determine which task types to view: Submitted, Running, Success or Failed
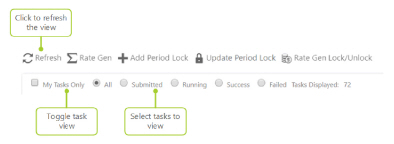
By default, the user will see scheduled jobs that are of interest to them (My Tasks Only). This can be changed by using the radio buttons and the check box. They will be able to switch between Submitted, Running, Success, Failed or All states of job. Moreover, they can choose to see jobs submitted by themselves or those of all users of the system. When changing the state of either the radio buttons, the check box or by clicking the refresh toolbar, the user will be able to refresh the queues list. The total number of jobs visible is displayed next to the status selection.
|
Type |
Icon indicating type of lock/unlock |
|
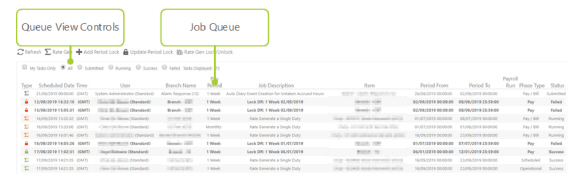
Tasks Displayed |
Number of tasks in the Queue view being displayed (comprising Submitted, Running, Success, Failed or All tasks) |
|
Scheduled Date Time |
The date and time that the task was scheduled |
|
User |
Name of user who has scheduled the task |
|
Branch Name |
The name of the Branch that the task is related to |
|
Pay Period |
The pay period of the employee |
|
Job Description |
Type of job for this task |
|
Item |
Specific item that is being rate generated/period locked/unlocked etc. |
|
Period From |
Start date |
|
Period to |
End date |
|
Payroll Run |
One of four values - blank, 2 Weekly Paid Staff, Monthly Paid Staff or Weekly Paid Staff |
|
Phase Type |
One of five phases - Contracted, Scheduled, Operational, Actual or Pay/Bill |
|
Status |
The status of the task - this will be Submitted, Running, Success or Failed |
|
Message |
Detailed message associated with the status of the task |
Screen Actions
|
Refresh |
Select to refresh the Rate Generation Jobs Queue view |
|
Rate Gen |
Add a Rate Generation Job to the Queue. Undertake manual Rate Gen - see subsequent section in this chapter |
|
Add Period Lock |
Add Period Lock to the Queue. Undertake Add Period Lock - see subsequent section in |
|
Update Period Lock |
Update the Period Lock. See subsequent section in this chapter |
|
Rate Gen Lock/Unlock |
Update Rate Gen settings Lock/Unlock. See subsequent section in this chapter |
|
My tasks only |
This setting only applies to Rate Generation Jobs. Tick this check box to only see tasks submitted to the Rate Generation Jobs Queue by the user. If this box is un-ticked, the user will be able to see all tasks submitted to the Rate Generation Jobs Queue by others as well as themselves |
|
Submitted, Running, Success, Failed or All |
From this radio button, the user can select the items that they want to see in the Rate Generation Jobs Queue, from the choices of Submitted, Running, Success, Failed and All |
Add a Rate Generation Job
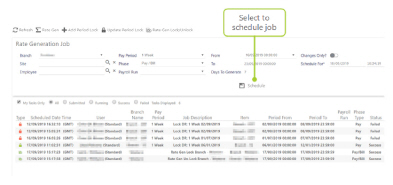
When Rate Gen is selected, the Add Rate Generation Job screen is displayed. The user can select a Branch to use, which will default to the users Default Branch. If the user selects a Site, then the Branch will show the Site's Branch and the Branch and Employee selectors will be disabled unless the Site selection is cleared. If the user selects an Employee, then the Branch will show the Employee's Branch and the Pay Period will show the Employee's Pay Period. Branch, Site and Pay Period selectors will be disabled unless the Employee selection is cleared.
Screen Layout and Fields
|
Days to Generate |
Number of days that the rate generation is going to be undertaken for - calculated by Timegate using the From and To dates |
Screen Actions
|
Branch |
Select a Branch Name from the list in the drop-down menu |
|
Site (and ) |
Select to view available Sites and select them from the popup dialog box (and to clear your selection) |
|
Employee (and ) |
Select to view available Employees and select them from the popup dialog box (and to clear your selection) |
|
Pay Period |
The Pay Period for the selection (examples may include 1 Week, 2 Weeks, 3 Weeks, 4 Weeks or Monthly). The monthly date range will always start on the first of the month. The To date and Days to Generate will update automatically on each change of the pay period or |
|
Phase |
One of five phases - Contracted, Scheduled, Operational, Actual or Pay/Bill |
|
Payroll Run |
One of several predefined values for your business e.g. blank, 2 Weekly Paid Staff, Monthly Paid Staff or Weekly Paid Staff |
|
From and To |
These drop-down lists will enable the user to define a Date and Time of the start of each pay period past and present up to the number of periods to show system setting. It will show date ranges based off the Pay Period selection |
|
Changes Only? |
Changes Only? will schedule jobs where already rate generated Duties are ignored |
|
Schedule For* |
The Schedule For time is when the job will be set to run for. It defaults to a few minutes after the Add toolbar item was clicked |
|
Schedule |
Select Schedule to schedule the job, sending it into the Rate Generation Jobs Queue. It can be set to any time and date in the future. This will schedule the job for the selected time in the time zone of the selected Branch |
Period Lock - Basic Principals
The process of locking and closing is to mark rate generation records with a unique transaction number, control changes to a period that has been finalised and to accurately track changes after the period has been closed. The transaction numbers are created sequentially from when they are locked, but the exact number is irrelevant other than for identification purposes.
A period will be made up of both duties and diary events that match the selected branch or branches. All branches can be selected, and this will create a period that is all branches that the user has access to. Duties that are locked or closed will show an envelope icon in scheduling pages and both duties and diary events will show the transaction number in the pay/bill tab. Only the pay and bill phase of the duty can be affected, previous phases are for information only. Only paid diary events will be affected.
The duties and diary events will only be included in the period for Employees with the selected pay period and between the date range. Duties must start within the selected date range. Diary events can be locked for multiple periods, rate generation records that fall within the period will be marked with this transaction number and other rate generation records will fall into another period.
If a payroll run type is selected, then pay records with that payroll run type from the employee will be marked with the transaction number. If the employee does not have the selected payroll run type, then only the bill record will be marked.
Pay and finance (bill) are normally locked together and mark the pay and bill rate generation records with the same transaction number, however if invoicing has been licensed, pay and bill will be locked independently.
For finance locking, instead of selecting a payroll run type, a billing frequency can be selected, and only duties for site groups with the selected billing frequency will have their bill record marked.
Once a period is locked, it is possible to adjust (if the users security permissions allow) duties and diary events. It is then important that the period is re-locked. This is done by selecting the period and clicking re-lock. If the period is to be scrapped, it can be unlocked, and all duties and diary events marked with the transaction number will have the transaction number removed and be open for edit again. It is then possible to create a new period in its place.
Add Period Lock (Period Lock Job)
When Add Period Lock is selected, the Period Lock Job screen is displayed. note that this is enabled by security function.
The process for locking is as follows:
-
Select Add Period Lock
-
Select the Applies to type (if applicable)
-
Select one, many or all Branches from the branch picker
-
Select the Employees pay period
-
Select the Payroll Type (if applicable)
-
Select to lock approved duties only (if applicable)
-
Select an escalation group to notify that the period has been locked
-
Select to schedule the lock for later (if applicable) and the time and date to schedule for Select Lock
There will then be a record shown in the queue below in bold. This will be visible for all users to notify them that a lock is about to take place. If the job is not scheduled, then it is unlikely that it will remain here for more than a few seconds and disappear when the user refreshes the page.
Screen Layout and Fields
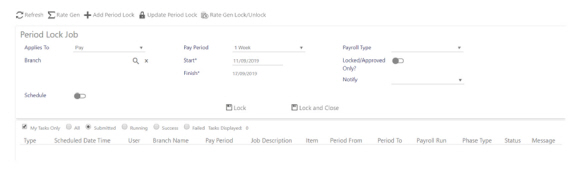
Screen Actions
|
Applies to |
Select either Pay or Finance or Pay/Bill Note: if Invoicing is not enabled, the user will only be able to choose Pay/Bill combined. If invoicing is enabled, as it is in this example, the user is able to separate them |
|
Branch (and ) |
Select to view available Branches and select them from the popup dialog box (and to clear your selection) Selecting all branches will only lock those branches that the user has access to. The user is unable to lock branches that they do not have access to. Note: The user must positively action which Branch(es) they wish to lock, or whether to lock all Branches. If you do not make a selection, your entry will be classed as invalid (unlike older desktop based versions of Timegate, whereby doing nothing was treated as selecting every single branch in the system to create a lock) |
|
Pay Period |
The Pay Period for the selection (examples may include 1 Week, 2 Weeks, 3 Weeks, 4 Weeks or Monthly). The monthly date range will always start on the first of the month. The Finish* date and Days to Generate will update automatically on each change of the pay period or From date |
|
Start* |
Select a Start* date |
|
Finish* |
Automatically generated Finish date, based on the Start* date and the Pay Period duration |
|
Payroll Type |
Select the appropriate type of payroll type from the list |
|
Locked/Approved Only? |
Select whether to lock approved duties only |
|
Notified |
Select whom to notify of the period lock by selecting an escalation group from this drop down list. If nothing is selected, only the user who locks the period will receive the notification email |
|
Schedule |
This feature enables the user to schedule whether the lock happens now or at a scheduled time in the future. To schedule for the future, enable Schedule. Upon enabling this setting, the Schedule For option (described below) is displayed. When using the scheduling functionality, Branch Managers and Site Managers can be notified earlier on in the process, when a lock is going to be undertaken. Rather than battling with them to relock periods and get in last-minute regeneration changes, they will know in advance of the period lock taking place. |
|
Schedule For |
The Schedule For time is when the job will be set to run for. If the user chooses not to schedule the job. It will go onto the queue and be focused on as immediately as possible |
|
Lock |
Select to Lock the period. You'll be given a warning asking are we sure that we want to lock the period |
|
Lock and Close |
Select to both Lock and Close the period. You'll be given a warning asking are we sure that we want to lock the period. On clicking close, we will be presented with a warning “Are you sure you wish to close this period? Check for any outstanding issues. This cannot be undone.” Once it is closed, it’s closed |
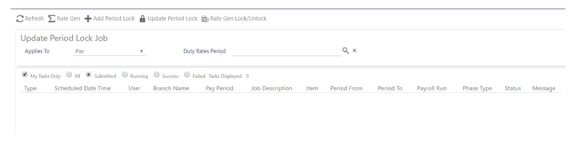
Update Period Lock (Update Period Lock Job)
When Update Period Lock is selected, the Update Period Lock Job screen is displayed.
The process for relocking is as follows:
-
Select Manage Period Lock
-
Select the Applies To type (if applicable)
-
Select the existing period from Duty Rates Period
-
Select to lock approved duties only (if applicable)
-
Select an escalation group to notify that the period has been locked
-
Select to schedule the lock for later (if applicable) and the time and date to schedule for
-
Select Relock
Screen Layout and Fields
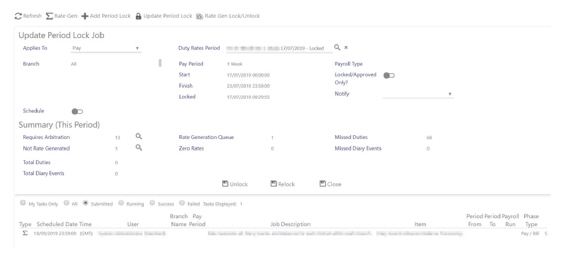
Initially, the screen is shown as follows. As soon as the two values (Applies To) And Duty Rates Period and are completed, it expands as shown overleaf:
Screen Actions
|
Applies to |
Select either Pay or Finance or Pay/Bill Note: if Invoicing is not enabled, the user will only be able to choose Pay/Bill combined. If invoicing is enabled, as it is in this example, the user is able to separate them |
|
Duty Rates Period (and ) |
Select the Duty Rates Period from the popup list. |
Unlocking the period
The following process allows you to unlock the period:
-
Select Manage Period Lock
-
Select the Applies To type (if applicable)
-
Select the existing period from the Duty Rates Period picker
-
Select an escalation group to notify that the period has been locked
-
Select to schedule the lock for later (if applicable) and the time and date to schedule for
-
Select Unlock
Screen Layout and Fields
|
Branch |
The individual Branch or Branches that have been locked |
|
Pay Period |
The Pay Period for the selection |
|
Start* |
The Start* date |
|
Finish* |
The Finish date, based on the Start* date and the Pay Period duration |
|
Locked |
Date Locked |
|
Payroll Type |
The type of payroll |
|
Requires Arbitration |
Number of duties that require arbitration. The count of duties and diary events matching this period that need manual arbitration and has not been arbitrated. This will show a magnifying glass if the count is greater than 0, where the user can select to see information on these specific duties and drill down to site view for that duty.Select (shown when Requires Arbitration is 1 or above) to load a dialog of all the duties that require arbitration: 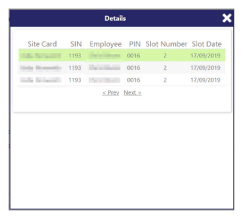
Previously, users would have had to go through multiple numbers of reports, guess work and hours of processing to working out where their issues were. Now, all the user needs to do is open this dialog. From within the dialog box, the user can select each of the rows. This will result in them being taken into the Site Card View for the day and Slot Number of the given duty. These duties can then be arbitrated as necessary |
|
Not Rate Generated (shown when 1 |
The count of duties and diary events matching this period that have been arbitrated, but are not marked as rate generated. This will show a magnifying glass if the count is greater than 0, where the user can select to see information on these specific duties and drill down to site view for that duty. Select to load a dialog of all the duties that require arbitration. Again the dialog box that pops up saves significant time and effort |
|
Rate Generated Queue |
The count of duties and diary events matching this period that have a matching job in the rate generation queue that is scheduled or running |
|
Zero Rates (shown when 1 or above) |
The count of duties and diary events matching this period, that the sum of the rates is 0. This will show a magnifying glass if the count is greater than 0, where the user can select to see information on these specific duties and drill down to site view for that duty |
|
Missed Duties |
Number of missed duties (those that are the count of duties matching this period that are not marked as locked and have duty rate records that have not been marked with a transaction number.) |
|
Missed Diary Events |
Number of missed diary events (those that are the count of diary events matching this period that are not marked as locked and have duty rate records that have not been marked with a transaction number.) |
|
Total Duties |
Duties that are marked with this transaction number and are locked |
|
Total Diary Events |
Diary events that are marked with this transaction number and are locked |
Screen Actions
|
Applies to |
Select either Pay or Finance or Pay/Bill Note: if Invoicing is not enabled, the user will only be able to choose Pay/Bill combined. If invoicing is enabled, the user is able to separate them |
|
Duty Rates Period (and ) |
Select the Duty Rates Period from the popup list. |
|
Locked/Approved Only? |
Select whether to lock approved duties only |
|
Notified |
Select whom to notify of the period lock by selecting an escalation group from this drop down list. If nothing is selected, only the user who locks the period will receive the notification email |
|
Schedule |
This feature enables the user to schedule whether the lock happens now or at a scheduled time in the future. To schedule for the future, enable Schedule. Upon enabling this setting, the Schedule For option is displayed. When using the scheduling functionality, Branch Managers and Site Managers can be notified earlier on in the process, when a lock is going to be undertaken. Rather than battling with them to relock periods and get in last-minute regeneration changes, they will know in advance of the period lock taking place. |
|
Schedule For |
The Schedule For time is when the job will be set to run for. If the user chooses not to schedule the job. It will go onto the queue and be focused on as immediately as possible. |
|
Unlock |
Select to Unlock the period |
|
Relock |
Select to Relock the period |
|
Close |
Select to Close the period. Note: On clicking close, we will be presented with a warning “Are you sure you wish to close this period? Check for any outstanding issues. This cannot be undone.” Once it is closed its closed. |
Period - Close
Once you are ready, a period can be closed. Once a period is closed, it is not possible to un-close it. Any changes to a duty or diary event in a closed period will not remove rate generation records previously created and will always create a positive and negative contra adjustment record, even if these are identical to the original rate generation records. These records will not belong to the original period but will belong to the next closed period – see closed period processing for more information.
Any contra records created will be included in the next matching period once it is closed. The maximum duration that the close will look back is determined by the system settings for the look back days/weeks/months and the pay period selected. If the pay period is 1, 2, 3 or 4 weeks, the weeks look back will be used. If the pay period is monthly, the months lookback will be used. If the close is a finance only close, the days look back will be used. Only duties and diary events with contra records in this look back period, from the start of the new period, will be included in the close.
The process for closing is as follows:
-
Select Manage Period Lock
-
Select the applies to type (if applicable)
-
Select the existing period from the Duty Rates Period picker
-
Select an escalation group to notify that the period has been locked
-
Select to schedule the close for later (if applicable) and the time and date to schedule for
-
Select Close
Period Summary
The period summary is shown at the bottom of each existing period and shows a list of useful information. The requires arbitration, not rate generated and zero rates numbers also will show a magnifying glass next to them if there is any duties or diary events that fall into this category. This will show a dialog which will show the user information about the duty or diary event. It can also navigate to site view for a selected duty.
The numbers will only show duties and diary events fall within the date range of the period, the employee has the same pay period and payroll run type (if applicable).
-
Requires arbitration: Shows the count of duties that require arbitration and match the periods criteria. Once these duties have been arbitrated correctly, the period can be re-locked to include them.
-
Not Rate Generated: This shows the count of duties and diary events that match the periods criteria and for some reason, have produced no rate generation records. This could be for many reasons, usually looking at the duty and re-saving to trigger a re-rate generation will include the duty. Once these duties have been fixed correctly, the period can be re-locked to include them.
-
Rate Generation Queue: This shows the count of duties and diary events that match the periods criteria but are currently awaiting rate generation. Once these have completed, the period can be re-locked to include them.
-
Missed Duties/Diary events: This shows the count of duties/diary events that match the criteria of the period but are not part of the period. This could be because they require the period to be re-locked, or they are included as part of another period.
-
Total Duties/Diary events: This shows the count of duties/diary events that are included in the selected period.
Rate Gen/Lock Unlock (Rate Gen Lock Job)
When the Rate Gen Lock/Unlock is selected, the Rate Gen Lock Job screen is displayed.
Screen Layout and Fields
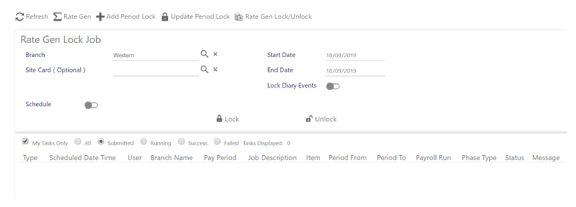
Screen Actions
|
Branch (and ) |
Select to view available Branches and select them from the popup dialog box (and to clear your selection) |
|
Site Card (Optional) (and ) |
Select to view available Sites and select them from the popup dialog box (and to clear your selection) |
|
Start Date |
Select a Start date |
|
End Date |
Enter an End date |
|
Schedule |
This feature enables the user to schedule whether the duty rate generation appens now or at a scheduled time in the future. To schedule for the future, enable Schedule. Upon enabling this setting, the Schedule For option (described below) is displayed. When using the scheduling functionality, Branch Managers and Site Managers can be notified earlier on in the process, when rate generation is going to be undertaken. Rather than battling with them to relock periods and get in last-minute regeneration changes, they will know in advance of the period lock taking place. |
|
Schedule For |
The Schedule For time is when the job will be set to run for. If the user chooses not to schedule the job. It will go onto the queue and be focused on as immediately as possible. |
|
Lock Diary Events |
Select to Lock Diary Events as well as Duties |
|
Lock |
Select to Lock Rate Generation Job |
|
Unlock |
Select to Unlock Rate Generation Job |
For more information about using PPA including step-by-step examples, see the Timegate Prior Period Adjustments Functionality (June 2021).
1 - Prior Period Functionality is enabled by contacting TEAM Software Technical Support. Period lock is then controlled in the Web Client from Admin | System | System Settings | Rate Generation using the Enable Prior Period Adjustments setting. The Rate Gen Lock is always shown. be aware that once you have switched to the Web Client from the Desktop Client, you will not be able to revert back to using the Desktop Client.