Manage: Messaging
How to get there: Manage | Messaging
From this screen, the administrator can create a variety of communications for different audiences using both email and SMS text messages. See Monitor | Message Log for more information
Screen Layout and Fields
|
Selected Audiences |
In this part of the screen the specific audience is selected for the communication (more details below) |
|
Filters |
This part of the screen is used in order to filter the audience into a smaller group as is necessary using the various options available (see more details below) |
|
Filtered Employees |
This part of the screen summarises the correspondents that could be selected to send messages to (see more details below) |
|
Managing Settings |
(See more details below) |
|
SMS |
This is where an SMS message can be entered (see more details below) |
|
|
This space is used for creation and formatting of Emails (see more details below) |

Screen Actions
|
Message Log |
Click this button to view the Messages Log. For more information, see Monitor | Message Log |
|
Send |
Click this button to send the SMS and/or Email that has been composed |
Selected Audiences

Click on the [...] button to access the Select Audience screen. Depending on how many records are set up, the < Prev and Next > button along with the Partial Search data entry field and Search button may be used to navigate through the records. Click on one or more records to start defining the audience for the communication that is being sent out.
Filters
Filters are used in order to further define the target audience (as and where appropriate).
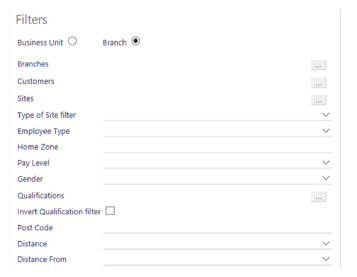
The different filter controls are as follows:
|
Business Unit/Branch |
Use this radio button to determine whether to filter by a Business Unit or a Branch. If a Business Unit is selected, the next option in the list is Business Units, otherwise it is Branches |
|
Business Units |
Click on the [...] button to choose the Business Unit(s) from a pop-up screen that has the same functionality of the Select Audience pop-up (as outlined above) |
|
Branches |
Click on the [...] button to choose the Branch(es) from a pop-up screen that has the same functionality as the Select Audience pop-up (as outlined above) |
|
Sites |
Click on the [...] button to choose the Site(s) from a pop-up screen that has the same functionality of the Select Audience pop-up (as outlined above) |
|
Type of site filter |
Select from Site Team, Standard Location or Both |
|
Employee Type |
Select the type of employee from the drop-down list. |
|
Home Zone |
Type in the Home Zone here |
|
Pay Level |
Select the pay level from the drop-down list |
|
Gender |
Select the gender from the drop-down list |
|
Qualifications |
Click on the [...] button to choose the Qualification(s) from a pop-up screen that has the same functionality of the Select Audience pop-up (as outlined above) |
|
Invert Qualifications Filter |
When selected, this will filter by the opposite of those qualifications selected in the Qualification field |
|
Postcode |
Enter in the Postcode to filter by |
|
Distance |
The distance in miles selected from the drop-down list |
|
Distance from |
Select from the drop-down list either Site or Home (in terms of distance from the mileage selected in the Distance field) |
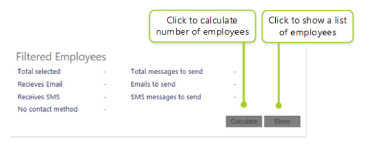
Filtered Employees
The Filtered Employees part of this screen summarises the number of employees that are in the filtered group ready to have communications sent to them.
|
Calculate |
Click this button to populate the seven fields on the screen - the fields are detailed below |
|
Show |
When clicked, a pop-up screen is displayed showing the different employees that will be sent the message |
|
Total Selected |
Total amount of employees in the filtered group |
|
Receives Email |
The amount of employees within the group that will accept email |
|
Receives SMS |
The amount of employees within the group that will accept SMS |
|
Total messages |
The overall total amount of messages to send |
|
Emails to send |
Number of emails that will be sent |
|
SMS Messages to Send |
Number of SMS messages that will be sent |
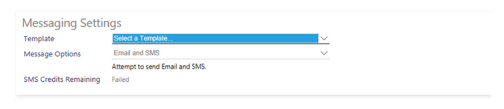
Managing Settings
From this part of the screen, the message that is going to be sent is defined in terms of templates and methods of sending. Additionally, the amount of SMS credits that the company has are displayed, enabling the user to calculate if they have enough credits to send out their message.
|
Template |
Select from the drop-down list a template for the message that is going to be sent out. This will be used to pre-populate the SMS and Email parts of the screen |
|
Message Options |
From this drop-down list, select the message format to be sent:
|
|
SMS Credits Remaining |
The amount of SMS Credits held by the organisation. If additional credits are required, contact your TEAM Software representative |
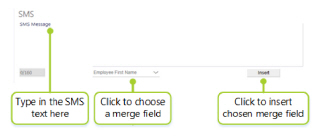
SMS
From this part of the screen, the administrator is able to define the content of the SMS message that they are sending out. Depending upon the template selected, this could have already been pre-populated with a message for the user. They can edit it as deemed appropriate . There is a number count to ensure that the message being created is within the limits of an SMS message (160 characters total).
|
SMS Message |
The content of the SMS message is typed in here/auto created from the template. Template content can be altered as necessary |
|
0/160 |
Count of the number of characters used in the message out of 160 (the maximum |
|
Employee First Name |
Select any merge fields to add into the message to customise it to the individual recipient for example their name |
|
Insert |
Click this button in order to insert the merge field into the SMS message |
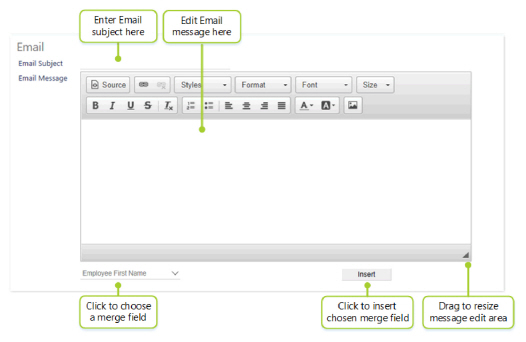
From this part of the screen, the administrator can define the content of their Email message. Depending upon the template selected, this could have already been pre-populated with a message for the user. They can edit it as deemed appropriate. The email is sent as HTML and can be formatted to take advantage of this.
|
Email Subject |
Enter the subject of the email here |
|
Email Message |
Enter the content of the email into the Email message editor. This may have been pre-populated with auto created text from a template. The template content can be altered as necessary. For more details about editing the message see the section below |
|
Employee First Name |
Select any merge fields to add into the message to customise it to the individual recipient for example their name |
|
Insert |
Click this button in order to insert the merge field into the SMS message |
Email message editor
The following options are available for the user to edit their email message content:

These text formatting/text editing options are standard Microsoft Windows and should be familiar to all users. Advanced users may wish to toggle between the Normal and HTML views. In the HTML view, they will be able to enter HTML tags to customise their email message.