Manage: Devices
How to get there: Manage | Devices
Devices View
The Devices View page is used to configure, view and group the various devices that can be used in conjunction with Timegate. Individual devices can be searched for using the collapsible search filter at the top of the screen,
Screen Layout and Fields

|
Device Type |
From the selection, choose the type of device that you wish to add e.g. Face Go, Finger Scan etc. |
|
Device ID |
Unique identifier for the device |
|
Device Group |
Select a group (as applicable) for the device. These groups are set up in Admin | General | Other Settings | Device Groups |
|
Site Group |
Select the Site Group that the device is assigned to |
|
Site |
Select the Site that the device is assigned to |
|
Description |
Description of the specific device |
|
Device Status |
Shows whether the device is active or inactive |
Screen Actions
|
Search |
Enter (any) search criteria in here and select |
|
|
Select to start the search |
|
Include Inactive |
Select to include/exclude inactive devices from the search. By default, only active devices are shown |
|
Device row |
Select a row to view the device pop-up screen to view and edit the individual device selected. note that if you open a device that you do not have the correct security access to edit, the following message will be displayed “You can not edit this device because it is assigned to a site or site group you do not have access to” |
|
Add |
Select to add a new device configuration (will launch the New Device pop-up screen ready to enter new device data into |
|
Refresh |
Updates the screen |
Device Pop-Up Screen
Screen Layout and Fields
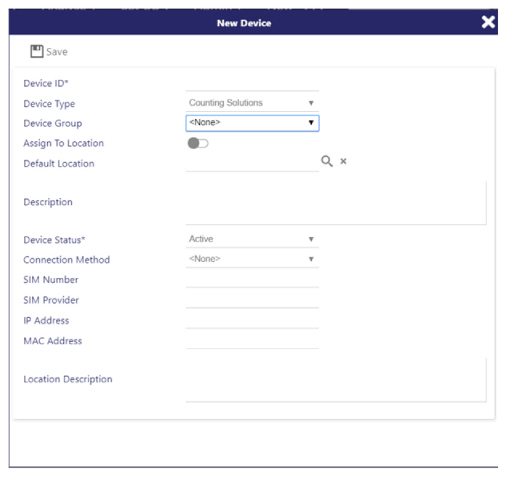
|
Device ID |
Unique |
|
Device Type |
From the selection, choose the type of device that you wish to add e.g. Face Go, Finger Scan etc. |
|
Device Group |
Select a group (as applicable) for the device. These groups are set up in Admin | General | Other Settings | Device Groups |
|
Assign to location |
When not selected, the field Default Location below is available for selection. If selected, the option to use Site Group is available instead of Default Location. By selecting Assign to Location, if when a device is used to log onto a duty, if the duty cannot be found (i.e. is ad hoc) it will be assigned to the Default Location. If the Default Location selected is configured with Auto Duty Create, all duties sent to the Default Location will be automatically created |
|
Default location |
The location (Site) that all duties without SINs (i.e. adhoc duties) will be directed |
|
Use Site Group |
Select to enable the Site Group option below. Otherwise, the Site option will be shown |
|
Site Group |
Select the Site Group that the device is going to be assigned to using the |
|
Site |
Select the specific Site that the device is assigned to using the |
|
Description |
Enter a description of the device here as applicable |
|
Device Status |
Select from Active, Inactive, Loss or Suspended |
|
Connection method |
For information only. Select from Connected by network cable, Connected by WiFi, Connected by SIM Card |
|
SIM Number |
For information only. The unique SIM Number on the SIM Card in the device (as applicable) |
|
SIM Provider |
For information only. The Service Provider of the SIM Card in the device (as applicable) |
|
IP Address |
For information only. The TCP/IP address for the device in format nnn.nnn.nnn.nnn |
|
MAC Address |
For information only. The MAC address for the device |
|
Location Description |
Enter a description of the location here as applicable |
Screen Actions
|
Save |
Select to save your new device |
Configuration of devices for use in locations with both scheduled and adhoc duties
Many customers find themselves in a situation, whereby they have lots of employees going through the doors to sign on at the same time. They do not want their employees to have to enter a SIN when booking onto duties. This is way too time consuming. Some of these duties are scheduled, whilst some are adhoc (employees turn up, swipe and expect duties to be created for them.) Historically, this would result in lots of arbitrations that would need actioning (i.e. those duties that do not exist would need creating). From 19.5 onwards, the way duties are processed through devices has been enhanced. Timegate can be set up so that if there is a scheduled duty for an employee, it will match to the site. If there is no scheduled duty, Timegate can, when configured correctly create a duty for the employee.
If a device has a default location rather than an assigned location, if a duty cannot be found for a PIN, it will be assigned to the default site location. If the default site location has been set up to auto duty create, a duty will be created. If the default location has not been set up to auto duty create, and a duty is not present for the employee, an arbitration will be created for the PIN at the default location.
The Device can be set up to a Site Location using the Assign to Location option or can be left to a Default Location (Selected using the )