Service: Incident Types
How to get there: Admin | Service | Incident Types
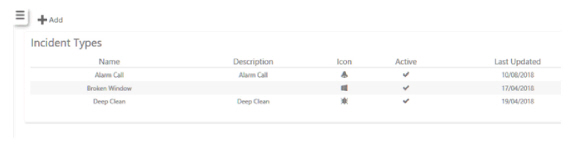
From this page, Incident Types can be defined for use in Service Delivery.
For related information, also see: Admin | Service | Service Profiles; Admin | Service | Status Groups; Set Up | Sites | Services and Admin | Forms | Form Design and Publish
Screen Layout and Fields
|
Name |
Name of incident type |
|
Description |
Description for the incident type |
|
Icon |
The icon that is to be shown on the screen in the app to visually represent the incident type |
|
Active |
Select Active to make the incident available. be aware that incident types cannot be deleted from within the Web Client. Instead, should the user not wish to use a given incident type, they should ensure that Active is not ticked |
|
Last Update |
System generated last update date |
Screen Actions
|
Add |
Select Add to load the following Incident Type “Default view” screen, as shown below. When the Enable Sharing is selected, Enable Editing becomes visible. If Enable Editing is selected, Duty Spanning becomes visible for selection. Further to this if Enable Alerting is selected, a series of Alerting options are displayed. All fields are shown in the diagram including the Expanded User Alerting and Contact Alerting attributes: 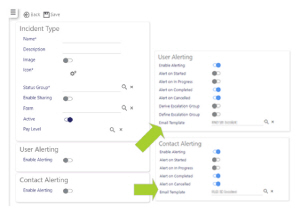
|
Adding (Creating) an Incident Type from the previous screen
Follow these steps to create an Incident Type:
-
Enter an Incident Type Name (this will be displayed on screen)
-
Add a Description
-
Select if you wish to capture an Image. Worth noting is that any image sent from a smart-phone/device has to be from a “live image” and cannot be an image that is already stored within the device, in the Gallery or on the Camera Roll
-
Select an icon to display on screen for the incident type. Select the visible icon to display a pop up screen of icons. Select the icon from those shown
-
Assign a Status Group by selecting the search (Magnifying glass) to view all available Status Groups
-
Select Enable Sharing to share incidents between users on different devices. Depending on the configuration of the following settings, the user logging the incident may be able to edit it, furthermore, it may be shared across multiple duties:
-
If Enable Sharing has been selected, Enable Editing is displayed.
Select Enable Editing to allow the employee logging an incident based on the Incident Type, whilst on duty, to edit the incident i.e. to create updates on the incident. It is only possible to edit incidents in Timegate when this option is selected. Without this option being selected, it is not possible to edit incidents. -
If Enable Editing has been selected, Duty Spanning becomes visible. By selecting Duty Spanning, incidents can be shared across duties e.g. if the incident is not closed before the end of one duty, it is visible for the subsequent user booking on in the next duty
-
-
To attach a Form to the incident, select the Search (Magnifying glass) to view all available Forms. Select a Form of your choice from the pop up dialog box
-
Select Active to ensure visibility for use
There are two kinds of alerting - Contact Alerting and User Alerting - these need to be configured appropriately. Contact Alerting and User Alerting can be enabled together, separately or not at all
To enable Contact Alerting, when the incident is raised, select Enable Alerting. Once alerting has been enabled, select from these options:
-
Alert on Started - if this is selected, an alert is sent to your Contact(s) when the Incident has started
-
Alert on In Progress - if this is selected, an alert is sent to your Contact(s) when the incident is in progress, being actioned
-
Alert on Completed - if this is selected, an alert is sent to your Contact(s) when the incident is completed
-
Alert on Cancelled - if this is selected, an alert is sent to your Contact(s) when the incident is cancelled
-
Email template - the final step of the process is to select an Email template. Select [...] and choose an Email Template from the list (from those defined in Admin | Service | Email Templates)
-
If the email template is to be removed, select Clear
To enable User Alerting, when the incident is raised, select Enable Alerting. This will result in the following options being shown on screen:
-
Alert on Started - if this is selected, an alert is sent to the Escalation Group (defined below) when the Incident has started
-
Alert on In Progress - if this is selected, an alert is sent to the Escalation Group when the incident is in progress, being actioned
-
Alert on Completed - if this is selected, an alert is sent to the Escalation Group when the incident
is completed -
Alert on Cancelled - if this is selected, an alert is sent to the Escalation Group when the incident
is cancelled -
Define Escalation Group - if this is selected, the incident will try to get the incident’s Escalation Group (see below). If not selected, nothing will happen
-
Derive Escalation Group 1 - if you have Derive Escalation Group turned on, it will try to get to the site level Escalation Group
-
Escalation Group - choose an Escalation Group from the list to use if the Define Escalation Group is selected. If the Define Escalation Group is not selected, nothing will happen regardless of any value defined in here
-
Email template - the final step of the process is to select an Email template. Select [...] and choose an Email Template from the list (from those defined in Admin | Service | Email Templates)
-
If the email template is to be removed, select Clear
-
Select Save
1.If both options (Derived and Defined Escalation Groups) are turned on, the email will be sent to both the defined and the derived escalation groups