Import: Data Take On
How to get there: Admin | Import | Data Take-On
Access to this area of the system is security controlled and access is only given to high-level users of Timegate.
Within the Data Take-On screen, the user can import data, as a job into the system from a selection of CSV file templates. The templates differ depending on the specific import being undertaken. The import job is submit onto a DTO Job Schedule queue ready for processing.
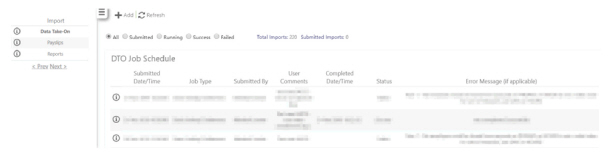
When selecting Data Take-On, the user will be presented with a list of all the import jobs that are in the DTO Job Schedule queue. This will include submitted jobs, jobs in progress as well as successful and failed jobs. Error messages where applicable are shown as well.
Note: this list could be empty
The jobs in the queue are ordered in reverse submitted date order, so that the latest submitted jobs will appear at the top.
The list will default to All jobs only, but the user can select any other radio button to show details of jobs of a particular status. i.e. Submitted, Running, Success or Failed:

All jobs created will be visible to everyone.
Up to 20 jobs can be displayed in the main grid before paging numbers are shown, allowing a user to view more jobs.
Jobs will not be removed from the list and so will remain forever as a permanent audit.
Screen Layout and Fields
|
Submitted Date/Time |
The date and time that the data take on job commenced |
|
Job Type |
The type of data take on - Contract Times Import, Contract Times Import (With Slot Names) or Site Bank Holiday Defaults |
|
Submitted By |
Name of administrator submitting the data take on job |
|
User Comments |
Any comments entered by the administrator at the time of submitting the data take on job |
|
Completed Day/Time |
The date and time that the job completed |
|
Status |
Current status of the job - Submitted, Running, Success, Failed |
|
Error Message (If Applicable) |
Error message will be shown here if there are problems with the import |
Screen Actions
|
Add |
Select to commence a new data take on job (import from a CSV file) - see below for more details |
|
Refresh |
Refresh the view and update the status on jobs |
|
All Submitted Running Submitted Failed |
Use the radio button to select which jobs to show in the screen on the screen. |
|
Information Icon |
Select to show information about the specific data take-on job. This will display the following screen with further details of the job: 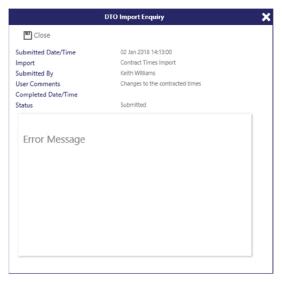
Select Close to return to the data take on job list. |
Setting up a new Data Take On Job
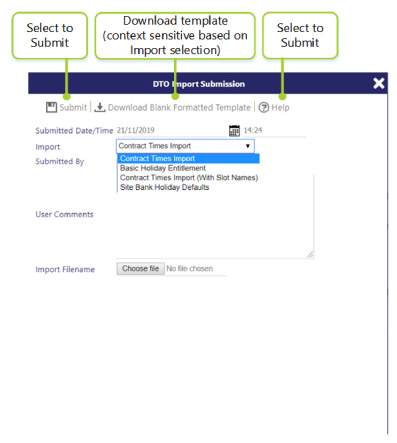
Select Add in order to undertake a new Data Take-On Job. The following screen will be displayed:
Screen Layout and Fields
|
Submitted Date/Time |
The date and time that the Data Take On job was submitted - these will default to the current date and time. They can be over written by the administrator to run at a different time, for example overnight or another quieter period |
|
Submitted By |
The name of the person that has submitted the Data Take-On job |
Screen Actions
|
Import |
Select the type of Data Take On you wish to undertake (this is also used to select the template you may wish to download). Details of the different DTOs and their templates can be found in the CSV Template Help section below. |
|
Submit |
Select to commence the data take on. Note: Regardless of the outcome of the import, the administrator will be emailed with details of the job once it has been completed. If the job failed, then the failure reason will be shown in the email identifying the row and column that’s causing the validation failure |
|
Download Blank Formatted Template |
Select to download a blank template in CSV format to complete with information to be imported (an example is given below). be aware that the template will vary based upon the type of import to be undertaken. For example, the Basic Holiday Entitlement template is different to the Contract Times Import template |
|
Help |
Select to download (in Word format) a help sheet that will aid in the completion of the CSV template |
|
User Comments |
Free-form text comments that the administrator has made for example details of the import that is taking place |
|
Import Filename |
Select the CSV file that you wish to upload. The following confirmation screen will be shown from which the OK button should be clicked upon to start the upload 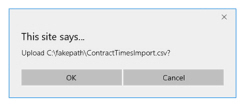
|
CSV Template Help
Below is an example of a CSV template (the one shown is for the Contract Times Import).
This must be completed accurately according to the information provided in order for data to be taken on successfully.

The following should prove useful when completing the various templates:
Basic Holiday Entitlements
The first row of the CSV file must contain the column headings.
When the import process runs, the following validation will be applied:
-
Pay Code - Must be valid and the correct length (one of either Pay Code or PIN must be used as the identifier)
-
PIN - Must be valid and the correct length (one of either Pay Code or PIN must be used as the identifier)
-
Holiday Start - in format DD-mmm i.e. 01-Jan
-
Unit of Measure - Must be DAYS or HOURS (can be mixed within the same import file)
-
Entitlement - numeric value to one decimal place
Contract Times Import
The first row of the CSV file must contain the column headings.
When the import process runs, a large amount of validation will take place before any data is imported.
This is detailed below.
-
SIN – Must be valid and correct length
-
EffectiveDate – Must be greater than the latest contract effective date that already exists for the site
-
DayNumber – Must be between 1 and 7 (1 = Sunday and 7 = Saturday)
-
SlotNumber – Must not be greater than the maximum number of slots as defined in the system settings
-
StartTime – Must be a valid time in the format “HH:mm”
-
FinishTime – Must be a valid time in the format “HH:mm”
-
HourType – Must match to the hour type code of an existing hour type
-
PayLevel – Can be left empty, but if used, must match to the pay level code of an existing pay level
-
PIN – Can be left empty, but if used, must match to an existing valid PIN and be the correct length
-
UnPaidMB – Can be left empty, but if used, must be a valid time in the format “HH:mm”
-
UnBilledMB – Can be left empty, but if used, must be a valid time in the format “HH:mm”
-
FlexibleShift – Must be “ ”, “Y” or “N” (“ ” will be interpreted as “N”)
-
CompleteBy – Can be left empty, but if the previous column is “Y”, then a valid time must be supplied in the format “HH:mm”
Any blank lines in the CSV file will be ignored.
Contract Times Import (With Slot Names)
The first row of the CSV file must contain the column headings.
When the import process runs, the same validation as the standard Contract Times Import is run.
In addition; Post Name, Slot Identity and Area must each be 25 characters or less.
Only one entry of the Slot Names is allowed per Slot Number. Empty or Duplicate Slot Names are ignored. for example For Site A, Slot 1 is Guarding Posts, Day Slots. The Area will be defaulted to Area 1 and there may not be any different entries for Site A, Slot 1 for the same effective date. There may be blank entries, or entries that read identical.
Site Bank Holiday Defaults
The first row of the CSV file must contain the column headings.
When the import process runs, the following validation will be applied:
-
SIN – Must be valid and correct length
-
Enable Bank Holiday Contract - Must be “ ”, “Y” or “N” (“” will be interpreted as “N”)
-
Default Stand-down – Must be “None”, “Scheduled” or “All Staff”
-
Holiday Date – Must be a valid date matching either a Site Group Holiday or Branch Holiday, depending on how the Site Group is configured.
-
Must not be a date in the past. The current date and any date in the future is valid.
-
Enable - Must be “ ”, “Y” or “N” (“ ” will be interpreted as “N”)
-
Stand-down – Must be “Default”, “None”, “Scheduled” or “All Staff”
For a single site, the Enable Bank Holiday Contract and Default Stand-down must be the same. Holiday Dates must not be repeated for the same site.
Site Budget Import (Daily)
The first row of the CSV file must contain the column headings.
When the import process runs, the following validation will be applied:
-
Site Identification (Site Code. This is used to identify the site the budget is for) - Text format, one of SIN, Site Code, External Reference, Source ID (Public Table) - set based on company needs. By default it is set to SIN.
-
Budget Date (Day on the budget) - Date format, check to see valid The specified date will be the date for the budget import. There must not be duplicate lines for the same site and same date within the CSV.
-
Hours (Sum of Total Hours. This is the budget hours for the Day) - Numeric format, check to see valid
-
Amount (Sum of Total Budget. This the total momentary value of the budget for the Day) - Numeric format, check to see valid
Site Budget Import (Weekly)
-
The first row of the CSV file must contain the column headings.
-
When the import process runs, the following validation will be applied:
-
Site Identification (Site Code. This is used to identify the site the budget is for) - Text format, one of SIN, Site Code, External Reference, Source ID (Public Table) - set based on company needs. By default it is set to SIN.
-
Budget Date (Week Commencing Date on the budget) - Date format, check to see valid. The specified date must be the start date of the week for that site card. It will import the budget for that whole week. The individual days will have the budget evenly spread throughout the 7 days, with any extra going towards the first day. There must not be duplicate lines for the same site and same week within the CSV
-
Hours (Sum of Total Hours. This is the budget hours for the week) - Numeric format, check to see valid
-
Amount (Sum of Total Budget. This the total momentary value of the budget for the week) - Numeric format, check to see valid
CSV Standards for Imports
New Import CSVs should follow this format:
-
Each record is located on a separate line
-
The first record should be the header record
-
Each record contains the same number of comma-separated fields
-
Any field may be quoted with double quotes
-
Fields containing a line-break, double-quote or commas should be quoted
-
A double quote character in a field must be represented by two double quotes
-
Examples:
-
Post for Guards L1, 2 and 3”
-
“Post for ““extra”” Guards” (will be interpreted as: Post for “extra” Guards)
-
“Post for Guards
L1, 2 and 3”
-
Note: These standards do not apply to the standard Contract Times Import (available in V15.1 onwards) as it is not designed to parse such documents.
When saving from a spreadsheet (such as Microsoft Excel), saving as a CSV file should automatically apply
this formatting.
See also: https://www.ietf.org/rfc/rfc4180.txt for further information about CSV files.