General: User Field Settings: Branches
How to get there: Admin | General | General Maintenance | User Fields - Branches
From this page, the user can create custom fields pertaining to Branches. The values in this tab will differ from implementation to implementation.
Screen Layout and Fields

|
Field Group |
Name of the Field Group (selected from the drop-down list) - this is optional and by default is set to “(None)”. The Field Group is populated with values from that have been defined in the User Fields Group page |
|
Field Label |
The label that is going to be displayed for the field |
|
Field Type |
The type of field. This can be Date, Numeric, Text or Yes/No |
|
Field Length |
The length of the field in characters for Numeric and Date only (the system determines the length of the field for Date and Yes/No) |
|
Decimal |
If number is selected, use this field to specify the amount of decimal places |
|
Mandatory |
Select, if this field is to be mandatory |
|
Selection |
Select, if the user is to be presented with choices from a drop-down list |
|
Inactive |
Select to render the field temporarily inactive (i.e. it is not visible to the user) |
|
Sort Order |
Use the arrows to sort the items in the list to how they will be shown on the screen |
|
System Code |
Code that is specific to the system implementation used to identify the field |
Screen Actions
|
Back |
Return to the general settings menu |
|
Add |
Select Add to create a new row at the top of the list. A row must be completed with the fields above in order to create a new User Field |
|
Save |
Select Save to keep your changes |
|
Delete |
Select the Bin Icon if you wish to delete it |
|
Refresh |
Select Refresh to revert to the unsaved state and remove any unwanted changes |
|
Selections |
Select Selections to define the various options that the user will be presented within the drop-down list for their user defined field. The following screen is shown: 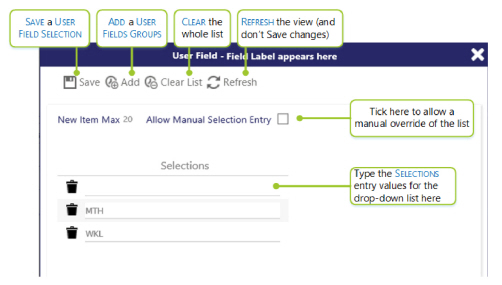
|