Engagement: Engagement: Documents
How to get there: Admin | Engagement | Documents
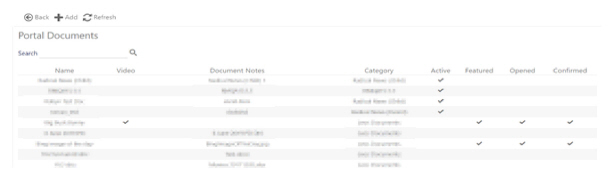
Portal Documents Screen
This screen allows the user to upload documents that will be shown within the Documents section of the Employee Portal. Each document can be assigned a Document Category to group them together with similar documents.
see Admin | Engagement | Document Categories for more information.
Screen Layout and Fields
|
Name |
Name of the document that will appear on the Employee Portal |
|
Document Notes |
Description of the document |
|
Category |
The name of the category that the document is to be assigned to. see Admin | Engagement | Document Categories for more information |
|
Active |
If the document is available to use in the system, it is ticked |
|
Featured |
Priority order that the document is shown within the pinned section on the Employee Portal (on a scale of 1 to 3) |
|
Opened |
Indicates (with a tick) if auditing is enabled. When this is the case, the system will log when the document was last opened in the Employee Portal by an employee |
|
Confirmed |
Furthering the ability to audit the opening of a document, this option (again indicated with a tick) enables the user to configure a dialog to appear after the employee has opened the document. The employee can either Confirm or Cancel the dialog, clicking Cancel will cause the dialog to reappear on any subsequent openings of the document until it is confirmed Once a document has been enabled for confirmation auditing, the document will appear in the Pinned Documents section in the Documents area in the Employee Portal Documents requiring confirmation will show as a new notification on the Documents area and will be listed in the Pinned Documents list at the top of Documents area. Documents that have yet to be confirmed will remain in the Pinned Documents section until they are confirmed, regardless of whether they’ve been opened or not. Confirming the document will remove it from the Pinned Section and remove the “New” tag. |
Screen Actions
|
Back |
Return to the previous menu |
|
Add |
Select Add at the top of the screen to create a new document |
|
Refresh |
To revert to the unsaved state |
|
Name |
Select to edit an existing document record |
|
Search |
Enter search criteria in the text box and then select the magnifying glass to search based on the keywords |
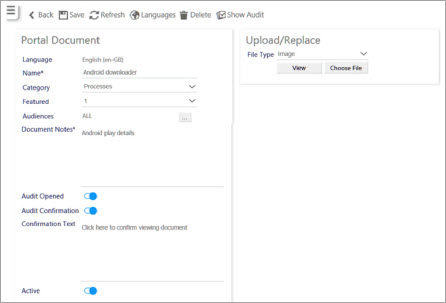
Add or Edit a Document
To add a document, click on the Add button from the screen above. To update a document click on the name of the document record that is to be updated from the screen above.
Both of these options display the screen shown below.
Screen Layout and Fields
|
Language |
The Employee Portal supports multi-language support. Select the language of your choice using the Languages button |
|
Name |
Name of the document to be shown on the Employee Portal (mandatory field) |
|
Category |
The name of the category that the document is to be assigned to. see Admin | Engagement | Document Categories for more information. |
|
Featured |
Set to specify the order that the document is shown within the pinned documents section of the Employee Portal. Select a value ranging from 1-3 (or Not Featured) whereby 1 is the highest value, from the drop-down list |
|
Audiences |
Select the audience for the document. For information about setting up an audience, refer to Admin | Engagement | Audience |
| External Link |
Select the insert an external video link |
|
Document Notes |
Description of the document for internal use only |
|
Audit Opened |
Select to enable auditing of the document being opened by an employee. The system will log when the document was last opened in the Employee Portal (See Show Audit below for further information) |
|
Audit Confirmation |
Furthering the ability to audit the opening of a document, this option (again indicated with a tick) enables the user to configure a dialog to appear after the employee has opened the document. The employee can either Confirm or Cancel the dialog, clicking Cancel will cause the dialog to reappear on any subsequent openings of the document until it is confirmed (See Show Audit below for further information) |
|
Confirmation Text |
Text that is to be displayed when the employee is asked to confirm their viewing of |
|
Active |
Ticking this check box will make the document available on the Employee Portal |
|
Choose File |
Press this button to upload the new document to the system. see the Upload Document Section below for more information |
|
View Document |
Select to view the current document stored in the system |
Screen Actions
|
Back |
Return to the Portal Documents tab |
|
Save |
Save any changes |
|
Refresh |
To revert to the unsaved state |
|
Languages |
Select the language of the Portal Document from the drop-down menu (when multi-language support is configured) |
|
Delete |
Select to delete a document |
|
Show Audit |
Select to open the Document Audit window: 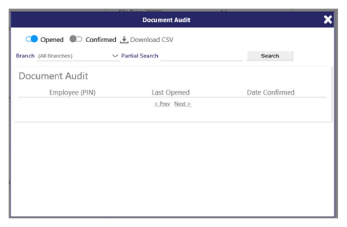
From this screen, the user is able to view opened and confirmed messages and download the audit trail as a CSV file. A search facility is also available that enables the user to rapidly find the information that they need using a partial keyword search. |
Uploading a Document
A pop-up window will be shown that will allow a document to be uploaded to the system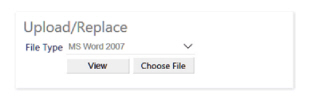
Screen Layout and Fields
|
File Type |
Select the type of document from the selection of available Document Types in the drop-down list: 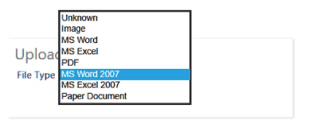
|
|
Choose file |
Select the file you wish to upload (uses your operating system’s file management interface to enable you to select the file that you wish to upload) |
|
View |
See the document that has been uploaded |