Engagement: Engagement: Automation Rules
How to get there: Admin | Engagement | Automation Rules
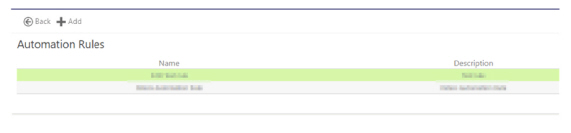
There are two screens associated with the Engagement Automation Rules. Firstly, the page that lists any previously created Automation Rules. This is shown as follows:
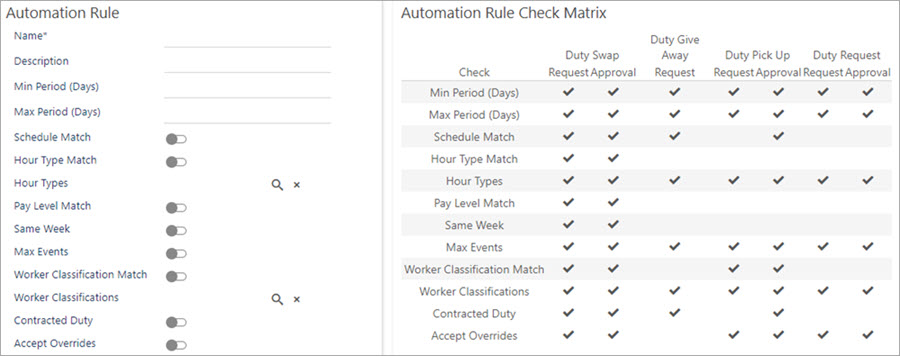
Users select the Automation Rule of choice to view. Alternatively, they can add a new Automation Rule. Either way, a second screen is shown. From this screen, the user can both view existing automation rules, or set up automation their rules for use when configuring specific automations within the screen Admin | Engagement | Automation Settings. The screen comprises three parts:
-
The toolbar
-
The Automation Rule section (where the different types of automation rules are configured)
-
The Automaton Rule Check Matrix (that details which checks are made along with when i.e. Duty Swap Requests/Approvals, Duty Give Away Requests, Duty Pick Up Requests/Approvals, Duty Requests Requests/Approvals). This is important to know as not all checks will be relevant to all scenarios. As a result, in some cases an Automation Rule may have been selected, but it will be ignored in that context
Screen Layout and Fields
To create an Automation Rule, enter a Name and Description, complete the rule settings as required (using the guidance in the folowing table), then select Save.
|
Name |
Name of the automation rule |
|
Description |
Description of the rule |
|
Min Period (Days) |
The minimum notice period in days to be able to make the change. By default this value has no value attributed to it. This figure will be used as the minimum and it will fail if this number of days is not met i.e. if the minimum is 5 and a request to change is made 3 days ahead, the request will fail the check. The days will be counted in day increments starting at 00:00, so a request made at 23:59 will count as 1 day at 00:00, and the next day begins |
|
Max Period (Days) |
The maximum notice period ahead in days, to be able to make the change. By default this value has no value attributed to it. This figure will be used as the maximum and it will fail if this number of days is exceeded i.e. if the maximum is 15 and a request to change is made 18 days ahead, the request will fail the check. The days will be counted in day increments starting at 00:00, so a request made at 23:59 will count as 1 day at 00:00, and the next day begins. The maximum value allowed in this field is 999 |
|
Schedule Match |
By default Schedule Match is not selected. When selected, both duties must be unchanged such that the Schedule Phase equals the Contracted Phase times. This ensure that any duties where a change to times was made are unavailable for a self-service change |
|
Hour Type Match |
By default Hour Type Match is not selected. When selected, both duties will require to be the same Hour Type |
|
Hour Types |
By default, this option is left blank. The user can select one or more Hour Types from the pop-up window that is displayed by selecting next to it. When selected the duty will have to be match one of the Hour Types selected. Select X to remove all values |
|
Pay level Match |
By default Pay level Match is not selected. When selected, both duties will require to be the same Pay level |
|
Same Week |
By default Same Week is not selected. If selected, then this will force the two duties to be in the same working window of time |
|
Max Events |
By default Max Events is not selected. If selected, then the rule will check for available allowance based on the relevant Self Service Rule. When selected a new panel is displayed: 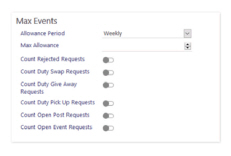
From here, the user can configure a group of settings to limit the number the number of occurrences of a request over a given period of time (Allowance Period) The Allowance Period has five options Weekly, Four Weekly, Monthly, Quarterly, or Yearly. Enter a value in the Max Allowance box Select the options that you want to count. The check will allow the system to count the number of requests of the selected type (accepted and rejected, with each check applied to both staff members in the swap). This is a rolling check. |
|
Employee Type Match/Worker Classification Match |
By default Employee Type Match/Worker Classification Match is not selected. When selected, both duties will require to be the same Employee TypeMatch/Worker Classification. Note: Timegate uses the label Employee Type Match. |
|
Employee Type/Worker Classification |
By default, this option is left blank. The user can select one or more Employee Types from the pop-up window that is displayed by selecting next to it. When selected the duty will have to be match one of the Employee Type/Worker Classifications selected. Select X to remove all values. Note: Timegate uses the label Employee Type and TEAM by WorkWave uses the label Worker Classification. |
|
Contracted Duty |
By default Contracted Duty is not selected. When selected then the duty must have the employee as the contracted and scheduled employee. This is useful when trying to prevent people giving away duties they have been scheduled onto on an adhoc basis |
|
Accept Overrides |
By default Accept Overrides is not selected. If selected, any overridable check failure will be created or approved. If this is deselected, any overidable check failures will require manual intervention |
Screen Actions
|
Back |
Return to previous screen (Automation Rules in list view) |
|
Save |
Save changes that have been made to the rule |
|
Delete |
Delete the rule |