Engagement: Engagement: Message Templates
How to get there: Admin | Engagement | Message Templates
Initially on loading this section, the following screen is displayed:
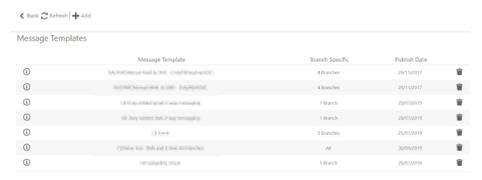
It shows the Message Templates that have been created along with the Branches that they are associated with and their Publish Date.
|
|
Select to view the Message template |
|
Back |
Select to return back to previous page |
|
Save |
Save any changes |
|
+Add |
Select Add to create a new Message template. The details of adding a message are detailed below |
The following actions can be undertaken:
Adding a Message template
Having selected +Add, you are presented with the Message Template screen as shown on the following page. This screen enables the user to set up a number of message templates for their company, which conveys a consistent message using a consistent format. These can be for a variety of circumstances that may occur. A message can be sent in many ways, as defined by the template.
The template may include several mail merge fields, which will automatically populate the message with information from the area of the system it is being sent from.
To send a message to a single, or group of employees:
-
A Message Template is selected
-
The message text shown
-
The option to update the message prior to it being sent is provided
For more information, see: Setup | Employees | Send Message
Duty Edit | Find Suitable Employee | Sent Message
Screen Layout and Fields

|
Template Name |
The name of the template. Use a name that the user will easily identify when searching for and using templates. Examples may be Find Suitable, Call Us, etc |
|
Template Type |
This option, selected from a drop-down list enables the user to specify whether the template is a standard one, or one to be used as an E-Card: Standard - used manually by the user throughout the system E-Card - used to automatically send a message to employees on special occasions such as birthdays and religious celebrations |
|
Message options |
Selected from a drop-down list, this option will set both the method and the order that the system will choose to use, to send the message. The choices are:
|
|
Allow Reply |
Check box to tell the system that the Employee is allowed to reply to the message sent. This will be with a reply of either YES <REPONSE CODE> or NO <REPONSE CODE> for example YES 857AL. This could, in turn perform an action based on where the message was sent from, such as confirming a duty |
|
SMS Message |
The message that will be sent, where the system has ascertained the Message Option for the Employee is SMS. The message is free format. Merge Fields can, however, insert relevant information about the Employee or Duty, customising the content to their wants and needs. In the example above, these Merge Fields are shown within square brackets. When the message is sent the [Site Name] will be replaced with the Site assigned to the Duty. If a Merge Field is used that does not exist, or the brackets are removed when editing the message, then the message will include the merge field itself and not the associated content. For example, “Can you attend [Site Name on...” would send the actual text “[Site Name” as the end square bracket (the ]) is missing. see Merge Field below for more information |
|
Merge Field |
A drop-down list is available of valid merge fields. Clicking the Insert Button will insert the merge field at the point of the cursor. The available fields are as follows:
|
|
Email Subject |
The Subject of the email that is to be sent. note that Merge Fields are not allowed within the Email Subject |
|
Email Message |
The message that will be sent where the system has ascertained the Message Option for the Employee is email. The message can be created using plain text or HTML (which gives the user more editing and formatting options). 
A text editor enables the user to change the font style, size and color etc. enabling the user to create documents that align to their company’s style guide. Additionally, the user has the opportunity to use Merge Fields customise the email message so that it contains such information as the employee name and shift code. In the example shown in the screen layout above, you will see these Merge Fields within square brackets. When the message is sent, the [Site Name] will be replaced with the Site assigned to the Duty. If a Merge Field is used that does not exist, or the brackets are removed when editing the message, then the message will include the merge field itself and not the associated content. For example, “Can you attend [Site Name on...” would send the actual text “[Site Name” (as the end square bracket is missing), see the Merge Field information below for more information. In addition, Merge Image URLs can be inserted that will insert an image that is available online. see Merge Image (URL) below for more information |
|
Merge Image (URL): |
Enables the user to insert a web URL link for an image to display in their email. The image will be inserted at the current cursor position and will be shown onscreen for example 
If the image location does not exist, then a broken link icon will be shown 
|
|
Editor/HTML Mode Buttons |
By pressing the Editor/HTML buttons at the bottom right hand side of the editor will toggle the message between Editor or HTML mode. 
The text below is an example of the HTML code that can be seen in the HTML mode 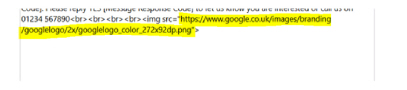
|
|
Branch |
Enables the user to select All or Specific Branches that the Template is available to select from. This may be due to the use of a different company division name within the message body itself, for example. When Specific is selected, clicking the [...] button will show a pop-up window to select the Branches required 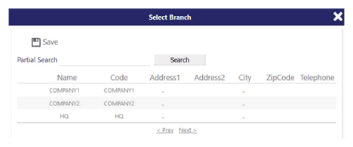
|
Screen Actions
|
Back |
Returns the user back to the menu without saving any changes |
|
Refresh |
Will abort all changes and revert to the unsaved state |
|
Save |
Will save any changes |
|
Delete |
Will delete a template |