New way to add Timegate Web user
Note: This content is applicable for use with TEAM by WorkWave.
Users are set up using a three-step process:
-
Create the user (detailed below)
-
The user is then assigned to a branch or site to control which parts of the system they have access to
-
Functional roles are finally assigned to control the level of functionality that a user has access to
The second and third steps have always been configured in the same way regardless of how users access Timegate Web, historically there have been different ways to manage the first step - creating a user. In the latest web version of Timegate Web Users are created from within the Users part of the program.
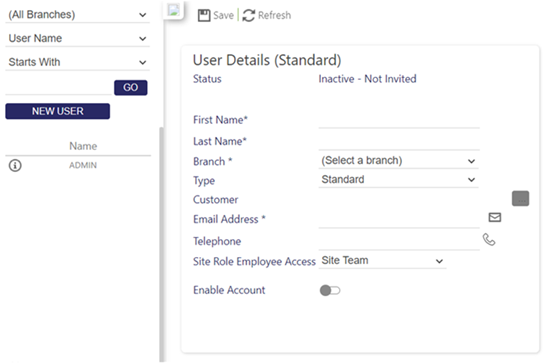
To create a new user:
-
From the main menu either:
-
Select New | User or
-
Select Set Up | Users then select NEW USER
-
-
Enter a First Name, and Last Name
-
Select the Branch that the user will have access to. From this screen, you can only add one branch - this will be used to configure their default Timegate view. This does not assign them to the branch - this is done in the second stage of the process from the Admin | Security menu
-
Enter an Email Address
-
Optionally enter a Telephone number
-
Optionally select Site Role Employee Access from the options available. This setting enables the configuration of a lower level of security access i.e. at a site team level, rather than a branch level
-
Select Enable Account
-
Select Save to create a user with a User Name comprising their Email Address
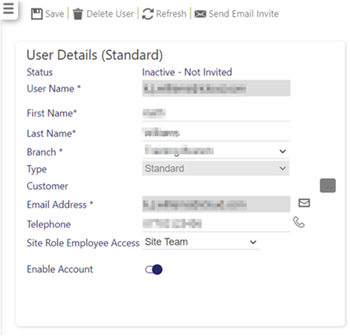
-
The Status will indicate Inactive - Not Invited. To invite the newly created user to access the system, select Send Email Invite:

An invite will be now sent to the users email address comprising their user ID, temporary password and link to access Timegate Web. They will finish the registration process themselves by following the link to set a new password and open Timegate Web for the first time.
Step one of the set up process is now complete. The next step is to go to the Admin | Security menu. From there you will be able to assign the user to a Branch or Site and allocate Function Roles.
Note: If a user does not receive their invitation to sign into Timegate Web, their credentials can be resent by selecting Re-Send Email Invite.